How To Replace Oil Pressure Sensor 1995-2019 GMC Savana 6-0L
Created on: 2013-09-24
Learn how to replace the oil pressure sensor in your 95-19 GMC Savana 6.0L
-
step 1 :Removing the Access Panels
- Undo the latches on the center console
- Remove the two 10mm bolts from the driver’s side lower dash panel
- Pull off the driver’s side access panel by hand
- Remove the two 10mm bolts from the passenger’s side lower dash panel
- Pull off the passenger’s side access panel by hand
- Undo the latches underneath the center console
- Lift the center console and pull it forward
- Remove the storage panel by hand
- Remove the four 10mm bolts from the cup holder panel
- Pull off the cup holder panel by hand
- Remove the top piece from the central access panel
- Push the central access panel underneath the dash
-
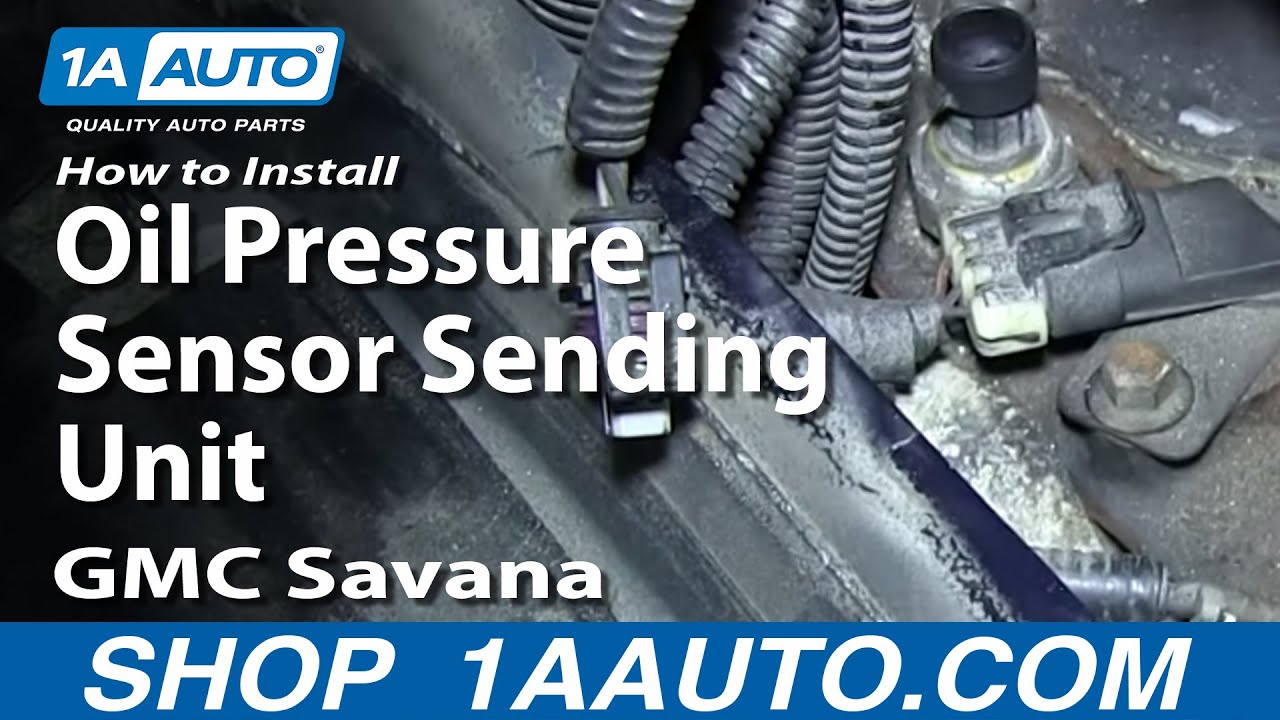
step 2 :Removing the Oil Pressure Sensor
- Disconnect the Oil Pressure Sensor Wiring Harness
- Loosen the sensor with a 1 and 1/16th inch socket
- Pull the socket out by hand
-
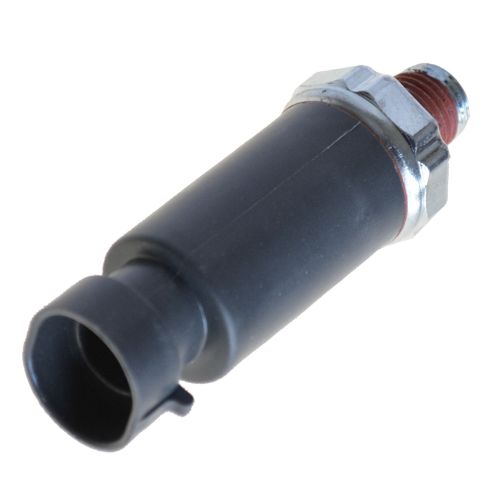
step 3 :Installing the New Oil Pressure Sensor
- Press the new sensor into place
- Twist the sensor in by hand
- Tighten the sensor with the 1 and 1/16th inch socket
- Connect the wiring harness
-
step 4 :Reinstalling the Access Panels
- Put the top piece back onto the central access panel
- Push the central access panel into place
- Line up the access panel latches
- Hook on the latches
- Put the cup holder panel into place
- Start the four 10mm bolts by hand
- Tighten the 10mm bolts
- Clip the storage panel into place
- Clip the driver’s side access panel into place
- Insert the two 10mm bolts into the driver’s side access panel
- Clip the passenger’s side access panel into place
- Insert the two 10mm bolts into the passenger’s side access panel
Tools needed
-
10mm Socket
Ratchet
1-1/16 Inch Socket
Brought to you by 1AAuto.com, your source for quality replacement parts and the best service on the Internet.
Hi, I'm Mike from 1A Auto. I hope this how-to video helps you out, and next time you need parts for your vehicle, think of 1AAuto.com. Thanks.
In this video we're going to show you how to replace the oil pressure sensor on this 2005 GMC Savannah 2500 with the 6-liter V8 engine. The tools that you'll need are a 10 mm socket and a 1 and 1/16th socket and a ratchet.
To start off go to the driver's side of the vehicle and you will see there is a panel right here and you're going to want to remove these two 10 mm bolts that secure that panel. Also, you'll see that there's a latch back here. Pull that back towards you and it should unhook that clip there. Then you just want to remove those bolts and we'll just fast forward as he does this. Now with the bolts removed you can just pull on that panel. Just reach underneath it and pull it out. Be careful not to pull out the panels above it. Now on the other side there are, again, two more 10 mm bolts securing a panel. You want to just remove these two 10 mm bolts and also, like on the other side, you want to pull back this clip and unlatch that. We will fast forward as he removes these two 10 mm bolts.
Now, you just want to pry this panel off. It should pry off pretty easily. In the center of the center console, underneath there's two more of these latch clips and what you want to do is you want to just push up on the clips and free them and then once you have this unlatched, just lift up and pull forward. It should pull right out. To make more room for yourself, the engine is behind this panel so what you can do is you can see it can't come out of this vehicle because the seats are in the way. The seats are only a few bolts if you want to remove them, but if you just want a little bit more room to save time what you can is you can just remove, you see those four 10 mm bolts inside this panel? You just want to remove those. With those bolts out you can now pull that panel up and off and remove that little top piece and now with the overall access panel being shorter you can push it under the dash in that case. Just to give you a reference to where it is, you will see from the passenger's door it's actually right in the center at the back of the engine.
What you want to do, is disconnect the harness, pull up on that tap. Pull the harness right up and out and then using a 1 and 1/16th inch socket just put that over the sensor and just start loosening it up and twisting it out. You have it loosened enough it will just pull straight out.
You can see the old one's on the right and the new one from 1A Auto is on the left. They are exactly the same. You just want to take that sensor and press it down into the hole and just twist it in by hand. Once it's in there firmly you just want to get your 1 and 1/16th socket and ratchet and tighten it up the rest of the way. Now just plug the connector back into the top of the oil pressure sensor and that's all set.
To put the panel back together what you want to do is put that top piece on. Line up the access panel and you just want to keep pushing it back into place. You'll see those clips have to line up. There are hooks on the van, on the floor of the van that you need to line the latch hooks up with. One you have it lined up you just want to start connecting all those latches so just hook onto the hook, pull the tab and lock it. You want to do that with all four of them. Now you can replace the cup holder panel. Put it into the place and replace those four 10mm bolts. It helps if you do it by hand. You can hold on to it and line up all the bolts to start it out by hand and then we'll fast forward as he uses the ratchet to tighten them the rest of the way. Now you can put on that little panel right there. It just clips into place. Replace the panel underneath the driver's side. Just push all the clips in. You should hear them snap. Then you just want to replace those two 10 mm bolts and we'll fast forward as he does this. Now you just want to push that panel into place on the passenger side. You want to line up the clips, push it in and then replace those two 10 mm bolts. Then you are all set.
We hope this helps you out. Brought to you by www.1AAuto.com, your source for quality replacement parts and the best service on the Internet. Please feel free to call us toll-free, 888-844-3393. We're the company that's here for you on the Internet and in person.
Shop Products


How to Replace Oil Pressure Sender 2009-14 Chevy Suburban 1500
How to replace a broken or faulty oil pressure sender on 09, 10, 11, 12, 13, 14, Chevy Suburban.
