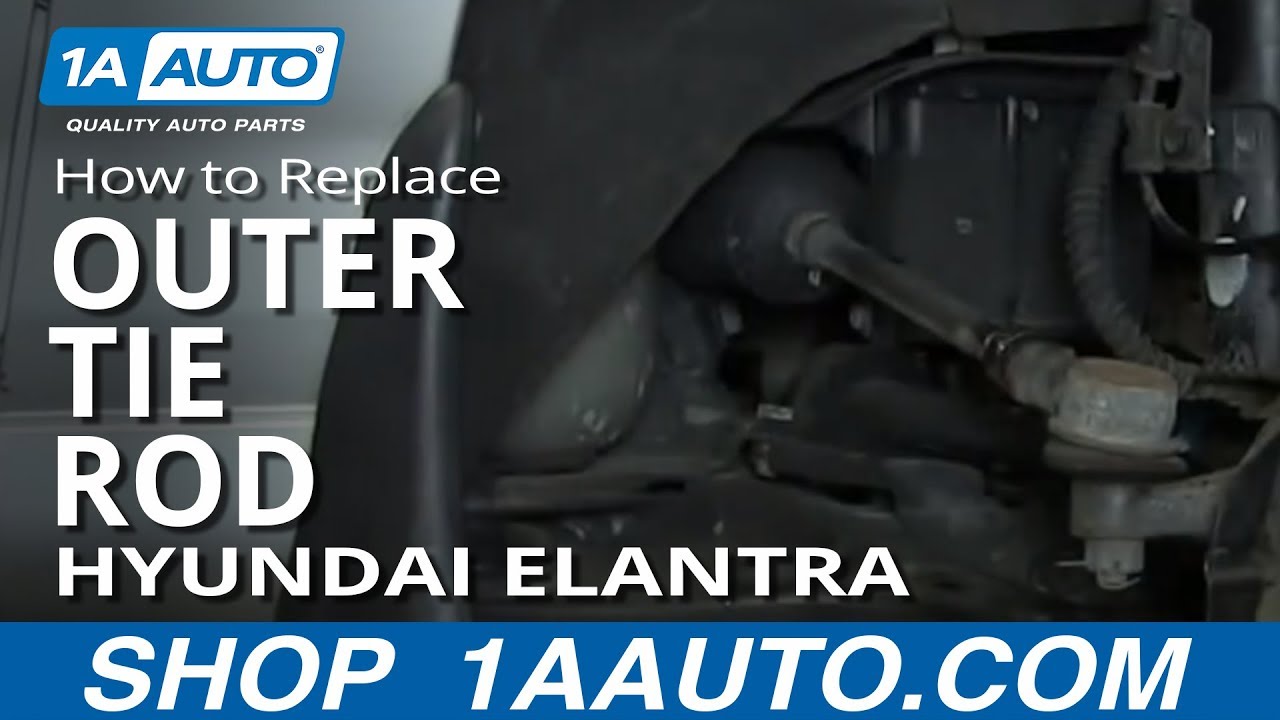
How To Replace Outer Tie Rod 1996-2006 Hyundai Elantra
Created on: 2013-05-20
Learn how to replace the outer tie rod yourself by following the steps in this how-to video
-
After completing this repair, it's recommended to have your car aligned
step 1 :Removing the Wheel
- Loosen the lug nuts with the vehicle on the ground
- Remove the hubcap
- Raise the vehicle with a floor jack
- Secure the vehicle on jack stands
- Remove the lug nuts
- Pull off the wheel
-
step 2 :Removing the Outer Tie Rod
- Measure from the end of the tie rod boot to the end of the tie rod
- Spray the 22mm nut on the outer tie rod with penetrating oil
- Hold the inner tire rod with a 13mm wrench
- Loosen the nut on the outer tie rod with a 22mm wrench
- Remove the cotter pin from the ball joint nut with pliers
- Remove the 17mm nut from the ball joint
- Hit the spindle with a hammer to knock the ball joint free
- Spin the outer tie rod free
-
step 3 :Installing the New Outer Tie Rod
- Screw the grease fitting on the bottom of the new tie rod
- Tighten it with a 7mm socket
- Twist the outer tie rod into the inner tie rod
- Measure from the outside of the boot to the inside of the tie rod to match your previous measurement
- Hold the outer tie rod with a wrench while tightening the 22mm nut to the tie rod
- Attach a grease gun to the ball joint fitting and give it several pumps
-
step 4 :Reattaching the Wheel
- Slide the wheel into place
- Replace the hub cap
- Start the lug nuts by hand
- Tighten the lug nuts preliminarily
- Lower the vehicle to the ground
- Tighten the lug nuts to between 100 foot-pounds in a crossing or star pattern
Tools needed
-
Adjustable Wrench
A Piece of Pipe (for leverage)
Torque Wrench
Hammer
Rust Penetrant
17mm Socket
Jack Stands
Grease Gun
Bearing Grease
7mm Socket
22mm Wrench
Ratchet
Floor Jack
Needle nose pliers
13mm Wrench
22mm Socket
Brought to you by 1AAuto.com, your source for quality replacement parts and the best service on the Internet.
Hi, I'm Don from 1A Auto. I hope this how-to video helps you out, and the next time you need a part for your vehicle, think of 1AAuto.com. Thanks.
In this video, we're going to show you how to replace an outer tie rod on this 2005 Hyundai Elantra. We'll show you the passenger side, but the driver side is basically the same and it should be the same for any 2001 to 2006 Elantra. The tools you'll need are jack and jack stands, sockets in the range of 17mm to 22mm, you'll need a ratchet, and probably a breaker bar or a pipe for some extra leverage, 14mm and 22mm wrenches, or just two large adjustable wrenches, and then you'll need pliers and grease if your new tire rod requires grease. We do recommend having your car aligned after this repair.
Start by removing one of the front wheels. If you don't have the benefits of air tools, you want to start with the vehicle on the ground, loosen the lug nuts, jack up and secure the vehicle on jack stands, and remove the lug nuts, the wheel cover, and wheel on tire.
The first thing we're going to do is measure from the end of the inner tie rod boot to the end of the other tie rod. Just to get a general reference, 1 foot and 1/4. Just put a little penetrating oil on the nut.
Now, using a 22mm or a 7/8 inch wrench, we're going to loosen this nut, and we're going to hold the inner tie rod with a 13 at the same time. I'm just going to with the nut, securing that free. I'm just going to twist the inner tie rod to make sure that it's free inside the outer tie rod, and it is. I'm removing the counter pin.
I'm removing the 17mm nut from the ball joint. I'm going to hit the spindle right here to knock the ball directly. Once you have the tie rod free, you can just spin it off. You just want to make sure that the inner tie rod doesn't turn at all.
The new part comes with a grease fitting. We'll just screw it under the bottom. Tighten it up with a 7mm. The old part and the new part from 1A Auto. We're just going to, for reference, put them side-by-side, and you can see that they're the exact same length, and it should go in just as the other one came out. Okay. We'll speed up here again as we thread that new tie rod on to inner tire rod. Again, just to keep hold of the inner nut that comes with the new outer tire rod is a 19 mm.
We missed the shot where you actually measure again from the outside the boot to the end of the tie rod. Make sure it matches what you had before. It's kind of a preliminary alignment, although you do want to get your car aligned after you do this repair. I'm going to hold the outer tire rod while I tighten down. I got my grease gun. I'm going to attach it to the fitting. Give it several pumps.
Put the wheel back in place. Put the hub cap on and start your lug nuts, and then you just want to kind of hand tighten them. Hand start them first to make sure you don't cross the threads, and then when they're hand started then just kind of preliminary tighten them up. With the car back on the ground, put a little bit pressure on it or weight on it. I'm going to use the 22 and torque wrench that I've set to 100 foot-pounds and torque them in a crossing or star pattern.
We hope this video helps you out. Brought to you by www.1AAuto.com, your source for quality replacement parts and the best service on the Internet. Please feel free to call us toll-free, 888-844-3393. We're the company that's here for you on the Internet and in person.
Shop Products


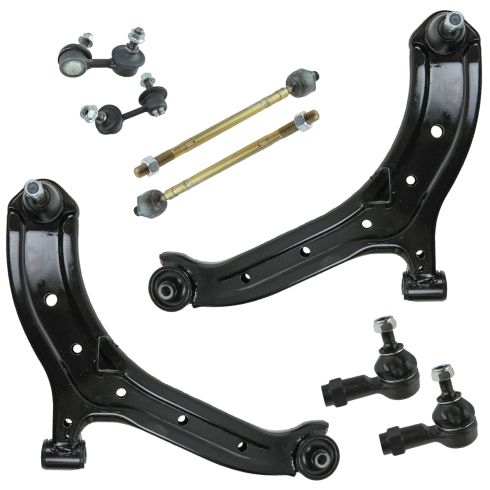
2000-05 Hyundai Accent Front 8 Piece Steering & Suspension Kit TRQ PSA59565
Part Details:
- (2) Front Lower Control Arms with Ball Joints
- (2) Front Sway Bar Links
- 8 Piece
- (2) Front Outer Tie Rods
- (2) Front Inner Tie Rods

How to Replace Tie Rod Assembly 1998-2004 Nissan Frontier
If the tie rod needs to be replaced, this video will show how to remove it and prepare a new on one the 98-04 Nissan Frontier
