How to Replace Outer Tie Rod 2007-13 Nissan Altima
Created on: 2019-09-12
Watch this video to learn how to replace the outer tie rods on your 07-13 Nissan Altima! 1A Auto shows you how to do it yourself and save!
-
step 1 :Removing the Wheel
- Raise the vehicle with minimal weight on the wheel
- Loosen the five 21 mm lug nuts
- Raise and support the vehicle
- Remove the lug nuts
- Remove the hub cap if equipped
- Remove the wheel
-
step 2 :Removing the Outer Tie Rod
- Apply rust penetrant to the tie rod jam nut
- Loosen the tie rod jam nut with large pliers, or a 22 mm wrench
- Remove the tie rod end cotter pin
- Remove the 19 mm tie rod end nut
- Hammer on the side of the knuckle to knock the tie rod end loose, and remove it
- Unscrew the outer tie rod end from the inner tie rod, while counting the number of turns it takes to remove it
-
step 3 :Installing the Outer Tie Rod
- Starting with the end pointing down, thread the outer tie rod onto the inner tie rod, completing the same number of turns counted when taking it off
- Install the tie rod end into the knuckle
- Install the tie rod end nut
- Torque the 19 mm tie rod end nut to 25 ft-lb
- Tighten the jam nut onto the outer tie rod
- Have a wheel alignment performed on the vehicle
-
step 4 :Installing the Wheel
- Install the wheel onto the wheel studs
- Install the hub cap if equipped
- Install the lug nuts by hand
- Tighten the lug nuts by hand in a star pattern
- Lower the vehicle with minimal weight on the wheel
- Torque the 21 mm lug nuts to 83 ft-lb in a star pattern
- Lower the vehicle completely
Tools needed
-
21mm Socket
Side Cutters
Hammer
Torque Wrench
Locking Pliers
19mm Socket
22mm Wrench
Ratchet
1/2 Inch Breaker Bar
Hey friends. It's Len here at 1A Auto. Today, we're working on our 2010 Nissan Altima, and I want to show you something very basic, replacing an outer tie rod end. Going to be super easy. I can do it. You can do it too, and if you need this or any other part, you can always check us out at 1AAuto.com. Thanks.
Okay friends, so one of our first steps is to make sure that we have the vehicle's weight partially supported off the ground but the wheels still touching, and we're going to break free all the lug nuts. If you're going to be using an air gun, you don't have to worry about pretty much any of this except for getting the vehicle off the ground and then taking off the lug nuts.
I'm just going to show you using the ratchet for now, 21 millimeter. We're just going to break all the lug nuts free, and the reason for doing this while the wheels still in the ground is just so the wheel can't spin while we try to break these free. There we are. All five broken free. Let's move on to the next step.
Okay, so I'm just going to switch over to the air gun now, 21 millimeter, but you can continue with a ratchet if you want. Just take off all five of these lug nuts.
First what we're going to do, we'll spray this down, which I just did. I'm going to use some nice long pliers and grab onto this jam nut right there. I'm just going to break it free. There we are. See if it slid or if it broke free. Okay, it did break free. Cool. Now, that we know we've got that broken free, we can move ahead to the next step.
We're going to take off this Cotter pin. It just basically locks this nut in place so it can't come off. If you don't have access to a new one, try to save it. If you do have access to new ones like I do, it is what it is. You can cut it and do whatever you need to do. Essentially get it out of there. There we go. Cut that off. Now, we're going to remove that nut.
All right, so I'm going to remove this nut. I'm going to use my 19 millimeter socket with my 1A Auto air gun here. There we are. We got a washer and a nut. We'll set those aside. I'm going to grab our hammer, and we're going to give the knuckle right across here a couple of loving bonks and see if we can get this to come up.
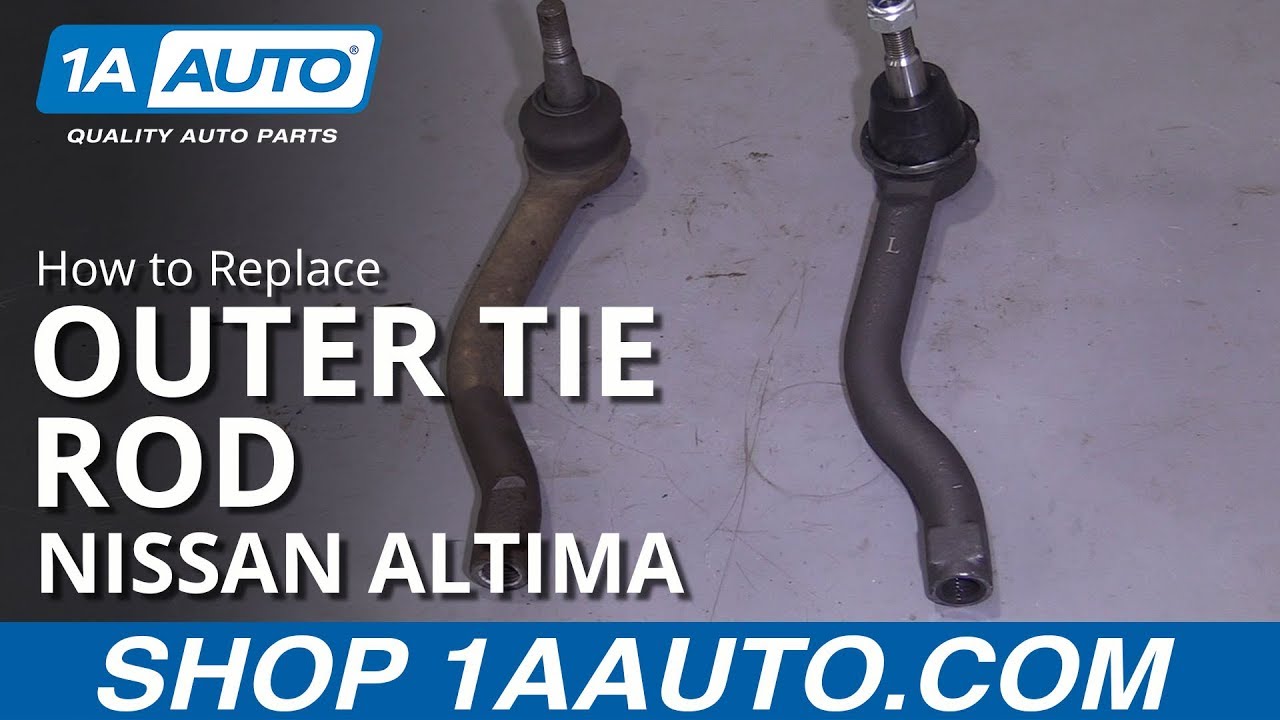
There we are. We'll take off this outer tie rod end. It's a good idea to count how many times it comes around. So, it started facing down. One, two and so on. There we are. 17 turns. So, we'll take mental note of that or you can write it down if you don't have a very good memory. 17.
So, here we are friends, a quick product comparison for you. Over here, we have our original outer tie rod end out of our 2010 Nissan Altima. And over here, we have our brand new quality 1A Auto part. As you can tell, they're both shaped the exact same. They've got their nice bend in there. They've both got the stud that goes through the knuckle. Comes with a brand new neoprene locking nut, and it comes with a pre-sealed boot that already has grease inside there for you. There's no maintenance involved with this. It's pretty much just put it in and drive it.
That said, I don't see any reason why this wouldn't be a quality part to install under the vehicle, so I'm going to go ahead and do it. If you need this or any other part, you can always check us out at 1Aauto.com. Thanks.
When we removed our outer tie rod end, we remember it was facing straight down. When I was turning it and taking it off, I counted 17 turns from down until when I took it off. So, I'm just going to start by going reverse here until I feel like it wants to grab. That's the beginning. One, two, three and so on.
We'll just get this locking nut out of the way for now. We're going to bring this over, get it into the knuckle. Bonk bonk. We're going to put on our self-locking nut. We're going to torque that down. I'm just going to bottom it out for now.
It's bottomed out. Let's grab the torque specification, and we'll torque it down.
All right, so let's go ahead and torque this down. We're going to use our 19 millimeter socket and torque it to 25 foot pounds. There we are. Let's just check it one more time real quick. That's tight. Let's move along to the jam nut.
So, here's our jam nut. We're just going to take it, turn it, turn it, turn it to the left until it's bottomed out against the outer tie rod end. To continue jamming it in or locking it, I'm just going to go this way. There we are.
Now, just take your pliers, give your tire rod just a little wiggle like this. You can see it moving down here. You want to try and get it as level as possible to the knuckle. It's going to be able to move around. That's what it's supposed to do, but I like to have it just about as level as possible to start. After that, it can do whatever it wants to do.
So, there we are. To finish up, all you would do is just put the wheel on, torque it up, drive it down the road. Oh, and an alignment.
All right, so we're going to take our wheel, roll it right over to our leg, lift with our abs, and put it up on here. We have our lug nuts ready. I'm going to grab my hubcap here so I can grab it nice and easy. Here we go. Right up our leg. Lift with our leg muscle/abs. Put that up there. Hubcap. Grab ourselves a few lug nuts here. All right, so we've got them all started. We're just going to bottom them out, and then we'll go ahead and torque them down. To a bottom them out, we're going to go in star pattern, and we'll do the same procedure for torquing them down.
Okay friends, here we go. Let's get ready with our 21 millimeter socket. We're going to torque down these lug nuts 83 foot pounds in a star pattern.
Now, for safety sake, let's just go around one more time. It doesn't cost us anything. It doesn't hurt, and it's a small price to pay for a good amount of safety. There we are. All torqued up. Just make sure your break's pumped up. I'm sure it is. Make sure you get an alignment and go ahead down the road. Easy peasy.
Thanks for watching. Visit 1AAuto.com, your place for DIY auto repairs, for great parts, great service, and more content.
Shop Products


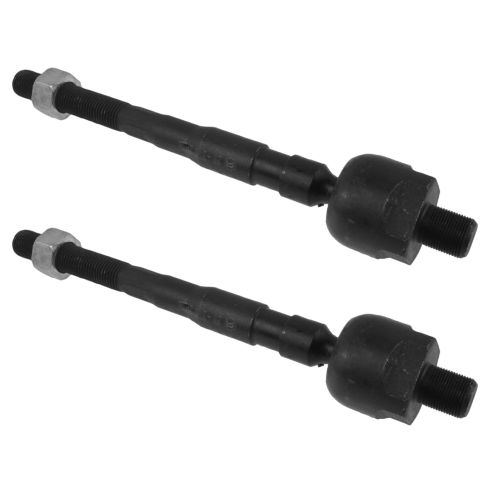
Nissan Altima Front Driver & Passenger Side 2 Piece Tie Rod Set TRQ PSA55181
Part Details:
- 2 Piece
- (1) Front Passenger Side Inner Tie Rod
- (1) Front Driver Side Inner Tie Rod

Allergy Symptoms How your Car and 1A Auto Can Help
1A Auto reviews how to install a new cabin air filter and how it can positively affect your health
