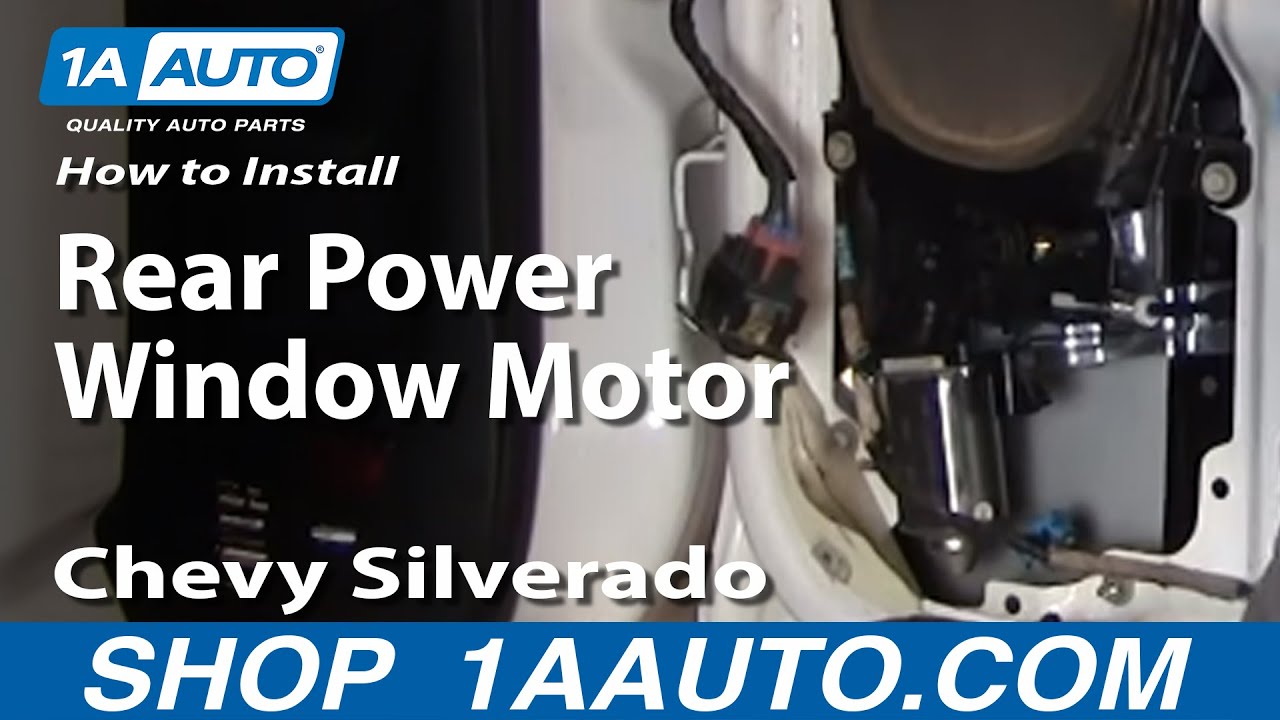
How to Replace Power Window Motor 1999-2004 GMC Sierra 2500
Created on: 2011-06-23
In this video, 1A Auto shows you how to replace a rear power window motor in a 99-04 GMC Sierra 2500.
-
step 1 :Remove the door panel
- Remove the two 7 mm bolts in the door panel
- Pry out the door handle trim panel, courtesy light, the lock button and power window switch panel.
- Disconnect the wiring harness connections.
- Pull up the door panel and set it aside.
- Carefully peel back the water shield
-
step 2 :Remove the power window motor
- Remove the two 10 mm nuts to disconnect your window from the regulator.
- Unbolt the speaker with your 8 mm socket and ratchet and disconnect the lead.
- Disconnect the power window motor lead.
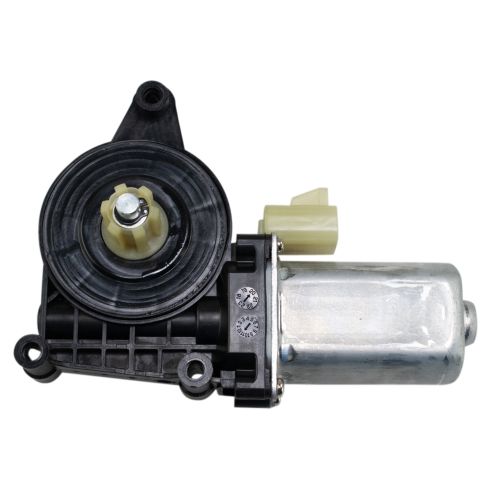
- Unbolt and remove the power window actuator and motor from the door.
- Unbolt the motor from the actuator using your 8mm socket and ratchet.
- Disconnect the motor from the actuator cables.
-
step 3 :Install the new motor
- Connect the motor to the actuator cables.
- Bolt the motor to the window actuator assembly using your 8 mm socket and ratchet.
- Install the window actuator into the door.
- Bolt the motor and actuator into the door using your 8 mm socket and ratchet and extension.
- Install the window into the actuator, and secure with your 10 mm socket and ratchet.
- Reinstall the speaker, remembering to connect the lead.
- Replace the water shield.
-
step 4 :Install the door panel
- Check out our videos for more detailed instructions on door panel assembly.
- Clip the door panel back on, threading the wiring through the respective gaps in the panel.
- Connect the courtesy light, power window switch panel, and the power lock switch.
- Clip in the courtesy light, power window switch panel, power lock switch, and door handle trim panel.
- Replace the two 7 mm bolts.
Tools needed
-
Socket Extensions
Flat Blade Screwdriver
8mm Socket
7mm Socket
10mm Socket
Ratchet
Brought to you by 1AAuto.com, your source for quality replacement parts and the best service on the Internet. Hi, I'm Mike Green. I'm one of the owners of 1A Auto. I want to help you save time and money repairing and maintaining your vehicle. I'm going to use my 20 plus years' experience restoring and repairing cars and trucks like this to show you the correct way to install parts from 1AAuto.com. The right parts installed correctly, that's going to save you time and money. Thank you. Enjoy the video.
In this video we're going to show you how to replace a rear window motor. This vehicle's a 2002 Sierra Crew Cab, same as a Silverado or Sierra. For a '99 to '02, '03 and up, the process to remove the door panel may be a little different. The tools you'll need are a regular screw driver, a 7 mm socket, 8 mm socket, and 10 mm socket with ratchet and extensions. There are two 7 mm screws that you have to remove or bolts, one right in there and then one down in the bottom corner here. As well, you need to pry out this trim panel, pry out your lock button, and pry out your window switch and disconnect it. First, put your finger under it, pull up that bezel, regular screw driver, stick it in the front there; pull off your lock button, then this switch also pry up gently there, the front of it. There's a little tab. With your screw driver, push on it. Pull the protector down and out. You can also pry out your light and reflector. Disconnect it. Your 7 mm socket ratchet extension.
We'll just speed up here as we remove those two 7 mm bolts. Once everything's unbolted, you just lift up on your panel and it comes off. Fast forward a little bit here. Slowly and carefully. I know I'm fast forwarding. Please slowly and carefully pull back your water shield so you can access the inside of the door panel. The window- I actually have my key on and my window switch is in. You can see that the window is clipped in by two 10 mm nuts here. You tighten these up and they tighten these clips up. Usually what happens on these regulators is the cables snap. In that case, you can bring your window up and down anywhere you need it. AS you can see, there's plenty of room in this door that if your window motor's broken and it won't move, you should be able to get in there and get at them. You can easily remove this speaker with three 10 mm bolts here. The last thing down here is my window motor. Just push on this tab. If you want, use a screw driver, push that tab down and out.
I use my 10 mm socket and ratchet extension and loosen up these two nuts. You can see my window's down a little bit. Once those are loose, you can just take your window and push it up into place. Just use some blue painter's tape to make sure that the window stays up. Remove these two little nuts. Now just loosen these two upper ones a few turns and then a bolt right here that holds the window motor way down in the corner. We'll just speed this up a little bit as I take that lower bolt out. The regulator can go out, up - and your regulator. To remove your window motor, there are three 8 mm bolts here. We'll just fast forward as we remove those three 8 mm bolts. Disconnect the motor from the housing. A new motor from 1A Auto. See, it's all the same. It's going to bolt right in. Get it to mesh up with the gears there a little bit. Just going to put our bolts back in. Fast forward as we tighten them up. You want to be careful not to tighten them too much. They are self-threading. You could strip the plastic threads.
Make sure you get your wires on the correct side down here. Also, make sure that the regulator's on the inside of the window. The bolts they put on are a little too big to go through those slots. What I'm doing here is the upper bolts you can leave in the regulator. You can just hang them up in the doors. They go through larger holes and then slide down into slots. The bolts that came in the regulator, the heads were just a little too big to fit through the larger part of the hole. I'm just threading them out, putting them back in place and threading it back in. Fast forward here as I start that lower nut on; then I aligned the other rail. I get it in and start that nut. Continue to move quickly here. I start the bolt that's in the lower corner of the window motor. I take my ratchet socket extension and I tighten all those five bolts up. You tighten them up firm, but not extremely tight. I've got my key on. I'm going to plug my window motor back in. Now I'm going to run my regulator up. Loosen up these nuts here. Remove my tape. Bring my window down. Make sure it goes into the clamps here.
Take a little bit of mild hand soap and just grease the window a little bit to go down into these clamps. Move the window down. Make sure it's going into the clamps where we want it to. Push it down into the clamps. You may find that you want to loosen them up a little bit more. You basically- there'll be marks on the windows. You just want to line them up in the same place. Use your ratchet extension and socket and tighten those clamps up. Again, these don't have to be extremely tight. You want them nice and firm so they'll grip the windows. I still have my key on so I can just test the window; put it down, put it back up. We'll fast forward again here. I just tighten those clamps up another couple of turns; disconnect my switch and start putting my plastic shield on. Put this all back together. Make sure this harness goes through this upper hole. Make sure you put your lock rod through this lower hole here. In the interest of keeping this somewhat manageable as far as length, I'm going to fast forward through putting the door panel back on. If you wanted to see this in regular speed, just check out our other videos for the Sierra and Silverado crew cab rear door panel install and replace. Once you get the door panel back on, it is a pretty easy process. You put it back on, slide it down, a couple of bolts, the trim panels, and you should be all set.
We hope this helps you out, brought to you by www.1AAuto.com, your source for quality replacement parts and the best service on the Internet. Please feel free to call us toll free, 888-844-3393. We're the company that's here for you on the Internet and in person.
Shop Products


How to Replace Front Window Regulator Motor 2005-16 Toyota RAV4
Check out this video to learn how to replace the power window motor on your 05-16 Toyota RAV4. 1A Auto shows you how to do it yourself to save you money!
