How to Replace Radiator cooling Fan 2013-17 Nissan Sentra
Created on: 2020-03-23
Watch this video to learn how to install a new radiator fan on your 2013-17 Nissan Sentra.
Tools needed
-
12mm Socket
Socket Extensions
Jack Stands
Trim Tool Set
Pliers
Pocket Screwdriver
Socket Driver
Phillips Head Screwdriver
Wheel Chocks
Hose Clamp Pliers
10mm Socket
Drain Pan
Ratchet
Floor Jack
Needle nose pliers
Marker / Writing Utensil
Channel-Lock Pliers
Take these push pins out right here. Use a trim tool. You can do the same on the other side. And there's four bolts, take these out. Use a 10-millimeter socket and just take this panel down. This is the drain right here on the radiator, and there's a little spout. You can actually take a piece of rubber hose. I'm just gonna put it on the end of this so I can direct the flow of coolant, and now I can open up this nut right here. Make sure you do this when the vehicle is cold. You don't wanna do this when the coolant is hot. All right. So, I loosen this up just to the point where the plug almost doesn't come out and it's coming down the drain hose just a little bit. It's just trickling, so I'm gonna go take the cap off and let it drain some more. Then I'll just take the cap off. There we go. It's gonna drain a lot quicker, and just let that drain out. Take this 10-millimeter bolt out here and one on the other side as well. And there's all these trim clips. You need to pull these all out, all over. Use a trim tool and just pop the center part out and then pull the rest out.
Sometimes, if you take two screwdrivers, get in here like this and just work it out. A lot of times these break, so you may have to replace them. Pull that cover off and take these two trim clips out. Oop, those broke. Push the center down and then pull out the clip. Do the same on this one. Pull out the clip. I'm gonna have to replace those. I'm gonna take these panels off right here. Now, you can probably work around it, but it's only a couple screws, so just use a Phillips head screwdriver. Take these two screws out and slide the panel backwards. Do the same on this one. Take this push pin off right here. If you had one right there, take that one off and also on this side, if you have one right there. Slide that out of the way. Take this wire out of the way right here. There's a little retainer holding it to that bracket, and then the two horn wires, take those off. You can use a straight blade screwdriver to pop those out, and just move those wires out of the way a little bit. We're gonna take this bracket off next. Before I do that, I just wanna take a felt-tip pen and just mark where it was when it came off. That way when I go to put it back together, it's in the exact same spot. I'll do that there and the same to the other side.
Take these two bolts out. You can use a 12-millimeter socket. And do the same for the other side. And I'm gonna use a 13-millimeter socket, take this bolt out here, loosen that up. Take that one out and use a 12-millimeter socket, take this bolt out. And just grab this panel right here and just move it out of the way. Be careful not to hit the battery. I'm just gonna put a fender cover under here. Just keep this out of the way. I don't wanna arc it out on the battery. If you're really afraid of it arcing out, you can always disconnect the negative cable on the battery. Now I'm gonna take this hose off right here. Just use some needle-nose pliers, then slide the hose off. You can try twisting it back and forth. I use some hose pliers. Let's slide that off. And take a 10-millimeter socket, take this bolt out here, and slide the reservoir up and out. Take this hose clamp off right here. Just use some hose clamp pliers, squeeze it, move it down. Okay. That's good. And slide this hose off. You can use a pick to help slide it off.
Now we'll take these two bolts out. Use a 10-millimeter socket. And then slide this pipe up and out of the way. And we wanna disconnect this connector, but there's a wire retainer right here, or wire clip. Just use a trim tool, take that off first. And sometimes just use some needle-nose pliers, pull it out that way. Disconnect the connector and just push down on the lock tab. Just try to slide it up and push down. There's a little tab right there. Put that out of the way.
From underneath, let's get the lower radiator hose off. Just use some hose clamps, hose clamp pliers. Move the hose clamp down the hose. Just grab the hose, twist it back and forth. Make sure you have your drain bucket underneath here. I already closed up the drain on the radiator. Pull this off slowly. There's a clip that's holding the radiator hose on it. This one's actually broken. So, either cut that or pull that clip off.
Now, pull this cover back a little bit and there's a bolt right in here. Gonna use a 10-millimeter socket to remove it. And right here, take that one off too. And just grab the condenser. Hold the radiator down and just try to slide this up a little bit. There's some clips that it slides into down there and also on the other side. Slide it out. Just be careful. You don't wanna break this, but you can do this without having to evacuate the system. And you can grab the radiator, or fan assembly, and slide it right out. So, you can try to take the fan out while it's in the car. It's not that easy. The only extra, you'd have to take the lower radiator hose off anyway, but if you use some large pliers and just put a little pressure, pulling the fan up, and get it to that location, then push down right here as well, trying not to break it. Get that separated. Do the same on this side. And slide that off. Fan comes right off.
All right, to install it, I'm gonna install the radiator first before I install the fan assembly. There is some pins on the bottom. It's just gonna be easier to install the radiator separate from the fan. Taking it out is a little bit different. So, slide those pins in down below, get the condenser out of the way. That goes in there. Put this in there. Now we can get the condenser lined up. It's gonna slide in over here, and slide in down below there. Gonna put these J nuts in. You could do this before you put the radiator in if you wanted to. There's one right here and one over here. And put the bolt that goes right there in, and then over here. Get that bolt started, and snug it up. The same on this side. Now, take the fan. Now, just make sure you line these tabs up with the clips or the retainers on the radiator. Start with lining up the bottom ones first.
Once the bottom is lined up on both sides, you can push the tops and lock them in place. You don't wanna forget the connector, so make sure you get that lined up. This goes on this way. Line that up, lock it in place, and then push this retainer right there. That's good. Make sure the wires are out of the way. Reattach the lower radiator hose. Slide that in position. Use the hose clamp pliers, put the hose clamp back where it was. There we go. Now, take this panel, put this back up here and get the bolts started. Should be four bolts. And put the push pins in here, right here, and right here, and do the same on the other side. Then tighten these four bolts up. And take this upper radiator hose, line that up there, slide it onto the radiator first, move the hose clamp over. That's good. Install the two bolts right there and right here, and tighten them up. And take the coolant reservoir and just slide it down into position. And there's a tab on the bottom that's gonna hold it. Just make sure you line that hole up and put the bolt in. Tighten it down.
Take the reservoir hose, slide that on. Take some needle nose pliers, slide the clamp over. Take this panel. If any of these bushings came off, put these back in. Take it off the radiator. These are gonna line up with these pins on the radiator. Just slide this back in position. Looks good. And put these bolts back in. And put these two bolts in. And with this lined up properly, which it looks like it's all set, tighten these bolts down. And these also. And reconnect the horn wire, black one further away, and then brown one closer to the middle. And hook this wire retainer right there, reinstall a push pin right here, and same on the other side. Reinstall these brackets. Line the pin up in the middle. Take the screws and tighten those up. And put a push pin right here, and one on the other side. Okay. Put this trim piece back in, and put all the push pins back in. And put this bolt in, tighten it down. And do the same on the other side.
Now I'm gonna fill up the cooling system. I'm gonna use a funnel to help pour it in. Just use the appropriate coolant for your vehicle. So, we have the coolant filled in the system. I'm gonna start the vehicle. This is a special funnel to help bleed the system and stuff. If you don't have this funnel, just make sure the coolant is all the way up to the top, then start the vehicle. Once the vehicle is running, just double check the level. You may have to top it off. It may suck some of the coolant in there. You wanna make sure you monitor the temp gauge. You don't want it to go into the hot or the emergency zone. So after about 10 minutes, once the temperature starts rising, just make sure you have heat coming out of the vents. If you don't have heat coming out of the vents, you may not have enough coolant in the system. Shut the vehicle off and start over.
We've let this run for about 15 minutes. The coolant temperature is right where we want it to be. We have heat coming out the dash. Now I'm gonna shut the vehicle off. Now, this is burping a little bit. I'm gonna let that do its thing. Once it stabilizes, I'll take the funnel off, put the cap back on, make sure the coolant reservoir has coolant in it. Let the engine cool down, and then adjust the coolant level accordingly.

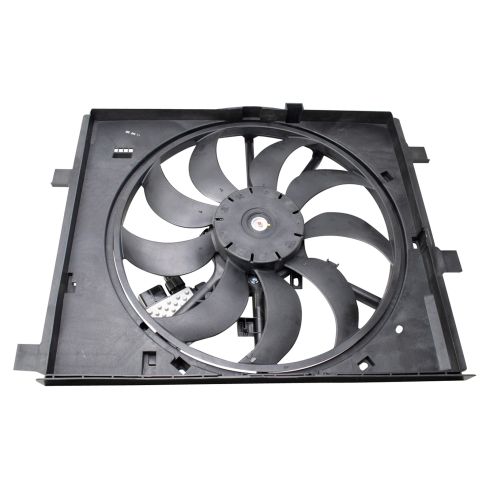
2013-19 Nissan Sentra L4 1.6L Turbo Engine Cooling Fan Assembly TRQ RFA89055
Part Details:
- 1

How to Replace Radiator Fan 2009-17 Chevy Traverse
How to repair, install, fix, change or replace a broken radiator fan. If your car overheats or runs hot and the radiator cooling fan will not turn on then this may be your solution. This video shows the process for the 09, 10, 11, 12, 13, 14, 15, 16, 17 Chevy Traverse, GMC Acadia, Buick Enclave, or Saturn Outlook.
