
How to Replace Radiator Cooling Fan Assembly 2001-07 Toyota Highlander L4 2-4L
Created on: 2018-03-27
How to repair, install, fix, change or replace a broken radiator fan. If your car overheats or runs hot and the radiator cooling fan will not turn on then this may be your solution. This video shows the process for the 01, 02, 03, 04, 05, 06, 07, Toyota Highlander.
-
step 1 :Draining the Radiator
- Raise and support the vehicle
- Apply rust penetrant to the eight 10mm bolts on the splash shield
- Remove the eight 10mm bolts from the splash shield
- Pry the two push clips out of the splash shield with a flat blade screwdriver
- Pull the splash shield down and off
- Have a drain pan ready
- Unscrew the radiator drain by hand
- Twist off the radiator cap
- Allow the radiator to drain
- Close the radiator drain
-
step 2 :Disconnecting the Radiator Lines
- Loosen the transmission cooler line clamps with pliers
- Disconnect the transmission cooler lines from the radiator
- Attach the finger of a glove to the hose and connector with a zip tie to prevent leaking
- Loosen the lower radiator hose clamp with pliers
- Disconnect the lower radiator hose from the radiator
- Carefully disconnect the overflow hose from the radiator
- Loosen the upper radiator hose clamp with pliers
- Disconnect the upper radiator hose from the radiator
-
step 3 :Removing the Radiator
- Disconnect the radiator fan electrical connectors
- Remove the 12mm bolts from the radiator brackets
- Remove the radiator brackets
- Lift the radiator up and out of the engine bay
-
step 4 :Removing the Radiator Fan
- Remove the six 10mm bolts that hold the fan assembly to the radiator
- Pull the fan assembly off the radiator
-
step 5 :Connecting the New Fan to the Radiator
- Line up the new fan on the radiator
- Fasten the six 10mm bolts that hold the fan assembly to the radiator
-
step 6 :Installing the Radiator
- Remove the rubber grommets from the radiator
- Place the grommets on the radiator support
- Lower the radiator onto the grommets
- Line up the radiator brackets
- Insert the two 12mm bolts into the radiator brackets
- Connect the radiator fan electrical connectors
-
step 7 :Connecting the Radiator Lines
- Connect the upper radiator hose to the radiator
- Tighten the upper radiator hose clamp with pliers
- Connect the overflow hose to the radiator
- Connect the lower radiator hose to the radiator
- Tighten the lower radiator hose clamp with pliers
- Remove the zip ties and glove fingers from the transmission cooler lines with side cutters
- Connect the transmission cooler lines to the radiator
- Clean any fluid off the radiator with paper towels
- Top off the transmission fluid
- Tighten the transmission cooler line clamps with pliers
-
step 8 :Filling the Radiator
- Twist off the radiator cap
- Add coolant to the radiator using a funnel
- Turn the heat to hot, but do not run the fan
- Run the engine to clear air bubbles from the cooling system
- Add coolant as necessary
- Add coolant to the overflow bottle as necessary
- Twist on the radiator cap
-
step 9 :Installing the Splash Shield
- Lift the splash shield into place
- Insert the two push pins into the splash shield
- Insert the eight 10mm bolts into the splash shield
Tools needed
-
12mm Socket
Funnel
Socket Extensions
Rust Penetrant
Pick
Side Cutters
Gloves
Flat Blade Screwdriver
Paper Towels
Wire Ties
10mm Socket
Drain Pan
Slip-Joint Pliers
Ratchet
Needle nose pliers
Hi. I'm Mike from 1AAuto. We've been selling auto parts for over 30 years!
Raise and support your vehicle or you could do this on the ground. This vehicle’s a bit higher. You need to remove this lower panel. If yours is completely intact, you'll have eight 10 mm bolts around the outer edge. Up here, this bumper is broken, so these are loose. That one's broken off there. There is a push clip on either side. This one is missing but it would look just like this one here. I'm going to start by removing the bolts.
Spray a little rust penetrant in here. Use a 10 mm socket extension and ratchet, and just go along and remove all these bolts. This one was still connected. You unbolt it here. It’s broken apart. I'm not going to worry about it. The bumper has broken, but the bolt is there, so I'll remove that bolt. This bolt here is the same thing: the bumper's broken but the bolt is still there holding on this front shield. Just the clip is holding the shield on now. I'll pop the clip out with a flat-bladed screwdriver to unlock it. Sometimes these break. This one looks kind of brittle. If it's discolored, it might break. If it breaks, just replace it with a new one.
Place our drain pan under the vehicle to catch the coolant. Then it can either be reused if it's nice and clean or disposed of properly. Now you can remove the radiator drain. It's this white plug right here. Open it up. You don't have to take it all the way out. You can just kind of unscrew it and it'll start to drain. It's got a little nozzle on the bottom. Then, what you can do, once it starts to drain – of course, you're doing this when the vehicle is nice and cool – you can open up the radiator cap. It'll come out faster. If you drain the radiator, you can close this back up.
You can go ahead and remove the clamps off the transmission cooler lines. Squeeze these together over there. Work this hose off. Maybe even take a right-angle pick and work it around the edge of the hose. It helps break the seal. Probably, some fluid's going to come out of here. Get ready to catch it. There's a little bit there. I'll hold that hose up top. You can cut the fingers off latex gloves and put right over it, and then take a cable tie. I'll get this one started. It'll keep a bunch of that from dripping out. At the hose end you can do the same thing.
You do the same thing for both the feed and the return line. You're going to loosen the clamp on the lower radiator hose, you squeeze it together with some adjustable pliers. There is a part that will lock and keep it open. If you get it just right, then you can lock it. Slide the clamp back over the hose. It'll just sit there. Remove the hose from the lower part of the radiator. It should come free. If not, you'll need to use a right-angle pick to break the seal, but this one's going to come loose for us. Some coolants probably going to come out of here. Have a bucket ready to catch it and just be careful it doesn't splash you in the face.
To pull the overflow hose off, just be careful because this part of the radiator's plastic. You don't want to break it off, if you want to reuse the radiator. I'll put it aside. I'll remove the upper clamp with some adjustable pliers. There is a lock on here. We'll get it in place. If it doesn't lock, you can still work it off and put it down the hose. Remove this hose. You can wiggle it back and forth to break the seal. There shouldn't be too much coolant up here. Just put it back out of the way.
Unplug the electrical connectors to the fan. There's one of these on each side. Push in the lock. Pull it off and do the same over here.
You need a 12 mm socket and ratchet extension to remove these bolts that are holding in the radiator bracket. The same for both sides. If the fans are going to stay with the radiator, you could try to remove them but, believe it or not, there's not enough clearance to get them out. Lift up on the radiator. It will come out of the rubber mounts. Pull it straight up and out of the car.
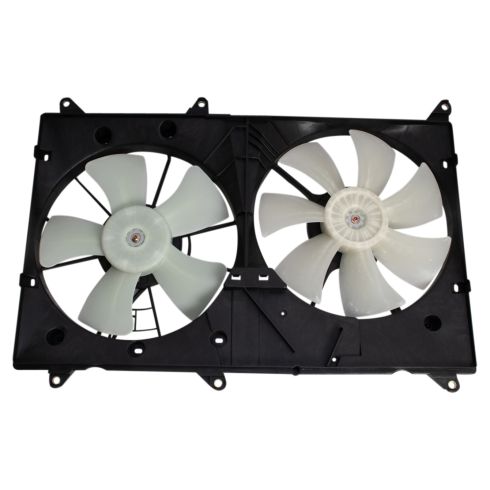
Here's our original radiator with cooling fan assembly. Here's our brand new cooling fan assembly from 1AAuto. You can replace just the cooling fan assembly and reuse the radiator if you wish. This radiator's fine, so we're going to reuse it. We'll swap it over. As you can see, it’s the same style design as the originals, same style connectors. These'll fit great and work great for you.
There's three 10mm bolts along the bottom. There's three along the top. Just remove all three and then swap them over to the other radiator fan assembly. Take the old one off.
Install your new fans. Line up on the same holes. I'll get these top bolts started. Put this top one on. This has the bracket on it for the hood latch.
Just be aware when you take out your old radiator, these rubber grommets that fit down in the body, sometimes, it never seems to fail, but one will always come out with the radiator and one will stay in the body. When you go to reinstall the radiator, you want to make sure that you're not missing these. They're either in the frame rail or they're in the radiator, so that when they sit down in the front, the bottom of the radiator will be secure. I'm going to take this one off of this radiator, and sit it inside the car. I recommend doing that if you're replacing the radiator. Put these down inside the car first, and then place your new radiator down on these pins or reuse your old radiator that way.
So these rubber grommets, that one stayed in the frame in the front, also called a radiator support. So I'm going to put this one back in over here. Now, when I put the radiator back in, those pins in the bottom will slide in there, and the radiator will be held into the bottom. To reinstall the radiator, I'll lower it straight down and get it centered on those pins, so it should slide right in. So it's held in there with the pins.
Put the upper brackets in. Those go just like that. Same for both. Then reinstall the bolts. When those get tight, just stop. Same for the other side. Plug the electrical connectors back in for both fans. It's very important. Don't forget to do that or else the fans won't work. They'll click when they're locked into place.
Then reinstall the upper radiator hose. Squeeze the clamp together and put it back into place. If you actually manage to get the clamp to lock, we'll just kind of line it up where it was originally and then I'm going to use a flat-bladed screwdriver to just unlock it. It'll snap into place. There it is. Put this back on. Slides right over it. Put the radiator hose back on. Watch out for dripping coolant. Put the hose clamp back down where it belongs.
Using side cutters, cut off the cable tie. Careful, it's going to drip. Do the same for this one. Also, it will probably drip. Of course, afterwards top up the transmission fluid. Put the hose back on. Wipe up any excess. Put the hose clamp back in place. Do the same for the other side.
We're going to fill and bleed the cooling system. We're using a coolant funnel. Pour the appropriate 50/50 mixture of water and coolant the vehicle calls for. You don't need a funnel like this. It does make it easier. It certainly makes it easier to show you what's happening, but we're going to run the car with it filled with coolant. The cap, of course, is not on here. This allows the car, when it warms up, the thermostat opens and allows any air bubbles that are trapped in there to come out through this funnel, and then be replaced by this extra coolant. You can simply do that by just filling the radiator up to the top and then running the car with the cap off. It might get a little messy but it will work in your driveway. At the same time, I'm also going to turn on – I'll turn the heat to hot. I won't turn the fan motor on because I want the car to get warm enough and have the thermostat open up but I do want coolant circulating through the heater core, so we eliminate any bubbles that may be in there.
I'm going to remove our funnel. This coolant is hot, so be careful. If you need to, you can use this to top off your overflow reservoir. If not, I'll put it back in the bottle and reuse it. We'll remove our funnel piece here, the adapter. The radiator's filled right up to the top. I'll reinstall the radiator cap.
Put this shield back in place underneath the bumper. Some of these clips are broken. This does line up over here. The push clip that's not broken, I'll put in. This will be the same for the other side, except ours is broken and missing. But this will go underneath. I'll put this 10 mm bolt back up in place capturing these two shields. If ours wasn't broken, this bolt would go through and up and into it. There's one more here but ours broke. It's rusty. It's not a big deal. It's held in with enough clips and bolts.
Thanks for watching. Visit us at 1AAuto.com for quality auto parts, fast and free shipping, and the best customer service in the industry.
Shop Products
Toyota Highlander Lexus RX300 Dual Radiator & Condenser Fan Assembly TRQ RFA80461
Part Details:
- 2

How to Replace Radiator Cooling Fan Assembly 2005-06 Chevy Silverado V6 4-3L
How to repair, install, fix, change or replace a broken radiator dual fan assembly. If your car overheats or runs hot and the radiator cooling fan will not turn on then this may be your solution. This video shows the process for the 05, 06 Chevy Silverado
