How to Replace Rear Door Lock Actuator 2002-09 Chevy Trailblazer
Created on: 2011-05-25
Find out how to remove and install the door panel to access and replace the door lock actuator with the steps in this instructional video
-
step 1 :Removing the Door Panel
- Pry off the trim piece inside the door pull with a flat blade screwdriver
- Pry off the door handle bezel with a flat blade screwdriver
- Pry off the window switch with a flat blade screwdriver
- Disconnect the window switch wiring harness
- Remove the two 7mm bolts inside the door pull
- Pry off the door panel by hand
-
step 2 :Accessing the Door Lock Mechanism
- Remove the 10mm bolt from the door handle
- Pull the door handle forward and out
- Pull of the latch and lock rod clips
- Pull the latch rod and lock rod out of the door handle
- Peel back the water shield
-
step 3 :Removing the Door Lock Mechanism
- Pull the lock knob rod out of the yellow clip
- Remove the three T30 Torx bolts from the lock mechanism
- Pull the lock mechanism down, while keeping the latch rods from falling into the door
- Separate the latch and lock rods from the lock mechanism
- Disconnect the wiring harnesses from the lock mechanism
- Pull the lock mechanism out of the door
-
step 4 :Separating the Door Lock Actuator
- Carefully remove the three T10 Torx bolts that hold the actuator to the lock mechanism
- Pull the actuator away from the lock mechanism
-
step 5 :Connecting the New Door Lock Actuator
- Push the door lock actuator shoe into the lock mechanism
- Twist the actuator into place
- Line up the actuator and lock mechanism gear teeth
- Insert the three T10 Torx bolts into the actuator
-
step 6 :Reinstalling the Door Lock Mechanism
- Attach the rod with the white wrap to the upper lock clip
- Attach the rod with the yellow wrap to the lower lock clip
- Attach the wiring harnesses to the lock mechanism
- Push the mechanism into place
- Start the three T30 Torx screws by hand
- Reconnec the lock knob rod to the yellow clip
- Test that the door lock works
-
step 7 :Reinstalling the Door Handle
- Put the water shield on
- Attach the latch rods to the door handle using the clips
- Push the door handle into place
- Insert the 10mm bolt into the door handle
-
step 8 :Reinstalling the Door Panel
- Pull the wiring harnesses through their cavity
- Lift the door panel into place
- Push the door panel clips in
- Connect the window switch wiring harness
- Push the door handle bezel into place using the locating tab
- Insert the two 7mm bolts into the door pull
- Push the trim piece into the door pull
- Make sure the door is unlocked
Tools needed
-
T10 Torx Driver
Socket Extensions
Flat Blade Screwdriver
T30 Driver
7mm Socket
10mm Socket
Ratchet
Brought to you by 1AAuto.com, your source for quality replacement parts and the best service on the Internet.
Hi, I'm Mike Green. I'm one of the owners of 1A Auto. I want to help you save time and money repairing or maintaining your vehicle. I'm going to use my 20-plus years experience restoring and repairing cars and trucks like this to show you the correct way to install parts from 1AAuto.com. The right parts installed correctly: that's going to save you time and money. Thank you and enjoy the video.
In this video, we're going to show you how to remove and replace a rear door lock actuator. If the door locks in one of your rear doors are not working then this is usually the problem. This procedure is the same for all GM mid-size SUVs, Trailblazer, Envoy, Bravada, Rainier, 9-7x and Ascender. You'll need 7 and 10mm sockets with a ratchet and extension, small flat blade screwdriver, T10 Torx driver and a T30 Torx bit with a ratchet and driver. Just a note this is done on a Trailblazer. If you have one of the other models removing the door panel may vary just slightly.
Start by using a small screwdriver and you want to pry up this little trapdoor here. Pull it out and there's two 7mm bolts there and then around your door handle you can see a little slots, you want to take your screwdriver, push in there and pull out. Push and then pull out on this bezel and then there's another one up here, another one here and the last one up here. Then that comes right off. For your power window switch, just work your screwdriver underneath. It pops up and out and then there's a tab right here, you just put your screwdriver in, push and pry it out. Disconnect that. Now I'll remove these two 7mm screws. We'll just fast forward, taking those two 7mm bolts out. Once you have that all out, you just work your hands underneath. It would probably be easiest to start here in the front. You just pull the panel, with brisk pulls and it comes off. You can see it has all the pins, it just goes into the little holes. Inside the door handle is a 10mm bolt. Use a socket and ratchet and extension. Now the handle slides forward and out. You pull the handle out a little bit and you see some clips back here. You want to pull the clip off and then pull the rod up. There's another one right underneath, pull the clip off again, pull the rod up and your handle is off. Carefully pull your water shield down so you can work on the top part of the door.
You want to go inside the door and you'll see a yellow clip there. I'm trying my to best to film it. You're just going to reach in with your finger and flip that clip open and then pull the rod out of the clip. Now, using a T30 Torx driver and a ratchet, I'm going to remove these three screws. We'll fast forward through removing those screws. Now, you want to pull the lock mechanism down, grab your rods and make sure that they stay on the outside here. As you pull the mechanism out, you will now see these rods clip into a little clip here and you can just force those out. There's another one. You just push them out of their little clips, maybe use a screwdriver just to push on them. Now, here your lock mechanism is hooked to a couple of harnesses, just little tabs here. Pull them up and disconnect that harness and this one up here, pull the tab, disconnect the harness. Now, your mechanism comes right out.
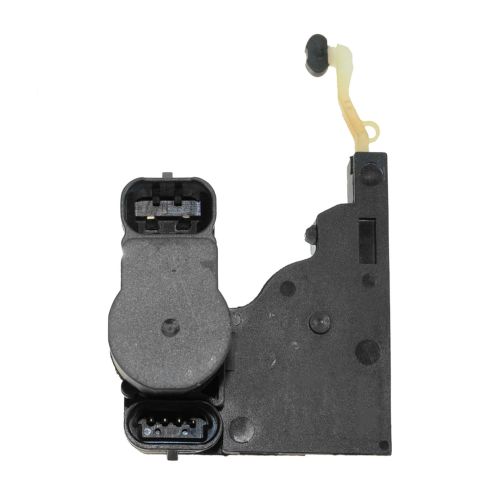
Now, your actuator's held on with three T10 screws and we'll remove those. We're going to speed this up a little bit. You want to be careful with these screws that you don't drop them and lose them, notice how I loosen them with the driver most of the way and then I use my hands to pull them out the rest of the way. You just have to be a little careful. Now your actuator comes off and you pull it off like that.
Here's a new actuator from 1A Auto; you can see it's the exact same. You've got to put that little shoe in and then twist the actuator down into place. Make sure your teeth get lined up there. Going to speed it up again a little bit. I just put each one in and then tighten it up just a little, wait until I get all three in before I tighten them all the way.
To get your actuator in, the rod with the white wrap on it goes to the upper clip and then the rod with the yellow goes down to the lower clip. The blue goes to the bottom. Plug that in and then the gray goes on top. Plug that in. Then put it up in. For that rod that you just connected, make sure it's off and out of the way. Slide the whole mechanism in. Start one of the Torx screws. I'm going to speed it up here again, just like with the other screws, I start all three of them first and then tighten them snug and then tighten them all the way up and you want these to be nice and tight, they don't have to be extremely tight but they should be good and snug. Reconnect our rod. For our rod, place it in the clip and lock the clip on. Now you can watch the rods here. We lock and unlock so it's moving the rods so that's all correct.
After that successful test, we can start putting the door back together. Put up the water shield and then go on from there. To install your door handle, now you've got two rods here, one's the lock. You can feel that it just has a detent in it and the other one just pulls, that's your door handle. The lock goes on the bottom. You just have to . it's a little hard to film but . put it into place, push it down in and lock the clip on. The door handle opener, just make sure you flip this clip around, again push it into place, maybe use our screwdriver just to help lock that clip into place. That goes ahead and goes in, slides back. Put in the 10mm bolt. We'll just speed up tightening up that bolt. You want it nice and firm. Put your door panel, make sure your harness gets into this little cavity. Pull it through. You pretty much should just put the panel into place, look back here and see the little green pin is where it's supposed to go. Look over here and push in those pins. You're all good. Connect our switch, and push it down. This has a little line up pin, it goes into a hole in the handle, make sure you push on all four corners. Then, put in our two 7mm bolts. We'll fast forward as we put those bolts and tighten them, you want them nice and snug they don't have to be overly tight, though. Then I'll push this back into place, and one good thing is to make sure your door is unlocked and you are all set.
We hope this video helps you out. Brought to you by www.1AAuto.com, your source for quality replacement parts and the best service on the Internet. Please feel free to call us toll-free, 888-844-3393. We're the company that's here for you on the Internet and in person.
Shop Products


How to Replace Door Latch 1994-2002 Dodge Ram 1500
Check out this video to learn how to replace the door latch assembly on your 94-02 Dodge Ram. 1A Auto shows you how to do it yourself
