How to Replace Rear Drum Brakes 2005-15 Toyota Tacoma
Created on: 2020-04-16
Watch this video to learn how to install new drum brakes and shoes on your 2005-15 Toyota Tacoma.
Tools needed
-
Metal Cutters
Torque Wrench
Hammer
Rust Penetrant
Pry Bar
Copper Anti-Seize
sanding disc
Chisel
Ratchet
Wire Brush
Pliers
One of the first things we need to do after your vehicle's raised and supported is remove all six of your lug nuts and get the wheel off of here.
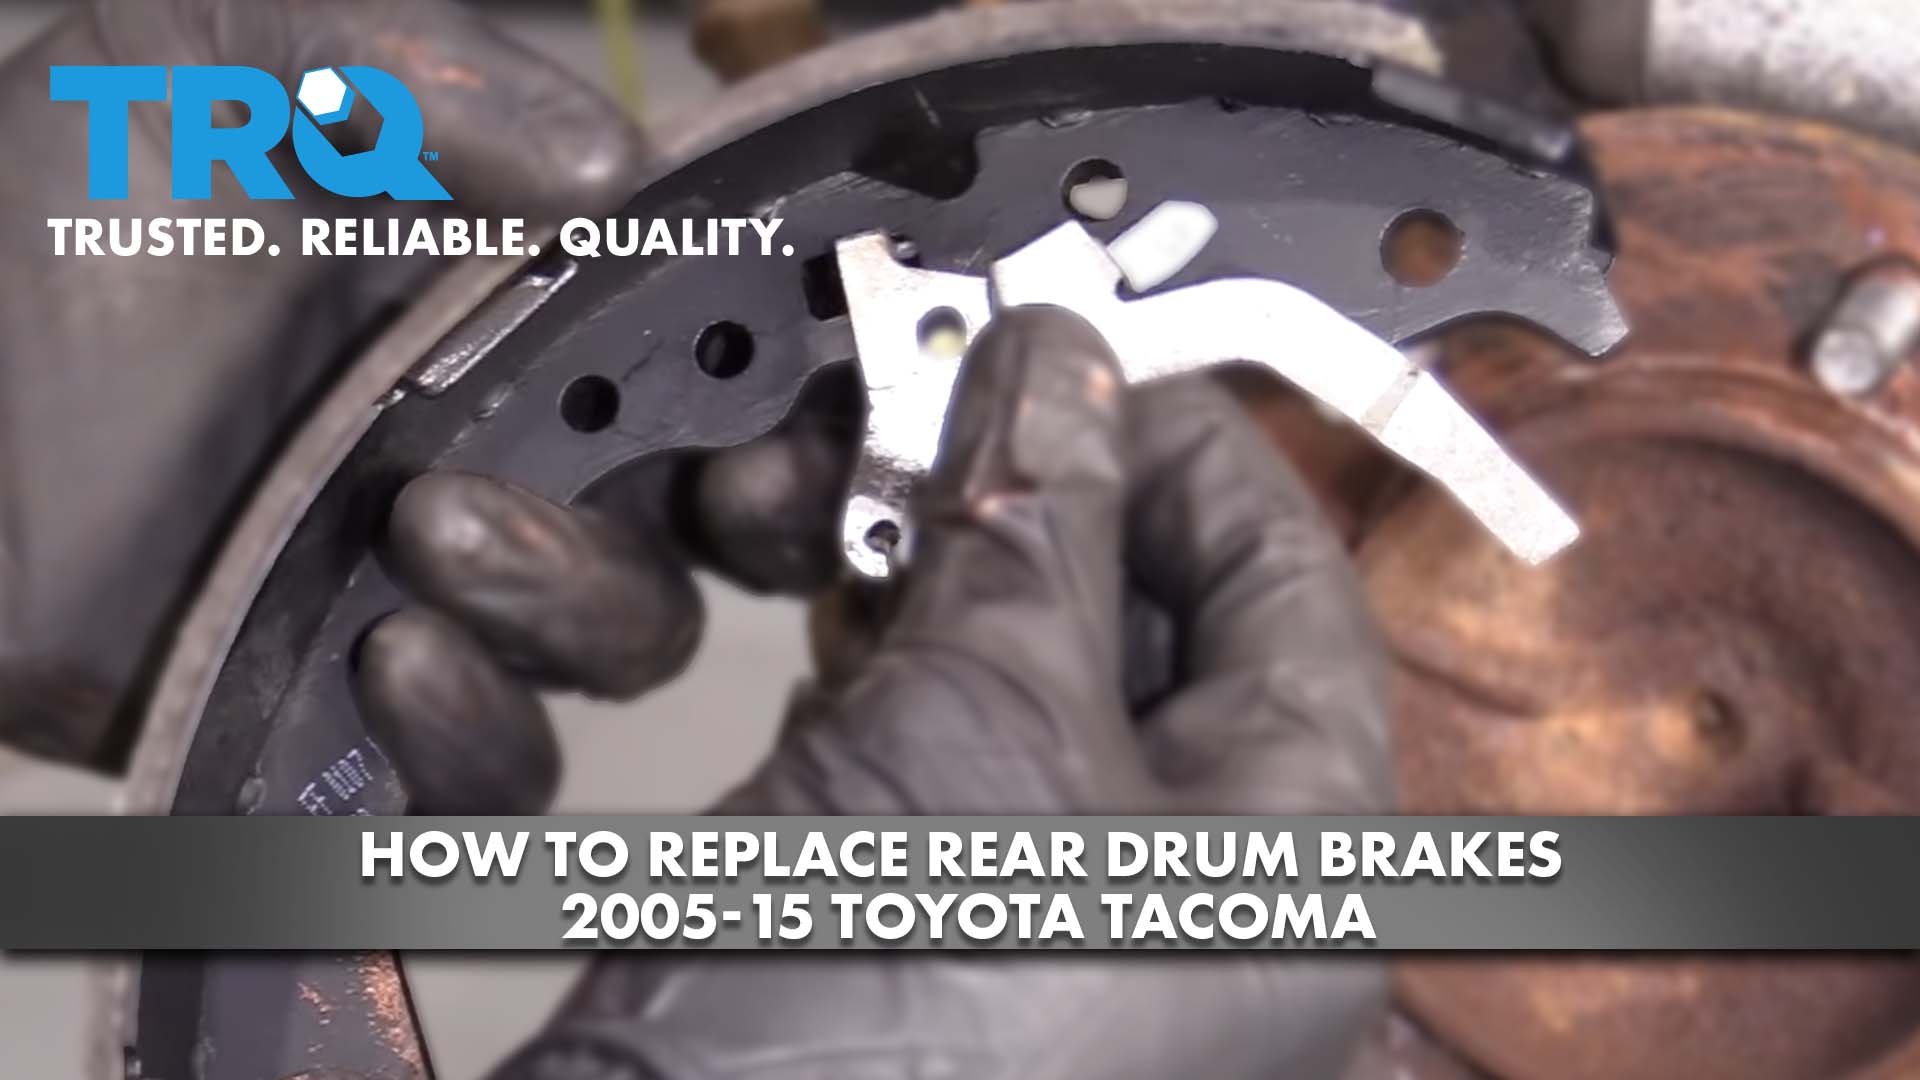
Now, with the wheels out of the way let's spray down this area so we can get the drum off. Now that we've let that sit for a little bit, let's go ahead and give this a bonk. Just be careful for all this stuff that might come flying off. Watch out for that brake dust. The next thing you're going to do is you're going to go ahead and clean this down and get off as much of this brake dust as possible. Don't use compressed air because you don't want the dust in your face. The next thing we're gonna do is use some cutters, but we're going to be careful not to cut our hardware here. Generally speaking, you want to make sure that your hardware is in good condition. If it's still nice and painted, it's probably great. If it's rusted and flaking, it's probably not, in which case you'd replace it. I'm going to use these cutters just to grip onto this spring and pull it off. Once I do that, I can press right here and it'll come off of there. Let's keep this in the same position like this so we can remember. Next, we're going to grab this yellow spring. It should come right off of this. This should just kind of pull and then twist. There we are. Let's get that out of there. So, the next thing we're gonna do is grab onto this orange spring right here, can use our cutters again, just be careful not to cut it, and just pull it right out of this hole right here. There it is. The next thing we want to do is remove this right here. You'll notice that it has a little slash cutout on it. You want to line that up. So, I'm going to press on the back of the pin, you can see that center part right there. That's a pin that actually goes through the backing plate. I want to hold onto that with my finger, grab onto this, press in, and then twist it so it lines up. Take that right off of there. Grab our pin, can put them both together, and just go through like that. At this point, you can grab your shoe and move it around. Now, we're going to come down here. You can see this spring right here, let's get that off as well. There we are. I'm just going to take that spring, set it up with that other shoe so I know where it goes. Let's remove this one as well. Hold on to that pin on the backside. Remove the pin, put them both together. Let's grab onto that shoe, carefully work it outta here. This is looking great. Okay. At this point, it's a great idea to take a look at your wheel cylinder, make sure that you haven't pressed out any of the pistons, and that there's definitely no fluid coming out. If there's fluid coming out, you're going to need to replace your wheel cylinder.
The next thing we need to do is get these little clips off right here. There's two of them. To get them off, we're just going to kind of hit them with the chisel and the hammer here. I'll show you how to do that. You just want to be careful not to destroy them. If you destroy them, you need to make sure that you replace them. So, I'm going to go ahead and hit on both these ears with this chisel, just like this. I'm just going to try to tap it. I can see a little gap right there, that's exactly what I'm looking for. At this point, I can grab that with some pliers, and just help it out of there. That's what it should look like, a nice U, okay? And then, of course, once we slide it back over, we'll crimp this down. If yours is a mangled mass or rotted, you need to replace this. Needs to be in good condition. Now, you would just do the same to the other one. Now, we should be able to grab onto this and you should be able to work it and it'll want to come off. Set that aside. Now, if we look at this, we have this spring that we need to get off. Go ahead and grab onto that, pull it out, slide this right off of here, and this right off of there. Awesome.
So, now, let's take this apart. You got your little cover area here, you need to make sure you clean this up as much as possible. You also have these threaded areas. Take this right apart, and then once you have it apart, just clean up all those threads. Now that we have this threaded area cleaned up, go ahead and put on some copper never-seize, super important. And then, of course, we're going to put this piece back through our spring, then thread this in. We're going to thread it in so it's about where it was before. And/or you could put it all the way in if you wanted to. And then once you've done that, we're going to coat this area and put this back on as well.
Okay. So, we have this whole thing lubricated up. I've got the casing lubricated. This looks great. We'll set it aside. Okay. We have this whole area right here, it's important to clean this up. You want to make sure you get all the rust flakes off of these bonding areas or mating areas, okay? Make sure you get all the rust out of this area right here because it's going to cause noise on the drums. And then once we get it all cleaned up nice and pretty, I'm going to show you where to lubricate. The next thing we need to do is clean down this mating area where the drum's going to ride. You can use a nice sanding disc, you can use a nice brush like this to try to get in between, whatever you have to do to make this as clean as possible. It's important to remember to clean up this area as well. Now, we're just going to use a little bit of a caliper lube, or you can use brake lube, but we're just going to go ahead and lube up all these mounting points. You have one, two, three on one side, you'll have three on the other side in the same areas, and then make sure you get that area that you just cleaned up right here as well.
Before you put away your lube brush, go ahead and get this area where the shoe is going to ride right down along here and right there as well. Coat this area with some copper never-seize. Now it's going to be time to get the shoes on here. It's important to make sure you have the right ones. For the driver side, you want the one with the two little nubs facing towards the front and the one little nub facing out towards the rear. Now, we're just going to clean up the backside of this, where the mating areas are. So, now, let's grab that forward shoe, take off this arm, we're going to clean this area where it mates up as well. Make sure you put a little bit of lubricant on there as well. Okay. So, we've got our matching shoe here, I'm just going to take this pin that we just cleaned up and lubricated, put it right over the new shoe, get it ready. Now, I'm going to take my short spring here, I'm going to get that ready as well. At this point, this is ready for recycling. We'll set it aside.
Okay. So, it's time to get the spring unit onto this rearward shoe. To do that, you can just line this up and then get this one to line up in the hole where it's supposed to go. This is looking great at this point. We can go ahead and grab the portion that's hanging down right there. We're going to slide this right through, just like this. The next thing we're going to do is get this on there. We have our lubricated areas, of course. Just slide it right on over and both those pins should go through. All right. To do these clips, just slide them right over. If it doesn't want to slide over, just line it up, then you can grab it with some pliers usually and help it along. Once it's over, just squeeze those two ears together. They don't necessarily have to be completely up against each other, just enough so that the clip can't come out. That looks great. I've got a nice little gap. Do the same to this one. I'm just going to turn this adjuster all the way in at this point. Now, we're going to line this up, just slide it right underneath that wheel cylinder in between the axle and the wheel cylinder. Perfect. At this point, go ahead and put your pin through from the back and then put your spring unit on here. There it is. I like to put it so it's straight up and down, and then I'll put this so it's straight up and down as well. And then you can grab your needlenose pliers, grab it, and twist it. Press in, give it a little twist, make sure it's completely in the slots. Perfect.
The next thing we're going to do is take this unit right here. It's going to go over this pin. So, just kind of line it up like that. You'll notice the little arm goes inside here, and this should be able to pivot a little bit. Go ahead and grab this spring and bring it down to this hole. Perfect. All right. So, we've got our setup here. We've got our spring on there. This arm is going to go up over this ridge and then over to here, you can see where it fits in perfect. This is going to come right across to here. Just go up and over. Just like that. The spring falls off all the time. This is gonna come across and then it needs to come behind here and then onto there. So, whatever you need to do to make that happen. Make sure the spring's settled in on both sides. Look at this piece, make sure that's in there as well. So, now, we need to get this lined up. You'll notice that this arm right here has a little flippy-do where this arm has to go behind. So, just kind of work it. Generally, if you kind of tug on this, you should be able to get it to go. Awesome. Let's get our other pin in there real quick. Just put it through the hole. Get our clip, line that up straight up and down like the other side, we're just gonna attach this now. Hopefully.
The next thing we're going to do is using a screwdriver, we're going to push this shoe as far as it can go. I want to go right through this hole in the backing plate. That's going to hold the shoe over. After that, we're going to grab onto this spring and give it a tug till it gets inside this hole right here. I'm just going to bring the spring down around the hub here, and I'm going to use that as leverage to put the spring into the hole. Just like that. Okay. Give it a little wiggle, should slide around. Check all of your locations to make sure all of your clips are attached. This is sitting where it needs to sit right here. The spring is behind this area right there, and then also pay special attention to this ridged area along here and just make sure it's not bent over or peened anywhere. If it's bent over, it's going to hit up against your drum and it's going to make a horrible noise. Now, we're just going to grab onto this spring, we've got a little hook, put this hooky-do right over there, and then this one's going to come right behind there. Double-check that one as well. Perfect.
Let's spray this down, and then give it a great wipe. Now, we're just going to remove this rubber dongle. So, now if you were to come through that hole in the backing plate, you can go right up against your star adjuster like this. This is how you would adjust it. As I turn it like this, I can hear the clicking, that's adjusting out. If I needed to bring this back in, I would have to press from the backside with a rod and move this arm right here. Once I move that, I can go in the opposite direction. Let's get our nice clean drum on here. Give it a little spin. We're just gonna listen to this, see if you hear any grinding, if you do, it's more than likely from this area right along here. Perfect.
Now what I like to do to adjust up the wheels is generally speaking what you'd want to do is have the wheel on. You'd have this pressed right up against there and everything's nice and flushed. I like to have it nice and open. So, I'll just take two lug nuts, I'll kind of snug them up like this to the point that the drum can turn like it's supposed to, but it isn't loose from the axle. Do the same on both sides, and once you've done that, you can continue with the adjustment from the back of the backing plate, just like this. So, while we're adjusting this, making it tighter, you need to keep spinning the drum like this, and you want to listen for drag. As soon as you start hearing a [vocalization] that's where you're going to want to pause. All right. So, I can hear a little bit of a scrape there, now I'm going to go over and adjust the other side just like this, and we'll continue. Now that we have the other side adjusted, we're going to get inside the vehicle and we're going to pump up the brake. That's going to make sure everything's settled in the way it needs to be. Once we've done that, we're going to come back out and check that adjustment again. If it feels like now at this point there's no drag at all, we're going to go a little bit more. If it feels like there's more drag, which is highly unlikely, you're going to de-adjust it. Once you adjust it to the point you have very minimal noise/drag, you're doing pretty good.
Okay. Now that that's nice and adjusted up, let's make sure we get that rubber plug back in and let's get the wheel on. Let's go ahead and get the wheel up on here. We're gonna start in all these lug nuts, bottom them out, and then we'll torque them to manufacturer specifications. Now it's time to torque down the wheel to 83 foot-pounds. When you do that, make sure you go in a crisscross pattern.
Torqued.
Shop Products


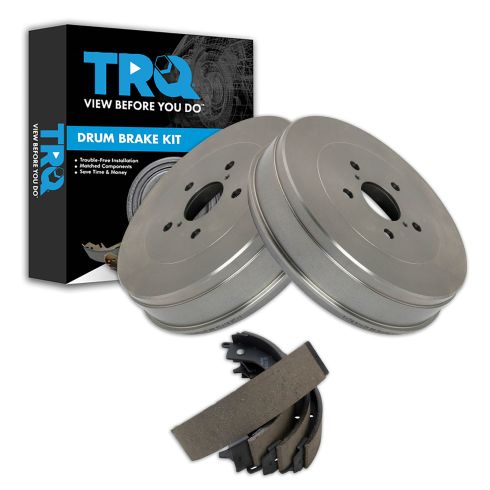
Toyota Tacoma Rear Brake Shoe & Drum Kit TRQ BKA10473
Part Details:
- (1) Rear Brake Shoe Set
- (2) Rear Brake Drums

How to Replace Rear Brakes 1994-2002 Dodge Ram 1500
Watch this video to learn how to replace the rear drum brakes and hardware on your 94-02 Dodge Ram.
