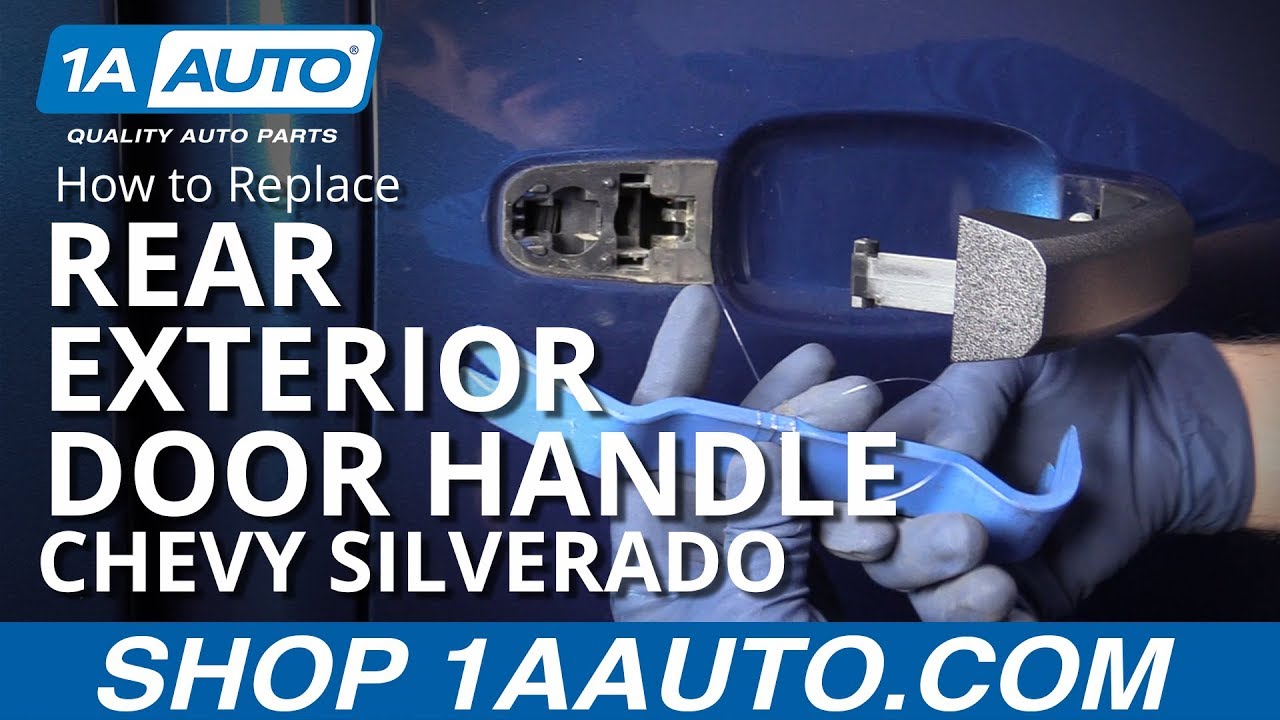
How to Replace Rear Exterior Door Handle 2014-17 Chevy Silverado
Created on: 2019-05-20
Watch this video to learn how to replace a door handle on your 14-17 Chevy Silverado. If it's broken, or you want a new look, 1A Auto will show you how!
-
step 1 :Removing the Rear Door Panel
- Remove the screw cover in the arm rest handle
- Remove the screw cover behind the door handle
- Remove the 7 mm screw behind the door handle
- Remove the two 7 mm screws in the arm rest handle
- Remove the 7 mm screw at the bottom of the door panel
- Pry the door panel away using trim tools
- Lift the door panel up and off
- Pull the lock rod out of the way
- Disconnect the door handle cable
- Remove the wire plastic retainer
- Disconnect the electrical connector
-
step 2 :Removing the Rear Door Handle
- On the side of the door, remove the bolt cover
- Loosen the T20 bolt just enough to remove the handle cover piece
- Pull the handle out, and slide it rearward to remove it from the latch bracket
- Remove the handle
- If you did not remove the rear door panel, skip to step 5
-
step 3 :Installing the Rear Door Handle
- Peel away some of the vapor barrier on the inside of the door
- Disconnect the window motor electrical connector for clearance
- Reach up inside the door to manipulate the door latch lever
- You can also use a screwdriver to manipulate the door latch lever through several holes in the inside of the door
- Hold the lever so that the door handle can reconnect into the door latch bracket
- Reconnect the window motor electrical connector and vapor barrier
- Replace the door handle cover
- Tighten the T20 bolt to secure the door handle cover
- Replace the bolt cover
-
step 4 :Replacing the Rear Door Panel
- Slide the window strip off the top of the door panel
- Remove the three mounting clips along the top of the door panel
- Replace those three mounting clips in their positions on the door below the base of the window
- Slide the window strip in place at the base of the window
- Reconnect the door switch electrical connector
- Replace the wire retaining clip
- Replace the door handle cable
- Pass the lock rod through the hole
- Line up the door panel with the locking clips
- Press the door panel in place
- Replace the 7 mm screw behind the door handle
- Replace the two 7 mm screws in the arm rest handle
- Replace the 7 mm screw at the bottom of the door panel
- Replace the screw cover in the arm rest handle
- Replace the screw cover in the door handle
-
step 5 :Installing the Rear Door Handle Alternate Method
- Loop a length of fishing line around the door latch bracket hook
- Wrap the other end of the fishing line around a tool for better grip
- Install the forward end of the door handle
- Pull on the fishing line to pull the door latch bracket forward
- Fit the rearward end of the door handle into the latch bracket
- Pull the fishing line out
- Replace the door handle cover
- Tighten the T20 bolt
- Replace the bolt cover
Tools needed
-
Socket Extensions
Flat Blade Screwdriver
T20 Driver
7mm Socket
Ratchet
Needle nose pliers
Fishing Line
Trim Tool Set
What's up guys? I'm Andy from 1A Auto. In this video, I'm going to show you how to replace the rear outside door handles on this 2015 Chevy Silverado. If you need these parts or other parts for your vehicle, click the link in the description and head over to 1aauto.com.
All right, to replace this outside door handle, there's two different ways you can do this. You can do this with popping the door panel off on the inside and getting in it, because there's a little bracket right here that you can't get to. Or you can use a little trick, and I'm going to show you both ways to do this.
I'm going to take a straight blade screwdriver. There's a little cover right here, just get in under here. Pull that cover off. And then right here there's a cover. Pull that cover off. I'm going to take a seven millimeter socket extension and a ratchet. I'm going to take this screw out here. There's two in there, and there's also one underneath here. Take all of those out. Now we want to take some trim tools. We want to get underneath the door panel. Just pry it out. There's a bunch of clips that hold it in, like that. Once you get those all out, then we can slide the door panel up, just like that. Pull the lock rod out of the way. This cable, want to push down on this button, slide the cable out, and then pull the ball out. Then this wiring harness, you can pull on that wire retainer, then disconnect the connector right there. Push down, pull it up.
Either way, you need to take this little cover off. Take a straight blade screwdriver and pop this off. So I'm going to take a T20 extension and a ratchet, and I want to loosen this bolt up right here. I don't want to take it out completely. I'm just going to wiggle this outside cover, make sure it's loose. At some point, you'll be able to pull this off and it will come out without taking this bolt out. There we go. And that slides right out. Now to take this part of the handle out, you're just going to slide it and pull it out. So just pull it out slightly, and then it's going to rock and it'll slide out just like that.
Here's our old outside door handle. Here's our new outside door handle from 1aauto.com. We went with a non-chrome look. We wanted to blackout this car, so we've got this textured black handle as opposed to the chrome handle, if you want a different look for your vehicle. The handle itself is the same, though. The mounting positions are the same. It goes on the same way. It has this little rubber gasket, just like the old one. It comes with this cover, as well, the same as the old one. Get yours at 1aauto.com, and you'll be ready to rock and roll.
Then we want to peel this insulation or this vapor barrier back. Just peel that. This has been off before, so it came off pretty easy. With this back, I'm going to disconnect the window motor right there, just so I can have room for my arms. And I'm going to have to reach up here, and it's going to be hard to show on video, but there's a little lever behind that I can push. So what I'm going to have to do, and you might need a partner to do this, so we'll get this started over here. Slide this in, and I'm going to try to push on that lever from the inside. It's very hard to see in there. I'm trying to move that lever. I can actually take a screwdriver through this hole and try to line it up with that lever.
So I've struggled a couple times, tried to get it from underneath here with my hand, tried to go in this hole. Now I'm going to try this hole. I'm going to take a bigger screwdriver, bigger straight blade screwdriver, try to go through here, and there's a lever. Just push on that lever. When I'm pushing, holding that lever down, then I can take the handle, make sure your gasket's okay. That's all set, and slide it in position. And it worked. Reconnect the rear window motor and then put the vapor barrier back up. You can take this cover. I'm just going to slide this handle up a little bit, get the cover in. Put that in position, and then I can start to tighten this bolt with the T20. Not too tight, it is just to secure that piece, so once it's snug, just give it a wiggle, snug it up a little more. Then it's good. Take this little cover, stick that on there.
There's this weather strip piece, or window strip, that goes at the base of the window. You're going to slide this off the door panel, and then there's these little clips. There's three of them. You need to pull those off. Going to use a trim tool, try to slide these out. Sometimes you need some, like, needle nose pliers. Get in there, slide that out. What you do is you get in there and try to squeeze this so that you can pull it off. Squeeze that, pull those out. Now these clips are going to go right here, just like that, all three. Put the clips on first, and then we'll take this weather strip or window strip, slide this in position right here, and press it down, just like that.
ll right, now let's hook the switch up. Push the connector on, and this wire is going to go into that retainer, going through that hole. Take this cable, put the balls through there, and then slide it over. Lock that in place. Take the lock rod, you need to slide it out, thread it through the hole. Once that's thread through, you can get all these pins lined up. Everything's lined up and you can just push the door panel on. Now, there's four screws we want to put in. There's one right there, two right here, and then one down below. Install those four screws with a seven millimeter socket and extension. Then I'm going to take a ratchet and tighten these down, just snug. I'll take this cover, slide that in there, lock it in place. There's a cover right here. this does the same. There you go.
So I'm going to show you how to install this door handle without taking off the door panel. Basically, what you would do is install this side and install this side. There's a little mechanism in there that gets folded back, so you can't do it on this vehicle. Other vehicles have similar setups, but the mechanism stays out when you take the door handle off. For some reason, on this vehicle they don't come off. So what I'm going to do is, I'm going to take a little bit of fishing line, fishing string, and there's a little hook right here. I'm just going to hook onto the center. It looks like a backwards E on this door. So I have it attached to the center of the little bracket in there that looks like an E. I'm going to wrap it around a tool, just so it doesn't cut my hands as I pull on it. All right, so that's good. Get this in position. So make sure this side is in, pull that out, and what I'm doing is actually pulling that bracket. I'm going to pull that, get it lined up, and door opens. And then slide it in position, and I know it's in there properly. I can actually recheck it, and what I can do is take the string and slide it out.
So of the two methods, the fishing line is a lot easier. You've just got to have a little finesse trying to get over the latch. But if you struggle with that, this might be the way you want to do it. Just take the long screwdriver and push it, get it in there.
Thanks for watching. Visit 1aauto.com, your place for DIY auto repairs, for great parts, great service, and more content.
Shop Products

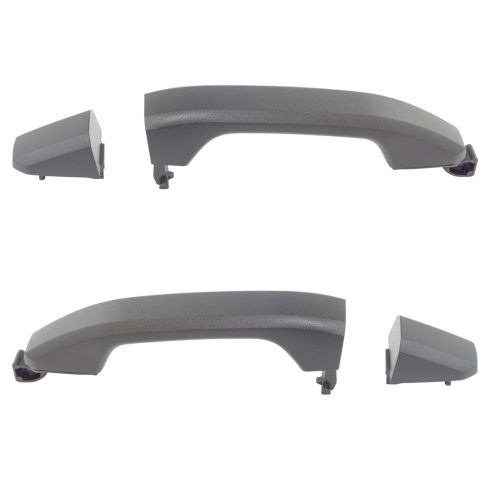
Chevrolet GMC Rear Driver & Passenger Side 2 Piece Exterior Door Handle Set TRQ DHA37226
Part Details:
- Textured
- 2 Piece
- (1) Rear Driver Side Exterior Door Handle
- (1) Rear Passenger Side Exterior Door Handle
- Black

Top 5 Problems Chevy Tahoe SUV 1st Gen 1992-2000
top 5 problems with the 1st generation Chevy Tahoe, part of the GMT400 platform, model years 1992 to 2000: Fuel Pump, Intake Gaskets / Coolant Leak, Power Steering Pump, Windshield Wiper Board and Door Handles.
