
How To Replace Rear Outside Door Handle 2001-06 GMC Sierra
Created on: 2011-06-22
Learn how to replace the rear exterior door panel on your 01-06 GMC Sierra with this video from 1A Auto.
-
step 1 :Removing the Door Panel
- Pry off the inner door handle bezel with a flat blade screwdriver
- Pry off the door lock switch with a flat blade screwdriver
- Pry off the window switch with a flat blade screwdriver
- Disconnect the window switch wiring harness
- Pry off the courtesy light with a flat blade screwdriver
- Pull the light bulb out of the courtesy light
- Remove the 7mm bolt behind the door pull
- Remove the 7mm bolt from the lower front corner of the door panel
- Pull the door panel up off the door
- Carefully peel back the water shield
-
step 2 :Removing the Outer Door Handle
- Pull back the latch rod tab
- Disconnect the latch rod from the outer door handle
- Remove the three 10mm nuts from the door handle
- Pull the door handle off from the outside of the door
-
step 3 :Installing the New Outer Door Handle
- Push the new handle in from the outside of the door
- Start the three 10mm nuts onto the door handle by hand
- Tighten the three 10mm nuts
- Connect the latch rod to the door handle
- Push on the latch rod tab
- Test that the door handle works
-
step 4 :Reinstalling the Door Panel
- Put the water shield into place
- Pull the wiring harnesses through the appropriate door handle cavities
- Put on the door panel using the locating tabs
- Push the door panel clips in
- Insert the 7mm bolt behind the door pull
- Insert the 7mm bolt into the lower front corner of the door panel
- Push the door lock switch into place
- Connect the window switch wiring harness
- Push the window switch into place
- Put on the inner door handle bezel
- Put the light bulb into the courtesy light
- Push the courtesy light into the door panel
Tools needed
-
Socket Extensions
Flat Blade Screwdriver
Rust Penetrant
7mm Socket
White Grease
10mm Socket
Ratchet
Brought to you by 1AAuto.com, your source for quality replacement parts and the best service on the Internet.
Hi, I'm Mike Green. I'm one of the owners of 1A Auto. I want to help you save time and money repairing or maintaining your vehicle. I'm going to use my 20-plus years experience restoring and repairing cars and trucks like this to show you the correct way to install parts from 1AAuto.com. The right parts installed correctly: that's going to save you time and money. Thank you and enjoy the video.
In this video, we're going to show you how to replace the rear outside door handle on this 2002 GMC Seirra Crew Cab, same as a Silverado as well as the same as the rear doors on Suburban. The only tools you'll need are flat blade screwdriver, a 7mm socket, a 10mm socket and then a ratchet and extension.
There are two 7mm screws that you have to remove or bolts: one right in there and then one down in the bottom corner, here. Then, as well, you need to pry out this trim panel, pry out your lock button and pry out your window switch and disconnect it. First put your fingers under it. Pull up that bezel. Take a regular screwdriver stick in the front there, pull out your lock button and on this switch, also pry up gently there. In front of it, there's a little tab. Use your screwdriver, push on it and pull the connector down and out. You can also pry out your light and reflector and disconnect it. Take your 7mm socket and ratchet and extension. We'll just speed up here as we remove those two 7mm bolts. Once everything is unbolted, then you just lift up on your panel and it comes off. Peel your water shield carefully, and pull it back some.
Now inside there's a rod that runs up to the door handle here and you can easily just use your thumb to push that clip off. Disconnect the rod and there's three bolts: one there, one there and then one that's a little bit more difficult, right up in there. For two of them, use a 10mm socket with a ratchet and extension. We'll just speed it up here as I take those two nuts off that are pretty easy to see. Then take my extension off and put my ratchet right up in. We'll speed it up here again as I take that nut off. Take that, and now, your handle pulls right out. You can see this is rusty. What happens is this breaks or sometimes this pin breaks.
Here's my original handle and a new handle from 1A Auto. You can see it's all the same. It doesn't hurt if you want before you put it in, to spray it with some penetrating oil or white lithium grease. You can see that this gets pretty corroded and gets sticky especially if you don't use the doors a lot and that's how the handle can break. The new handle just installs like the old one came out. Put it right in. Use your original nuts. We'll just speed it up here as I start those three 10mm nuts and then use my socket, ratchet and extension to tighten them up. You want to tighten them up firm; they don't have to be extremely tight, though. Reach up in there, connect the rod back into place. Put the clip back down.
Put your plastic water shield back into place. Put your door handle back on, make sure you bring this right up through here, bring your courtesy light through. The white plastic legs down there, get them resting in the door like that. Push the panel against the door. It should slide down nice and easy. Get this bolt next to the armrest. I just put that in backwards.
We hope this video helps you out. Brought to you by www.1AAuto.com, your source for quality replacement parts and the best service on the Internet. Please feel free to call us toll-free, 888-844-3393. We're the company that's here for you on the Internet and in person.
Shop Products


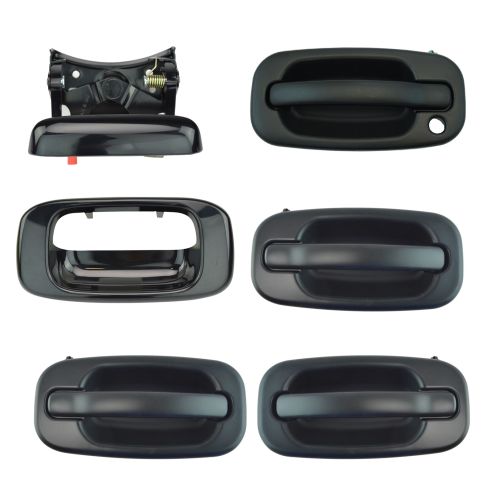
Chevrolet GMC 6 Piece Exterior Door & Tailgate Handle Set TRQ DHA32480
Part Details:
- Black
- Paint to Match
- 6 Piece
- (2) Rear Exterior Door Handles
- (1) Tailgate Handle Bezel
- (2) Front Exterior Door Handles
- (1) Tailgate Handle

How to Replace Rear Exterior Door Handle 2001-05 BMW 325 Xi
Check out this video if you need to replace the door handle on your 01-05 BMW 3 Series. 1A Auto shows you how to do it, step by step!
