How to Replace Rear Power Window Regulator 2002-08 Audi A4
Created on: 2016-03-31
New Window Regulator from 1AAuto.com
-
step 1 :Removing the Door Panel
- Remove the panel covering the battery
- Disconnect the negative battery terminal with a 10mm wrench
- Pry off the silver panel
- Remove the three Phillips screws from the door panel
- Remove the Phillips screw underneath the door pull
- Pry out the door panel
- Unlatch the door handle cable
- Disconnect the window motor wiring harness
- Disconnect the speaker wiring harness
- Lift the door panel up and off
-
step 2 :Removing the Window Regulator
- Remove the three T25 Torx screws from the window motor
- Pull the window module off the door
- Disconnect the wiring harnesses from the module
- Squeeze the clips on the regulator mount and push them through the door
- Pull the wiring harness out
- Pull the water shield up
- Remove the T25 Torx screw
- Pry off the sail panel
- Remove the weatherstrip
- Pry off the rubber boot
- Remove the T45 bolts under the boots and the two atop of the door
- Carefully remove the watershield
- Remove the two T30 Torx bolts
- Squeeze the white clip with pliers and push it through
- Lift the window, window track, and regulator (one piece) up and out
- Remove the T25 bolts holding the window to the regulator
- Take note of how the window is in the regulator
- Lift the window, push the regulator down, slide the window off
- Remove the T25 bolt from the window regulator
-
step 3 :Installing the Window Regulator
- Insert the regulator into place
- Tighten the T25 Torx screw
- Slide the window back in place
- Tighten the two T25 screws to the window
- Remove the wire tie from the new regulator
- Insert the regulator and window into place
- Tighten the two T30 Torx bolts
- Tighten the T45 bolts under the boots and the two atop of the door
- Insert the weatherstrip back in place
- Tighten the T25 Torx screw
- Press the regulator transmission into place
- Press on the two rubber boots
- Press the sail panel into place
- Put the water shield into place
- Mount the window motor to the door
- Tighten the three T25 Torx screws to the window motor
- Connect the wiring harnesses to the window module
- Test the regulator
-
step 4 :Reinstalling the Door Panel
- Connect the speaker wiring harness
- Connect the window motor wiring harness
- Latch the door handle cable
- Lift the door panel into place
- Push in the door panel clips
- Insert the Phillips screw underneath the arm rest
- Insert the three Phillips screws from the door panel
- Press on the silver panel with a flat blade screwdriver
- Connect the negative battery terminal with a 10mm wrench
- Replace the battery panel
Tools needed
-
Flat Blade Screwdriver
T40 Socket
Phillips Head Screwdriver
T30 Driver
10mm Wrench
10mm Socket
Ratchet
T25 Torx Driver
Brought to you by 1AAuto.com, your source for quality replacement parts and the best service on the Internet.
Hi, I'm Mike from 1A Auto. I hope this how-to video helps you out, and next time you need parts for your vehicle, think of 1AAuto.com. Thanks.
In this video, we're going to show you rear window regulator replacement on this 2007 Audi A4. Our procedure is pretty much the same for a 2003-08 A4 as well as S4. We show you on the driver's side, but the passenger's side is the same and in fact we actually show you the passenger's side door panel and then the driver's side regulator so they're interchangeable. You'll need a new window regulator from 1A Auto.com, 10mm wrench, Phillips screwdrivers, small flat blade screwdriver, T-25/30/40 Torx drivers.
Disconnect your battery. On this car there should be a panel on top that you take off a couple of fasteners and lift it up and off, then a 10mm wrench loosen and remove the negative battery cable.
Just pull this trim straight out and work your fingers under, and then it comes forward at the back. Four screws hold it in. There's one up under here and then one here, here, and here. A Phillips screwdriver will remove those. A little difficult. Sometimes you just have to feel for the screw once you have the right angle.
Pull the door panel out and then your door handle cable here, just pull it out of the clip and then just unhook it. On the speaker there are two tabs that you push in, and then on this there's a tab on the backside that you have to push really firm with your finger and pull down. If any of the clips come out when you remove the panel, helps to use just a little glue and glue them back in.
Disconnect window module. Push the tab and pull down. Remove the three T-25 Torx screws that hold the window motor in place. Pull the module off, and there's a tab on this one. Push the tab, pull it out, and on this one, you've got to push the tab underneath and pull it off.
Use needle nose pliers, and you need to push these three posts through. You squeeze the clips and push. Push that through. Pull this clip out. Go up and down and out, and then carefully pull your water shield up, and you want to remove this T25 Torx screw. Move this corner triangle piece just by pulling out firmly.
We have to remove the weather strip so just work your fingers back in, pull firmly, and on each end you need to remove the ends of these rubber hooks just like that. Just pull them out so they're loose. Remove this plug and then there's a similar one in the front.
Four T-45 bolts hold it in place: one inside the hole there, a silver one right here, and this one here on the front. There's another one in this hole here. Remove your water shield and then remove these two T-40 Torx bolts: one here, and then if you peel this down, one here. A little clip right here, just squeeze the teeth on it, pull from the back side. Squeeze the teeth and push that through. Now pull up on the window. This comes up and out.
Remove the two T25 bolts that hold the window to the regulator. Take note of how your window is in the regulator. I'm just going to mark my window on each side so I know to put the regulator back between the blue marks. With the window up, push the regulator down and slide the window down some. Once you get to a point you can slide it kind of kitty corner and pull the window right out. A T25 bolt holds the regulator to the frame.
Reinstallation: you can see we're putting our old regulator on. I'm not one to waste a part. The new ones from 1A Auto are exactly like this and they install the exact same way.
Just put this into place, drop your T25 Torx screw down through and then tighten it up. Even once you have it tightened up it'll still be able to move back and forth slightly.
Slide the glass back in place. Put the front in first and then slide the back in and then just make sure it goes in and slides up and down nice and easily. Then you can just bring your regulator right up to meet it. We'll use the marks I made earlier to line it up. Now reinstall the two T25 screws.
On your new regulator, you might have a wire tie it's right here, just to hold that wheel in. You'd want to clip that wire tie off first and put your rail down in on the frame.
Make sure that your window, the bottom of your window regulator goes down and in, and then as it's going down you want to make sure that these stay out of the way. There's just a little piece of foam here to push in. It likes to get caught. Push it down.
I'm going to reinstall the 6 mounting bolts, the T30s that are on the ends, and then the 4 T45s. These hidden ones, you put them on your T45 bit. This front one, I'm going to pull the weather strip out and go in behind, start it. You don't want to tighten these up all the way because you may want to adjust your window later. We're just tightening them so they're firm and then we're going to back them out a little bit.
Weatherstrip back in place. Just going to bring it up into its groove and then push it in all the way around. Shut the door, check the alignment. You want to push it up, make it a little tighter. Go ahead and do that, and then you can tighten up those bolts the rest of the way.
Reinstall the T25 bolt that attaches the bottom of the regulator to the door. Now you want to reach in here and grab your regulator transmission and pull it into place.
Reinstall the two rubber plugs. Glue on any weather strip that may have fallen down and reinstall the triangle seal at the rear. Put a little extra glue on the top. If you're putting a new regulator on it's a good idea to take your bolts and put them in and tighten them up and take them back out. All three, that just kind of pre-threads the holes. Remount your window motor.
You just want to be careful not to push the transmission back through, so put it into place, line it up, and then before you push on it, start your bolts in. That way if you push it through you can grab the bolts and bring it back.
The gears of the motor need to mesh with the transmission part of the regulator. If you find you're having trouble pushing it on, you can just move the window up and down a little bit. Then it should be a point where you can't push it down because it's hooked in with the motor. Then you can tighten up the bolts.
Reattach the harnesses. I just have the battery hooked up again and the key is on in the vehicle. I can reconnect to my module, that's the window and then I can also just test the locks reaching up, I can hear a click. The locks don't quite work because the door's open and they don't work while it's open but everything's all set. We'll disconnect the battery and shut it off again.
Just end up here, we'll kind of speed through putting the door panel back on. Pretty basic: reattach the harnesses, the cable, and put the panel back on and put the screws back in. If you needed to see this in more detail, just check out our other videos for the rear door panel for the Audi A4.
Press the rubber ends back in and reconnect your battery. Tighten it up with 10 millimeter wrench and then reinstall the panel that should be there.
Thanks for tuning in. We hope this video helped you out. Next time you need parts for your car, please visit 1AAuto.com. Also check out our other helpful how-to and diagnosis videos.
Shop Products


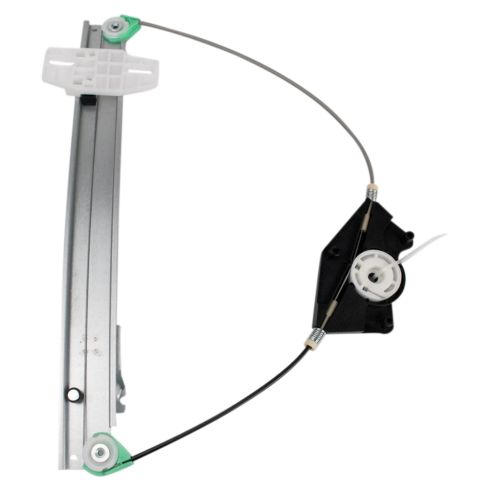
Audi A4 A4 Quattro RS4 S4 Rear Passenger Side Window Regulator TRQ WRA51990
Part Details:
- Yes
- Galvanized Steel
- Electric
- No

How to Replace Front Window Regulator 1999-2007 Chevy Silverado
This video shows you how to install a new window regulator on your 1999-07 Chevy Silverado.
