
How to Replace Rear Shocks 2014-18 Nissan Sentra
Created on: 2020-03-20
Check out this video to learn how to install new engineered to fit TRQ shocks on your 2013-19 Nissan Sentra.
Tools needed
-
14mm Wrench
Torque Wrench
Gloves
16mm Wrench
Locking Pliers
14mm Socket
Jack Stands
18mm Socket
Air Compressor
Assistant
Safety Glasses
1/2 Inch Impact Gun
Underneath the vehicle, I want to support this part of the rear suspension. This is basically a lower control arm. It is connected to the other side. So if you're doing both rear shocks, you can support both at the same time or you could even drive the vehicle up onto ramps on the back. You don't have to take off the rear tires to do this job.
Now I'm gonna use an 18-millimeter socket, take this bolt out. In the trunk of the vehicle, it's a little bit easier to access from the back seat. Fold the back seat down. Right here, this is a little cover. Take that cover off. Take this little cover off right there. And there's a nut right on top, take that nut off.
So to prevent the shaft from spinning, you can use a 16-millimeter wrench for the nut. And then for the top of the shaft, use a 5-millimeter wrench. It's not gonna be easy to get in there, but. It might be slightly easier to use a 16-millimeter ratchet wrench and some locking pliers. Just try not to get on the threads. There we go. And loosen it up. Just use some smaller locking pliers if you can. And try to take that nut off. And when the nut comes off, the shock is gonna fall down. Take that washer out, that bushing out. There's the nut.
Here's the old shock. Just take this cover off, the bumper's in there and we'll reuse this. Now with the new one, we're just gonna exercise it, do it three times. Take the cover, slide that over. Take this washer and this bushing and this pin. Make sure these came out of the old one before you slide this in and then up on top, you're gonna do the same. If you slide this in position, this is gonna go down and then you have your nut.
Then take the shock and slide it in position right here. And then it's best if you have a friend hold this for you while you put the nut on top. All right, take the bushing, put the bushing on first or the mount and take this washer and get the nut started. Now I'm going to take a 14-millimeter ratchet wrench and I'll use some locking pliers to hold the stud, hold the shaft from spinning. And tighten it up. Once it's snug, if you can get a torque wrench in there with a 14-millimeter socket, you can tighten that nut to 15 foot-pounds. Take this cover, put this back on. That's good. Close this up just like that. And then pull the shock down. Try to get the bolt hole lined up. This might be a little bit tricky. What you could do is put some extra weight in the trunk and that'll weigh this down a little bit. That's good. And tighten the bolt up. Torque that bolt to 64 foot-pounds.
Shop Products


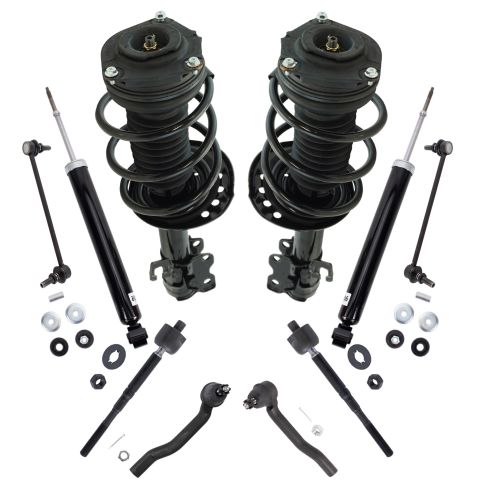
Nissan Sentra Front & Rear 10 Piece Steering & Suspension Kit TRQ PSA42255
Part Details:
- (2) Front Sway Bar Links
- 10 Piece
- (2) Front Strut & Spring Assemblies
- (2) Rear Shock Absorbers
- (2) Front Outer Tie Rods
- (2) Front Inner Tie Rods

How to Replace Strut Assembly 2000-05 Chevy Cavalier
Watch this video to learn how to replace the front strut assembly on your 00-05 Chevy Cavalier.
