
How to Replace Rear Wheel Bearing and Hub Assembly 2004-12 Chevy Malibu
Created on: 2020-08-17
This video shows you how to replace a rear hub assembly on your 2008-2012 Chevy Malibu.
Tools needed
-
Torque Wrench
Hammer
Socket Extensions
Rust Penetrant
15mm Socket
Jack Stands
19mm Socket
Liquid Thread Locker
Brake Parts Cleaner
Brake Caliper Hanger
Socket Driver
Paper Towels
Copper Anti-Seize
Wheel Chocks
Ratchet
Floor Jack
Wire Brush
1/2 Inch Impact Gun
Okay, friends. The first thing you need to talk about anytime you're working on your vehicle is safety. You want hand and eye protection. With that said, safely raise and support your vehicle so the wheels are off the ground. Once you've done that, we're going to remove all five of our 19-millimeter lug nuts. Remove your wheel. Now that we have the wheel off, we have a clear view of our caliper and our rotor. What we need to do first is get the caliper out of the way and then we're going to remove the rotor. Looking at the backside of the caliper, you're going to see two mounting bolts, one located right here, and one located up top. Remove them both and get the caliper out of the way. Remove your caliper. Carefully set it aside. Let's go ahead and get the rotor off of here. And now, we have a clear view of our bearing. Coming from the backside of the bearing, you want to make sure that you remove your ABS wire and be very careful with it because it's extremely delicate. Grab this tab, pull it down, check your wiring. Make sure you don't see any funny colors.
Next, we're going to take some penetrant spray and spray down all of our mounting studs. I always like to go around the center as well. Now, we're gonna use a 15-millimeter socket and remove all four of our mounting nuts. Now, we're going to take a hammer and we're going to try to bonk from the backside of this and just try to help it out. Once it starts breaking free in one direction, we'll come from the other side a little bit and just keep going until it comes out. Looks like it started to move. Grab your bearing, remove your backing plate. There it is, friends. Now that's out of the way, let's clean up the mounting surface. Spray down the area with a little bit of copper never-seize. Before you install your backing plate, make sure you double-check both sides to make sure there's no raised areas that are going to be between mating surfaces. Once you're sure, go ahead and take your bearing, put it through the backing plate, put it through your knuckle, and then go around back and put on those mounting nuts. Little bit of threadlocker. Now, we're going to start on all the nuts. We'll bottom them out and then we'll torque them to 47 foot-pounds. Criss-cross.
Let's get our ABS wire reconnected. Click it in, give it a nice tug. It must be secure. Use some copper never-seize. Make sure you clean the backside of your rotor, where it's going to be mating up against this hub right here. Once you've done that, go ahead and put it on. I always like to start on a lug nut to hold the rotor from moving around. Let's grab the caliper, remount it on here. It's always a great idea to use a little bit of threadlocker on your bolts. Torque these bolts to 96 foot-pounds. Wheel up on here. We'll start on the lug nuts and then we'll torque them down to 100 foot-pounds. Let's torque these to 100 foot-pounds in a criss-cross manner. Torqued. Go ahead and pump up the brake pedal. Let's go ahead and check and top off our brake fluid.
Shop Products


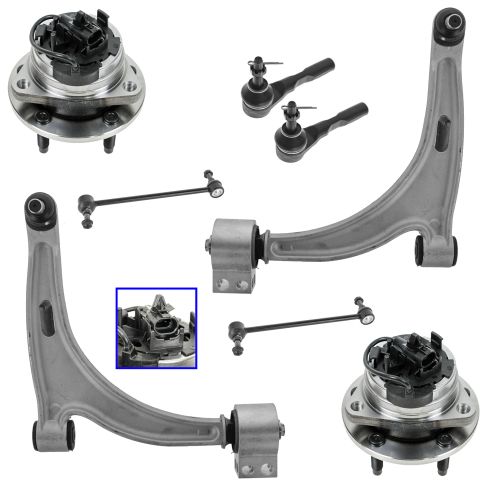
Chevrolet Pontiac Saturn Front 8 Piece Steering, Suspension, & Drivetrain Kit TRQ PSA56382
Part Details:
- (2) Front Outer Tie Rods
- (2) Front Lower Control Arms with Ball Joints
- (2) Front Sway Bar Links
- Ball Bearing
- 8 Piece
- (2) Front Wheel Bearing & Hub Assemblies

How to Replace Rear Wheel Hub Bearing 2013-19 Ford Police Interceptor Utility
Watch this video to learn how to install a new rear wheel hub and bearing assembly on your 2013-19 Ford Police Interceptor Utility, or Ford Explorer.
