How to Replace Rear Window Regulator 2000-05 Buick LeSabre
Created on: 2011-06-11
This video will show you how to remove the door panel and replace and test the window regulator to help you get your windows back in working order
-
step 1 :Remove the door panel
- Pry off the door latch bezel
- Remove the Phillips screw hiding behind it.
- Use a putty knife and a cloth rag to pry up and unclip the door panel
- Unplug the wiring harness.
- Carefully peel back the water shield
- Remove the polystyrene foam block by pulling out the pins.
-
step 2 :Remove the power window regulator
- Unbolt the window from the regulator with a 10 mm socket and driver
- Tape up the window with painters tape to secure it out of the way.
- Un-install the module to pull back the water shield further with your 10 mm socket and driver.
- Unbolt the three 10 mm nuts anchoring window regulator and motor to the door.
- Remove the window regulator and unplug the wiring harness.
-
step 3 :Install the new window regulator from 1A Auto
- Finesse the regulator into the door and situate it into the window tracks.
- Bolt in the three bolts, fastening the 10 mm nuts with your socket and ratchet to install it.
- Plug in the wiring harness.
- Untape the window and lower it into the window regulator and bolt it in.
- Replace the water shield and bolt the module back on.
- Reassemble the door panel by clipping it back on and replacing the Phillips screw.
- Clip the door latch bezel back into place.
Tools needed
-
Socket Extensions
Flat Blade Screwdriver
Phillips Head Screwdriver
Putty Knife
Painter's Tape
10mm Socket
Door Panel Removal Tool
Ratchet
Cloth Rags
Brought to you by 1AAuto.com, your source for quality replacement parts and the best service on the Internet.
Hi, I'm Mike Green. I'm one of the owners of 1A Auto. I want to help you save time and money repairing or maintaining your vehicle. I'm going to use my 20-plus years experience restoring and repairing cars and trucks like this to show you the correct way to install parts from 1AAuto.com. The right parts installed correctly. That's going to save you time and money. Thank you and enjoy the video.
In this video, we're going to show you how to remove and replace the rear window regulator on this 2003 Buick LeSabre. Common problem, the cable in these regulators break. The tools you'll need are a Phillips and flat blade screwdrivers, a putty knife or door panel clip tool, and a 10-mm socket with a ratchet and extension. Take a regular screwdriver, gently pry out, hands under. Pull that trim panel right out. There's a little Phillips screwdriver right here. Remove that screw. Now, you're going to use a putty knife or a door panel clip tool. Work it under. Really pull quick and firm. It comes up and off. Then, in behind here, there's a little lead. The lead is clipped on here. I just unclipped it. Press down that. Take it off.
Speed it up here as you carefully pull back your water shield, and then, there's that Styrofoam block. Use some pliers to pull the pins out and then remove it. I actually ended up breaking it accidentally. There's two bolts that hold clamps to your window, and when the window is all the way up, you can see them right there and there, and what commonly happens on these is the cable snaps. When the cable snaps, you can still pull your window up and down, and that's basically what you want to do. You want to pull your window as far as up as you can so you can get to those two bolts. A 10 mm and an extension. We'll fast forward as I just loosen those bolts up some. At this point here, you would push your window down and then pull it back up free of those clamps. I'm going to replug in my switch here. You can see my window goes down, and those clamps should be loose enough to pull my window up out of the way. Take, use a little painters tape just to kind of hold the window in place. Just taping it to the top of the door frame.
We're going to remove this module here. Really just make it easier to get in there and disconnect the window motor. I'm going to speed it up as I disconnect and then pull the water shield back further. You can see right in here, and our window motor connection and we basically just want to push down on this tab and pull it out. Take a regular screwdriver, and basically, I just kind of worked it in the back here, pried up a little bit, pulled back. Now, remove this nut. I'll speed it up here once again as I just remove the three 10-mm nuts that hold the regulator to the door. Now, I'm going to take the regulator because I want it back like that. It comes out. It should ... kind of come out like that. Here's my original regulator. New regulator from 1A Auto. You can see the new one from 1A Auto is all the same. It's going to bolt in, plug in the same. Just has a little bit shipping tabs on the studs here to just protect it. Only minor difference is that the window motor has a little lead on it rather than a plug on the motor. That actually makes it a little bit easier. This one's working fine in my car, so never one to waste a part.
Put it back in here. I'm going to start with it upside down. Drop it in and down. Eventually, it goes in after contorting it. Pick the back up like that. You need to make sure that the top goes on the inside of your window and guide this stud up and in to there, and the rest of the regulator like that. Start our 10-mm nuts. A little bit of fast forward as we start those nuts and then tighten them up with our ratchet and socket. When you tighten them, you don't have to get them extremely tight. They need to be nice and firm, but you don't want to over tighten them. Take our lead, plug that in. Remove our tape. Slowly bring the window down and get contact into the clamps. With the key on, reconnect our switch. Run it all the way up. Right in here. Tighten these up nice and firm.
It goes up and down, no problem. We use a little bit of white duct tape to put our block back together. Put that back in. Also bolt that module back in. I forgot to film that, so bolt that module back in. Put your shield back on, and then, you're ready to put the door panel back on. Switch back on here. Reconnect this lead. Again, it clips right up here. Now, there's a metal strip along here. You need to make sure it clips in to this channel up here, and it's, usually start out pushing it against ... Make sure you're okay, tabs go in. Carefully put your screw in.
We hope this helps you out. Brought to you by www.1AAuto.com, your source for quality replacement parts and the best service on the Internet. Please feel free to call us toll free 888-844-3393. We're the company that's here for you on the Internet and in person.
Shop Products


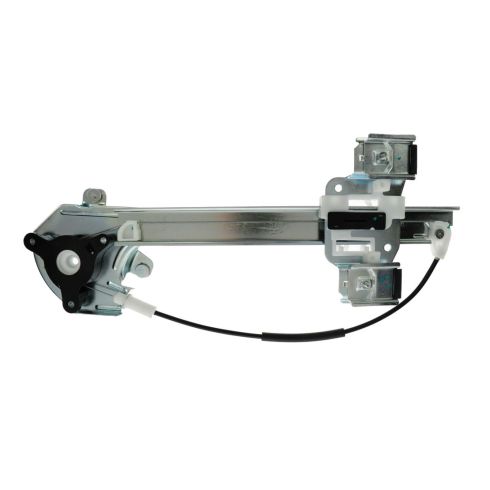
2000-05 Buick LeSabre Rear Driver Side Window Regulator TRQ WRA52377
Part Details:
- Yes
- Galvanized Steel
- Electric
- No

1AWRG00023 Buick Regal Century Oldsmobile Intrigue Window Regulator
Everything that you want to know about part number 1AWRG00023. It's a power window regulator for a Buick Century, Regal, and Oldsmobile Intrigue, years 97, 98, 99, 00, 01, 02, 03, 04, or 05. It fits the driver's side front door, and it includes the power window motor. New Window Regulator from 1AAuto.com.
