
How to Replace Shifter Assembly 2005-16 Ford Mustang
Created on: 2020-04-07
Watch this video to learn how to install a new shifter assembly in your 2005-16 Ford Mustang.
Tools needed
-
Socket Extensions
Socket Driver
Phillips Head Screwdriver
Pry Bar
Jack Stands
Wheel Chocks
Ratchet
Floor Jack
Trim Tool Set
Pick
Okay. So let's get started on this shifter assembly. First, let's get under the vehicle. So now that we're underneath, we gonna go above the rear drive shaft closest to the front yoke, and we'll come looking right up here and you can see the shifter linkage. We need to go ahead and pop the cable off of this right here. Use a pry bar, put it right in between the arm and the cable. And then just twist and it should want to pop off. This piece right here is the adjuster so if you were to move it up and down or this way and this way, you would see that the whole where this lines up would move. I'm going to keep it right where it is for now. Next, we gonna come up forward a little bit further, and we're gonna get the line out of the rest of the assembly.
So if you look at this cable, you're gonna see the bracket that's part of the shifter assembly. And you'll also see like a little hole with a white thing coming through. That's part of this right here, which is the lock. What we need to do is we need to make it so that little piton isn't coming through the hole in the blackness area here, and the same thing up top. So you can use a pick, a small screwdriver, whatever you need to, and I like to come from the forward side of the vehicle and just get right in between like a wedge, wedge it right in between the black and the white, that pulls out that little piton. I'm gonna do the same thing up top. This one I'm gonna use a pick and it's the same, just go right in there. That should wanna spread out. Now at this point, wanna grab right in between here and here and just trying to pop this out. Now that I have both those out like that, I'm just gonna try to pull on this. It's starting to work its way out. There it is.
Okay. So our shifter area right here is broken, but theoretically, that's what it should look like. You would take a nice plastic trim tool. Just try to work your way right underneath this black bezel and then just kind of work your way around. It should wanna pop free. Go around the other side. Once it's all popped free, you would just lift up the black bezel and then it comes up just like that.
The next step of course would be come inside here. You're gonna see two Phillips head screws. We're gonna remove both of those. At this point, should be able to grab this and wiggle it around. We're gonna carefully lift up, pull up on your emergency brake and then lift this up and pull it towards you. As you pull towards you, you're gonna have to work it around everything here, including your emergency brake. There we are. That was easy. We're gonna remove the 10-millimeter headed bolts that are located right in here. And out of there. Now we're gonna move up ahead to here to the bolts in the front, using a 7-millimeter, get those out of there. Now we're just gonna lift this up. All right, if seems like it's getting stuck on these side panels, which is quite possible, you can just grab them and pull them right off. There we are. Keep trying to pull up here. Don't forget when you're lifting up, you've got wiring under here. Just grab your small pocket screwdriver, release the tab, and then pull that out. At this point we're just gonna work this up and over our e-brake lever, get it right out of the way. Go and grab onto that electrical connector, squeeze down on this tab right here, and then pull this out. Let's move ahead to removing our mounting bolts or nuts. You're gonna have one here, one there, and then the same on the other side of the vehicle. So on the rear, it's a nut and on the forward side, it's gonna be a bolt. We'll do the same on the other side. Grab ahold of this. Now when we bring this up, we're gonna need to come up and then out at an angle, just like this. Awesome.
Let's go ahead and get this new shifter down in there. We're going at the same angle we took it out. Let's go ahead and get those mounting bolts and nuts back on there. We're gonna start them all in before we tighten any of them down. At this point, you might notice that you wanna take this and go ahead and put it back into maybe neutral or drive, but it doesn't wanna move. If you were to reach and push on this button right here, then you can squeeze these and pull it back to wherever you want. All right, that's the last one. It's nice and tight. Give that a nice wiggle. We're gonna grab our electrical connector, get it right in here, give it a nice tug.
Okay, so now let's get that big plastic center console in here. Now I'm gonna go over that e-brake Try to get the lever up through here. Grab that shifter handle, make sure that's making its way through like it should. And we're gonna slowly put this down in here. All right. Now we're gonna grab onto that electrical connector, wherever it is. Make its way under there. Grab the electrical connector go ahead and plug it in. Give it a nice tug. Beautiful. Now let's get our mounting hardware on here. We have our 7-millimeter headed bolts. We'll start those in on the front. Now we're going to put in these nuts on the backside here. Awesome. Let's snug 'em all up. All right. Everything's all bottomed out. Let's move along.
Let's go ahead and get our side pieces back on. You've got your little pitons, line them up, and put them in. Nice loving bonk. Do the same on the other side. Now let's get this piece up on here. We're gonna have to come up and over this e-brake so we can get it in through this slot. All right. So this is going to slide right down. Hopefully. There it is. Should come right down like that. Okay. Loving bonk. That's my favorite part. All right. Let's get our mounting screws in right here. One Phillips head right there, one Phillips head right here. Should just wanna slide right down and over. If it doesn't seem like everything's lined up, you could have it on backwards in which case, just kind of spin it around and give that a try. It slides right on. It's important to make sure you keep your shifter in the unlocked position, maybe in neutral or drive, that way there when we get underneath, we can make the adjustments as necessary.
Back under the vehicle, we can grab ahold of this. We're just gonna slide the white piece over both sides of that black piece. And then of course, slide it in. That clicks right in, give it a nice tug. It needs to be 100% secure. If those locking tabs are broken, maybe you tried picking them and you broke them and this thing comes loose while you're trying to drive and or shift your vehicle, it's not going to shift the way it should and you're going to have major issues. Make sure this is locked in and just as important, we're gonna put this on here, listen for a click, give it a tug. That needs to be 100% on there as well. If either of these are loose, you're going to have an issue.
So now this white piece here like I said before, this is gonna be the adjuster. If you were up top and you shifted into park, your little indicator should be right over the P. If your indicator isn't over the P, you need to come back under here and move this either forward or backward, depending on where you're located. And then of course you'd wanna go through the rest of the gears and make sure that the shifter's lined up with the indicator all the way through.
All right. So now we're going to step on the brakes, start up the vehicle, and we're gonna go through the gears. As we get into reverse, we wanna make sure that as we let off the brake, the vehicle is gonna wanna go in reverse. When we get to the D for drive, we want to let off the brake and make sure we go forward. Here we go. Reverse. Drive. Oh yeah, perfect.
Shop Products
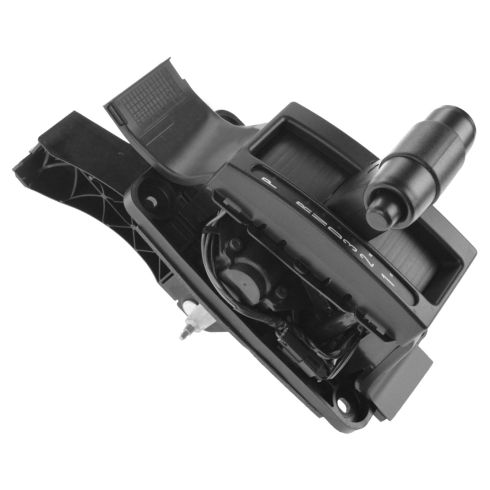
2005-09 Ford Mustang Transmission ID 5R55S Automatic Transmission Shifter Assembly Ford OEM 8R3Z-7210-D
Part Details:
- Black

How to Replace Automatic Transmission Shifter 1997-2003 Ford F-150
If the automatic transmission shifter is loose, stuck, or broken, watch this how-to video and learn how to replace it yourself
