How to Replace Side Power Mirror 1997-2001 Toyota Camry
Created on: 2016-06-29
Check out this video teaching you how to replace a cracked or broken side view mirror on your 97-01 Toyota Camry.
-
step 1 :Removing the Door Panel
- Pry off the trim piece inside the door handle
- Pry off the trim button on the arm rest
- Pry off the trim button on the door panel
- Pry up the switch panel
- Disconnect the window switch wiring harnesses
- Pry off the sail panel
- Remove the three Phillips head screws on the arm rest
- Remove the two Phillips head screws on the bottom of the door panel
- Remove the Phillips head screw in the top left corner
- Remove the Phillips head screw from the door handle
- Pry off the door handle bezel
- Pop out the bottom of the door panel
- Pull the door panel up and off
-
step 2 :Removing the Side View Mirror
- Disconnect the window wiring harness
- Remove the three 10mm bolts from the side view mirror
- Remove the side view mirror
-
step 3 :Installing the Side View Mirror
- Insert the side view mirror into place
- Tighten the three 10mm bolts to the side view mirror
- Connect the window wiring harness
-
step 4 :Reinstalling the Door Panel
- Lift the door panel into place
- Push in the door panel clips
- Tighten the two Phillips head screws at the bottom
- Tighten the three Phillips head screws to the arm rest
- Tighten the Phillips head screw to the top left of the door panel
- Connect the window switch wiring harness
- Press the window switch into place
- Insert the door handle trim bezel into place
- Tighten the Phillips screw to the door handle trim
- Press the trim bezel inside the door handle in
Tools needed
-
Socket Extensions
Flat Blade Screwdriver
Phillips Head Screwdriver
10mm Socket
Ratchet
Pick
Brought to you by 1AAuto.com, your source for quality replacement parts and the best service on the Internet.
Hi, I'm Mike from 1A Auto. I hope this how-to video helps you out, and next time you need parts for your vehicle, think of 1AAuto.com. Thanks.
In this video, we're going to show you how to replace the power mirror on this Toyota Camry. This one's a 1998 but the procedure is pretty much the same for '97 to 2001 Toyota Camrys.
You'll need a new power mirror from 1AAuto.com, a 10 millimeter socket with a ratchet and extension, flat blade and Philips screwdrivers and a small pick tool.
Using a small pick, remove the plastic trim that should be inside the bezel here covering this Phillips head screw, as well as this and this plug in the door panel. Our arm rest is a little stretched out here. Normally, you'll have to take a flat-blade screwdriver, place it underneath, pop up the trim panel, pull it back, move the switch housing from the door, and disconnect the electrical connectors. You'll also want to release the top of this black cover behind the mirror with a flat blade screwdriver, pull out, lift up to release the lock tabs on the bottom. Remove with Phillips head screws from the door panel, three on the arm rest, one on the handle bezel, one here closest to the dash and two underneath with a number two Phillips screwdriver.
Using a flat-blade screwdriver, reach between the bottom of the door handle and the bezel, pop it out, do the same thing on the top just above the lock, open the handle, pull the bezel out. Pop out the bottom of the door panel, lift up and remove the panel from the door.
Peel back the weather shielding on the inside of the door skin. Remove the connector for the mirror, remove the rubber cover on the front, lower mirror nut. Remove all three screws with a 10 millimeter socket and ratchet. Don't remove the last nut entirely until you're ready to remove the mirror from the door. Remove the rest of the last nut, remove the mirror and the wire harness from the door.
Here we have the old mirror which we removed from our vehicle and our new part from 1A Auto. As you can see, these mirrors are identical while this new one does need to be painted to match your vehicle, or you can buy a pair both in the same black and use them so they match.
We have the same three mounting bolts on the side here. It comes with a new insulating form, keep down noise, vibration and seal the weather outside of the car. You'll notice that while our harness is fixed on the OEM mirror, our new mirror comes detachable at the back. Should you ever need to remove this mirror again, there's no reason to remove your entire door panel to do so. You can move the small, black cover here, unbolt it, and disconnect directly from the mirror in the inside of the door. Remove it without having to take the interior part.
If your old mirror has a broken housing, it's falling off, the motor has gone bad or the glass is shattered, this new part from 1A Auto which includes glass already installed in the housing is going to go in. Direct fit just like your original equipment and fix you up right.
Reinstall your new mirror into the holes in the door. Our mirror comes with three new 10 millimeter nuts, we install those. Just hand tight for now. Then the rest of the way with a 10 millimeter socket and ratchet. Reinstall the rubber boot on the bottom bolt closest to the vehicle. This protects it from damaging the paint when we open and close the door. On the new harness that comes with your mirror, we'll install the smaller of the 2 3-pin connectors into the mirror. Reconnect the larger of the two connectors to the female connector in the door. Stick your weather shielding back in place.
After installing your mirror and hooking up the electrical connections, turn your key on and check all four directions to make sure that the motor operates properly.
Reinstall your door panel. Hook this channel into the top of the door, line up the plastic clips into their appropriate holes. Make sure that your door lock and window switch wires are pulled through the panel so they don't get locked behind it. Pop the panel back into place and reinstall your hardware. Reinstall the two Phillips head screws at the bottom, three in the armrest. The screw at the top-end side edge of the panel and its plastic cover.
Reconnect the electrical connectors on your lock and window switch. Slide the front tab onto the panel and snap the back and sides into place. Open the handle, slide the hook on the back of the bezel into the square hole. Snap the rear tabs into place, reinstall your Phillips head screw. Snap the crew cover into place, and now we have a nice, new handle and bezel assembly in our door. Reinstall the back of the mirror cover, hooking this tab into the square slot, snapping this one into the plastic retainer there. Reinstall the plastic cover for your armrest grip.
Thanks for tuning in. We hope this video helped you out. Next time you need parts for your car, please visit 1AAuto.com. Also check out our other helpful how-to and diagnosis videos.
Shop Products


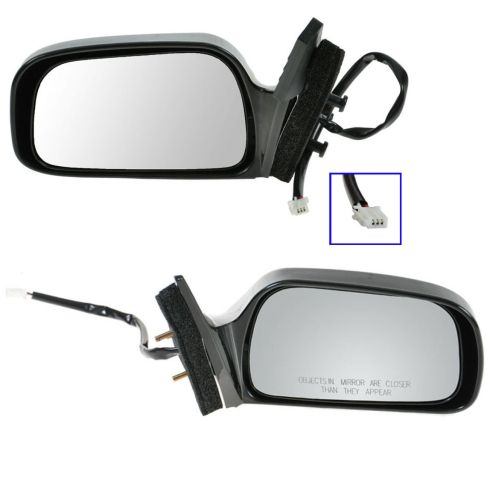
1997-01 Toyota Camry US or Japan Built Models Driver & Passenger Side 2 Piece Power Without Memory Paint to Match Mirror Set TRQ MRA09096
Part Details:
- 2 Piece
- Paint to Match
- (1) Passenger Side Mirror
- (1) Driver Side Mirror
- Electric
- 3
- 3
- No
- Black
- No
- No
- Manual
- No
- Plastic
- No
- Yes
- No
- Without Memory
- Smooth
- Yes
- Black
- No
- Smooth

How to Replace Mirror 1997-99 Toyota 4Runner
If the side view mirror is broken, this video shows what the steps are to replace it
