
How to Replace Side View Mirrors 2009-12 Toyota RAV4
Created on: 2019-09-23
This video shows you how to replace the side view mirror on your 09-12 Toyota RAV4. 1A Auto shows you how to do it yourself so you can save money!
-
step 1 :Removing the Front Door Panel
- Pry off the sail panel behind the mirror
- Pry up underneath the window switch bezel
- Disconnect the window switch connector
- Pry out the trim piece behind the door handle
- Pry off the trim bezel from the door pull
- Remove the Phillips screw from the door handle
- Remove the two Phillips screw from the door pull
- Pry out the door panel from its clips with a trim tool
- Lift the door panel up and off
- Unclip the door handle
-
step 2 :Removing the Side View Mirror
- Disconnect the mirror electrical connector
- Remove the three 10 mm bolts
- Support the mirror while removing the last bolt
- Push down on the retaining tab
- Remove the side mirror
-
step 3 :Installing the Side View Mirror
- Install the back plate onto the mirror
- Pass the mirror wire through the door opening
- Align the side mirror with the door
- Install the three 10 mm screws
- Connect the mirror electrical connector
-
step 4 :Installing the Rear Door Panel
- Clip on the door handle
- Lift the door panel up into place
- Press in the door panel clips
- Tighten the two Phillips screws to the door pull
- Tighten the Phillips screw to the interior door handle
- Press on the interior door handle trim
- Press on the door pull trim
- Connect the window switch wiring harness
- Press the window switch into the door panel
- Press the sail panel behind the mirror into the door
Tools needed
-
Flat Blade Screwdriver
Phillips Head Screwdriver
10mm Socket
Ratchet
Trim Tool Set
What's up, guys? I'm Andy from 1A Auto. In this video, I'm going to show you how to replace the mirror on this 2010 Toyota RAV4. If you need parts for your vehicle, click the link in the description and head over to 1AAuto.com.
I'm going to take a trim tool and just get underneath this trim right here. Slide it out. There's a little clip. I'm going to take this piece off, right here, this little trim cover, it goes under here. Just use the trim tool. Grab that. There's clips that hold that in, clips right there on top and bottom and on the front. I want to take this cover off. Just use the trim tool right here. Just get under there. Pry that out. There's clips that hold that in. Two right there, clip there, there, there, and there. Take the trim tool, go in right behind here, slide up, this slides right out. There's clips right there, clip right there, on the sides. And this just makes it easier to disconnect this connector rather than leaving this connected. So there's a little lock right there. Push down on that lock. If you take a trim tool, get in right here, right here. You can't pull on the wires because it's separate from the connector. There we go. It slides up like that, and then you can disconnect the connector.
Now there's three Phillips head screws right there. I'm just going to use a Phillips head screwdriver, take these out. If you have to, use a magnet. Get them up. Take that one out. I'm going to take a trim tool, go around the door panel, some clips. And just twist to the side a little bit. Just grab the door panel, slide it up slightly, and slip it out. There you go. Comes off nice and easy.
Disconnect this connector. There's a little lock tab right there. Just push down on that. Slide it out. If you need a little pocket screwdriver, just use that. That's good. Now I'll take a 10 millimeter socket, extension, and a ratchet, take these three bolts out. And be careful, you want to support the mirror once you get the last bolt out. Makes it easier if you have the window down also. Grab the mirror. There's a little tab right here. Push down on that and slide it out. And there you go.
Here's the old mirror assembly. Here's the new mirror assembly from 1AAuto.com. Comes with the cover off so you can actually paint it to match the vehicle or you can just install it black. Or even if your old mirror has paint on it, you could pull the cover off and install it on the new one. The connector is the same. It has the same rubber piece right here. Get yours at 1AAuto.com and you'll be ready to rock and roll.
All right, first I'm just going to position the mirror like that. Now, there's clips on the backside of here. So if you were to take them off, just get in behind with a trim tool. Pop those out. Just line this up. And lock it in place. Just like that. Now take the mirror, we're going to fish the wire through there. Get this lined up. Just make sure it looks good from the outside. It looks good. Now we'll get our screws. Get these started. Now I'll take my 10 millimeter socket, extension, and ratchet. Snug these up. That's snug. Make sure they're all snug. Not too tight because the mirror is plastic. That's good. Take the connector, line it up, lock it in place.
Now we'll take this door panel. We want to slide the wiring harness through there, and then take the handle, slide the handle through there. Get that in position. That looks good. Now we're going to slide the panel from up top near the window. Get that lined up first. Once that's lined up, just check to see if these pins are lined up with the holes. When they are, just give it a little tap. Go all the way around like that. And just feel and make sure the panel is flush with the door. That looks good.
Now I'm going to take these screws. The longer ones are going to go in where the handle is, right there. And use a Phillips head screwdriver. Tighten that up. And this one's going to go right here where the handle is, the door handle. We're going to put this cover on first. Doesn't really matter which order you put them on. Lock that in place. Put this cover on right here. Lock it in place. Take the window switch. We're going to line up the connector. Push that in, and then push down that little lock down. Take this position, this right here first, and then push down on the front. Just like that. Take this little cover, just line this up, lock it in place.
Thanks for watching. Visit 1AAuto.com for quality auto parts shipped to your door, the place for DIY auto repair. And if you enjoyed this video, please click the subscribe button.
Shop Products
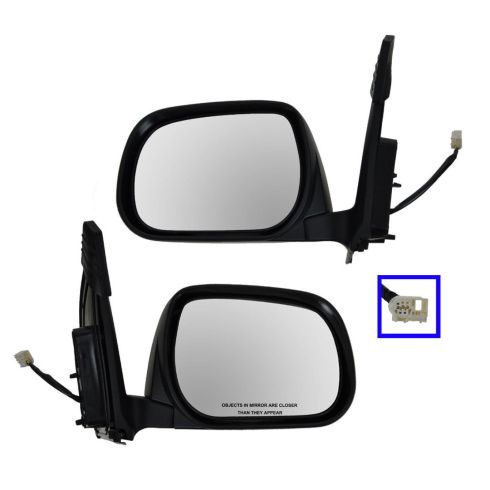
2009-12 Toyota Rav4 North America Built Models Driver & Passenger Side 2 Piece Power Without Memory Paint to Match Mirror Set TRQ MRA04762
Part Details:
- 2 Piece
- Paint to Match
- (1) Passenger Side Mirror
- (1) Driver Side Mirror
- Electric
- 3
- 10.47 in
- 3
- No
- Black
- No
- No
- No
- Manual
- No
- Plastic
- No
- Yes
- No
- Without Memory
- Smooth
- Yes
- Black
- No
- Textured

How to Replace Mirror 1998-2004 GMC Sonoma
How to repair, install, fix, change or replace a broken, smashed, cracked, or shattered rear side view mirror on GMC Sonoma, years 99, 00, 01, 02, 03, and 04.
