
How to Replace Starter 2004-07 Toyota Highlander L4 2-4L
Created on: 2018-01-22
New Starter from 1AAuto.com How to repair, install, fix, change or replace a broken, damaged, worn or faulty ignition starter switch on 04, 05, 06, 07 Toyota Highlander L4
-
step 1 :Removing the Battery
- Disconnect the negative battery cable with an 8mm wrench
- Disconnect the positive battery cable with an 8mm wrench
- Remove the battery mounting bolt
- Remove the battery mount
- Remove the bolts that connect the battery tray to the radiator support
- Pull out the battery tray
-
step 2 :Removing the Starter
- Locate the starter on top of the transmission
- Pull off the rubber boot
- Press the tabs and disconnect the wiring harness
- Remove the 12mm ground bolt
- Remove the two 12mm bolts holding the starter to the transmission
- Remove the starter
-
step 3 :Installing the Starter
- Insert the starter into place
- Tighten the two 12mm bolts to the starter
- Torque the two 12mm bolts to 27 foot-pounds
- Tighten the 12mm ground bolt with a 12mm wrench finger-tight or to 7 foot-pounds
- Connect the wiring harness
- Press on the rubber boot
-
step 4 :Reinstalling the Battery
- Put the tray clip into place
- Put the battery tray into place, front first
- Then slide the rear bolt hole over the bolt
- Insert the two bolts into the radiator support
- Put the battery on the tray
- Put the battery mount in place
- Tighten the 13mm battery mounting bolt
- Reconnect the positive battery cable
- Reconnect the negative battery cable
Tools needed
-
14mm Wrench
Socket Extensions
Torque Wrench
Rust Penetrant
10mm Wrench
10mm Socket
Ratchet
Hi, I’m Mike from 1A Auto. We’ve been selling auto parts for over 30 years!
Open the hood. We have to pull the release inside the car. It's just inside right around your left knee on the driver's side. You need to release the secondary or safety release, just kind of feel around for it. This one is right here. Squeeze up. Use a 10-millimeter wrench to loosen this so you can remove the negative terminal. This one's a little loose just from being rusty. If you needed to, you could use an adjustable wrench because that would probably fit better and do the same thing, loosen it. Once it's loose, you should be able to wiggle it free and then you can just push it aside.
Disconnect the positive terminal. We're going to lift up on the protective cover. Use a 10-millimeter wrench to loosen it. You don't have to take that all the way off, just get it loose enough and then you should be able to wiggle it free. Put that over there. Just going to spray some rust penetrant on these because they're rusty. Same for this bolt over here—get it from underneath. Use our ratchet extension and 10-millimeter socket. Don't need to fully loosen this one. Work on this bolt here. This should unhook. Just kind of have to play with it a little bit to get it to unhook from where it hooks underneath, but you don't have to take the nut fully off. We'll put this aside.
Now you can lift the battery out of the engine compartment. This is probably pretty heavy so be prepared. And then just put this in a safe place.
With the battery out of the way, you can reach down and pick up the plastic tray. Just kind of sits in there.
The starter is located right here in the top of the transmission. Pull these positive cables out of the way. There's the electrical connection. That's the signal wire, and then the direct power is right here.
You can pull the rubber boot down. I'm going to unplug this. I'll put the rubber boot back up. Unplug this first and push down on the lock. Sometimes you need two fingers, and then with other fingers you can push down and pull it out. Just put that aside. Move the boot out of the way.
Just going to spray some rust penetrant on here. Looks a little rusty, corroded. There's a 12 millimeter bolt, needs a 12 millimeter box wrench to loosen it. Reach in, take it off with my fingers. Boot's kind of in the way, just push the boot out of the way. And we'll pull this off. Put that off to the side. There are two bolts holing the starter to the transmission. There's one here and one back here.
I'm going to spray some rust penetrant on them. The seal's pretty tight between them, but it might soak in there and help. Use 14 millimeter box wrench to break these bolts free. I've done the hard work of loosening them with the box wrench, so I'm just going to use a small ratchet with a 14 millimeter socket, spin them out quickly. Put that bolt aside. And there it is. Starter's loose. Pull it from the transmission. Kind of have to maneuver it out of here. Just going to push it backwards. And then, slide it up this way. Maneuver it right out of here. There is our starter.
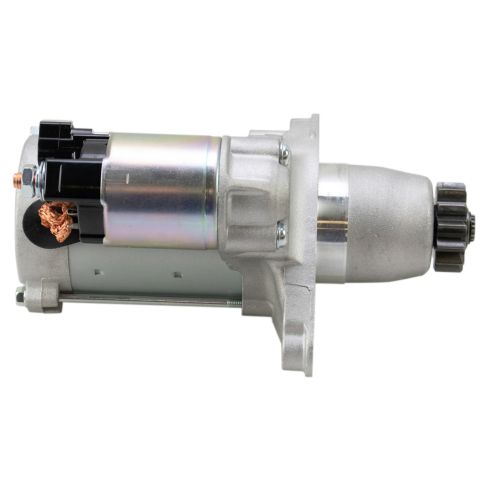
Here’s our original starter from our vehicle. Here’s a brand new one from 1AAuto.com. Same style mounting. Turn them around here. Same style electrical connector. Same style positive terminal. This is a brand new starter. There's no need to send it back for a core. This'll fit great and work great in our vehicle.
Feed our starter in. Kind of the reverse of the way I took it out. Maneuver it down in here. Got to go beyond this. Get it into the transmission opening. It gets a little hung up on the harness that's right here. Just kind of wiggle it in. And I'm going to turn it and get it to line up. So right there should do the trick. Pull the harness out of the way.
Going to reinstall the bolts. Both bolts are the same. Might have to move this around, get it to line up. I'll thread it in by hand. The same with the back one. Find my way back here with it. Move this around, get it lined up and installed. Using our torque wrench, and a short extension, because it's difficult to get the torque wrench in there with the bolt. The torque on this is 27 foot-pounds. Going to reconnect the wires. Start with the positive one. So I'll take off the nut that came with the starter, and place it right over.
This replacement nut is 13 millimeter, as opposed to the original was 12. I'm going to get it threaded down there and started. The torque on this is seven foot-pounds. Very, very light. So I'm just going to do it by hand. Seven foot-pounds really just feels kind of like finger-tight. Don't want to break the stud off the starter, so as soon as you feel it get tight, just like that, and I'll go about a quarter turn more. Perfect. Put the rubber cap back on. Don't want it to ground out. Find the electrical plug, and it's stuffed under here. Plug that back in. It's locked into place. Starter is installed.
I'll reinstall the battery. I'm going to reinstall the tray. It's got these two little plastic bumps that are going to fit right here with the metal battery support. Kind of cleaned some of the dirt out of the tray. Should just kind of find those. There it is. It just sits in there.
Replace your battery back in the engine compartment. Not going to hook it up, going to install the bracket first. Back of our bracket has a hook and you want to go down here and hook it into the opening, just like that. Lay the bracket on top. It sits over here on the radiator support. Install this 10-millimeter bolt, nice and tight. That's still hooked in there. Now I can tighten this down. You don't have to over-tighten this but you want it tight. So once it gets tight, just stop. Just don't want the battery to bounce around or go anywhere.
Reconnect the positive terminal first. Tighten it up. Put the cap back on it. Reconnect the negative terminal. Tighten it down. That's tight, battery is replaced.
Thanks for watching. Visit us at 1AAuto.com for quality auto parts, fast and free shipping, and the best customer service in the industry.
Shop Products
Toyota Lexus Pontiac Scion Starter TRQ STA03075
Part Details:
- 13
- 1.5 KW
- 12 VDC
- DENSO
- No
- 7.875:1
- Counterclockwise (Left)
- No
- Aluminum
- Yes
- Offset Gear Reduction
- No

How to Replace Direct Drive Starter 1982-91 GMC Jimmy Full Size
Watch this video to learn how to fix a car that won’t start. The experts at 1A Auto show you how to replace the starter on your 83-91 Chevy Blazer or GMC Jimmy.
