
How to Replace Sway Bar 1997-2005 Chevy Venture
Created on: 2011-02-17
Watch this video to learn how to replace the sway bar links on your 97-05 Chevy Venture. The process is similar for other GM vehicles as well.
-
step 1 :Remove the wheel
- Loosen the lug nuts
- Raise and secure the vehicle
- Remove the lug nuts and the wheel.
-
step 2 :Remove the stabilizer link.
- Jack up the control arm to relieve pressure.
- Remove the 13 mm nut and use a pair of vise grips on the bushing to remove the stabilizer link.
-
step 3 :Remove the sway bar
- Unbolt the two 15 mm bolts securing the mounting brackets.
- Pull off the bushings and remove the sway bar.
-
step 4 :Install the new sway bar
- Slide the sway bar into place.
- Put the bushings on and clip the brackets on.
- Install the stabilizer links.
- Put the bushings into place and thread in the stabilizer link bolt and screw down the nut at the top.
- Bolt in the sway bar brackets using your socket and wrench.
-
step 5 :Put the wheel back on
- Hand tighten the lug nuts.
- Lower the car.
- Torque the lug nuts, using a star pattern to 100 ft lbs.
Tools needed
-
Flat Blade Screwdriver
Torque Wrench
15mm Socket
Rust Penetrant
Jack Stands
19mm Socket
Lug Wrench
Ratchet
Floor Jack
1/2 Inch Socket
Brought to you by 1AAuto.com, your source for quality replacement parts and the best service on the internet.
Hi. I'm Mike Green. I'm one of the owners of 1A Auto. I want to help you save time and money repairing and maintaining your vehicle. I'm going to use my 20 plus years experience restoring and repairing cars and trucks like this to show you the correct way to install parts from 1A Auto.com. The right parts installed correctly. That's going to save you time and money. Thank you and enjoy the video.
In this video we are going to show you have to replace the front sway bar or stabilizer bar on this Chevy Venture. The stabilizer bar does fit a whole bunch of different GM cars and minivans so the procedures are going to be basically the same as this vehicle although there may be some differences if you're doing it on an Impala or a Grand Prix. Tool you will need include a flat blade screwdriver, 19 mm socket and ratchet or your tire iron, jack and jack stands, torque wrench, penetrating oil, in. socket and ratchet, hammer and also a 15 mm socket and ratchet.
Start by removing the wheel. Use a screwdriver to pry off the center cap. The wheel lug nuts are 19 mm. If you're using hand tools you will want to have the vehicle on the ground, loosen up the lug nuts and then raise up the vehicle and secure it. Remove them the rest of the way. I'm going to use air tools. I'll fast forward through finishing this and obviously you want to take this wheel off and the other wheel off as well. You can see I've sprayed this link with lots of penetrating fluid and what I'm going to do is I'm going to jack up the suspension here. What that's going to do is release some of the pressure. You can actually see that this stabilizer bar is cracked right there. Jacking it up to relieves some of the pressure. On this vehicle these are half in. It could be different. It could be a 13 mm on your vehicle, but you want a wrench on top and something to hold it on the bottom and pull. The longer you soak it with that penetrating fluid, the easier it will come apart. The only reason I'm fast forwarding here is because obviously I'm doing everything on the passenger side, but what I'm doing off camera is once I complete one step on the passenger side I'm doing that same step on the driver's side. Just something to keep in mind as I let this down here. Now you want to spray a whole bunch of penetrating oil down on the shaft of that bolt. I've got a set of vice grips on the middle of the bushing and my wrench down at the bottom and I'm just working that bolt free of that bushing. Now I'm basically just taking a hammer and beat on it. You can see it starts going down. Then you can pull that right out. Then pull that whole assembly right out.
Right in here you've got two 15 mm bolts and if you turn your wheels all the way to the other side it's pretty easy to get in there. I've got a deep reach socket although you can get in there with a regular socket as well. They are actually not that difficult. I'm just going to use an air ratchet and speed this up a little bit. I repeated that procedure for the other side and this might give you an idea of why these need to get replaced sometimes. Part of the end just fell apart. What are going to want to do is pull off these bushings on the other side as well. I've got the other side pretty much free. I'm going to freeze it for a second here. This is the part if you have an Impala or a Grand Prix or a Regal you may need to actually drop your engine carriage down which is nothing more than the two big bolts underneath those brackets. Support it with your jack. Undo those two bolts and let the engine carriage down a few inches and that gives you more room to do this if you have a problem getting the bar out. Bend it down like that. It will pull right out. Like I said you can see on this side that's what happens to them. They are hollow so they get some moisture in there and then they end up breaking on the end.
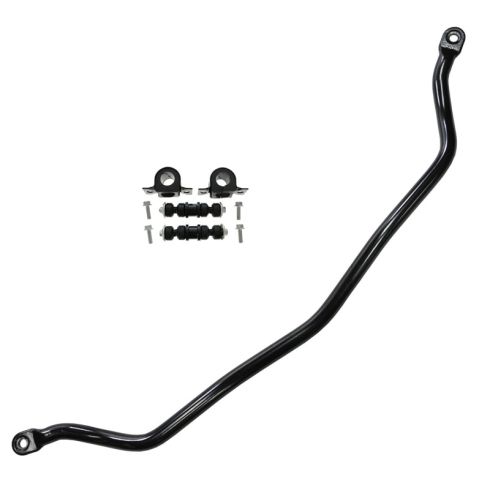
Here's the new bar from 1AAuto and our bar is solid. It's not hollow so you won't ever have that problem again even though the car may not last another 100,000 miles. It does go in. It's got a bend in the middle and that goes up so you want to feed it in there that way. Slowly feed it in. Our bar comes with all new bushings and brackets. The bushings just have a split in them. Feed them around the bar. It's roughly in place.
What I'm going to do is just use a little bit of hand soap and just put it on the inside of this bracket here. Makes it that much easier. You don't want to use grease or anything because that could eat away into the bushings. The hand soap is nice and mild. It just allows the bracket to go down on there quite a bit easier. I'll repeat that on the other side.
Now to put your end link in you want to undo it here. You've got the washer in that bushing and then take out this whole assembly here which is two bushings and a spacer. Carefully put that right in between the stabilizer bar and your control arm. Then you've got your link with the bushing on the bottom, push that up through. Finish it off with your bushing on top. Then start your nut on top here. Then you want to put the other side together the same way.
For the bushing I'm just going to use my original bolts because they are flattened here which makes them easier to start. It does come with new bolts, but since they don't have this shoulder on them they are a little more difficult to use. If you break your bolts obviously you can use these. I prefer using the original ones.
You have to keep the wheel straight or else the bar interferes with the steering until you get it somewhat bolted down. You can see I've got my bracket on here. I've got one side down and I'll try to start this rear bolt. I've got both those started. I'm going to go do the same thing to the other side. That's what this is. You do one thing on one side and you do the same thing on the other side until you start getting it going.
Now what we want to do is tighten up our length just preliminarily. You don't want to tighten it up all the way. You don't want to tighten anything up until you have the weight back on the front suspension. What I'm going to do is- I'll just tighten up the other side a little bit. I have the brackets on both sides and the links started. What I've done, see I've got it on my wheels with a piece of wood. Then over here I have it on my jack so all the weight is on the front suspension which it should be. You can see the vehicle is off the lift. Basically the procedure now is I'm going to tighten up my bracket bolts not all the way tight, but just so the bracket is about in away from the frame.
Then once I tighten those bracket bolts then I'm going to tighten up my links all the way. Then I will finish by tightening up the bracket bolts. Now I am tightening up the bracket bolts and again not tightening them up all the way yet. Actually what I'm doing there is I'm kind of pressing down on the bolt with the socket which helps start it. I found that one of them wasn't quite started yet, but I'm tightening those up. Now off camera I tightened up the other side and I tightened up the link so now I'm tightening up the link on my passenger side all the way. Basically you tighten until you can't tighten anymore. You don't have to be extremely tight. Then once you're done with the link then you tighten up the frame bushing bolts all the way. Then you can jack up the vehicle and remove the jack stands or actually jack up the vehicle some, remove the blocks from under the wheels, put your tires back on, remove the jack stands and put the thing back on the ground and you're all set. Here I am putting the wheel back on. I'll put the lug nuts on with my fingers. Then I'll use the air wrench to just tighten them up a little bit. Then with the wheel on the ground I will tighten them up to 100 foot pounds with the torque wrench. I'll use a star pattern crisscrossing.
We hope this helps you out. Brought to you buy www.1AAuto.com, your source for quality replacement parts and the best service on the Internet. Please feel free to call us toll free 888-844-3393. We're the company that's here for you on the Internet and in person.
Shop Products

How to Replace Front Sway Bar Links 2012-17 Toyota Camry
This video shows you how to install new TRQ sway bar links on your 2012-17 Toyota Camry.
