How to Replace Sway Bar Link 1999-2004 Honda Odyssey
Created on: 2013-02-26
Watch this video for step-by-step instructions on how to replace the front stabilizer links on your 99-04 Honda Odyssey.
-
step 1 :Removing the Wheel
- Loosen the lug nuts with the vehicle on the ground
- Raise the vehicle with a floor jack
- Secure the vehicle on jack stands
- Remove the lug nuts
- Pull off the wheel
- If the wheel is frozen in place, kick the tire to loosen it
-
step 2 :Removing the Stabilizer Link
- Apply penetrating oil to the stabilizer link bolts
- Attach an 18mm wrench to the back of the top stabilizer link bolt
- Remove the top 18mm nut with a socket and ratchet
- Pull out the top stabilizer link stud
- Attach an 18mm wrench to the back of the bottom stabilizer link bolt
- Remove the bottom 18mm nut with a second 18mm wrench
- Pull out the stabilizer link
-
step 3 :Installing the New Stabilizer Link
- Push the lower stabilizer link stud into place
- Push the upper stabilizer link stud into place
- Start the two 18mm nuts
- Tighten the nuts to between 55 - 60 foot-pounds of torque
-
step 4 :Reattaching the Wheel
- Slide the wheel into place
- Start the lug nuts by hand
- Tighten the lug nuts preliminarily
- Lower the vehicle to the ground
- Tighten the lug nuts to between 95 - 100 foot-pounds in a crossing or star pattern
Tools needed
-
Torque Wrench
Rust Penetrant
18mm Wrench
Jack Stands
18mm Socket
Ratchet
Floor Jack
1/2 Inch Breaker Bar
Brought to you by 1AAuto.com, your source for quality replacement parts and the best service on the Internet.
Hi, I'm Mike from 1A Auto. I hope this how-to video helps you out, and next time you need parts for your vehicle, think of 1AAuto.com. Thanks.
In this video we're going to show you how to replace the front stabilizer link or one of the front stabilizer links. We show you the passenger's side and the driver's side is the same procedure. With stabilizer links, you'll hear a rattling and sometimes you'll know that it's a stabilizer link if you enter a slight curve and then the rattling stops. That's usually a good sign that the stabilizer link is bad. What you'll need is a new stabilizer link from 1A Auto. If you're going to replace one, it's probably a good idea just to replace just them both. Usually if one is getting worn out, the other one is getting ready to go. Jack and jack stands, I did put a star. You can do this without jacking the vehicle up but it does make it quite a bit more difficult just to get in there in the angles and stuff. You'll need two 18mm wrenches and you'll need an 18mm socket and ratchet and some penetrating oil.
As you can see here, I've got the vehicle raised up and I'm removing the lug nuts with my impact wrench. If you don't have an impact wrench, you want to start with the vehicle on the ground. Loosen the lug nuts with a 19mm socket and breaker bar or your tire iron. Then raise and support the vehicle and remove the lug nuts and wheel the rest of the way. You can see here I'm kicking the tire. That's basically just a way . if your tire or your wheel is a little bit frozen on because of the aluminum, just give it some good kicks and break it loose and then you can remove the tire.
We're going to start by putting some lubricant on the ends of the bolts so that the nuts actually come off from the front and the back side. We have an 18mm wrench and an 18mm socket to the top of the end link. The 18-mm wrench goes on the back; the socket goes on the front and then you've just got to use your muscles to tear it apart. I'm just going to speed up here as we remove that nut the rest of the way. Now, we can just pull the end link out. Once we remove the end link from the strut, you can go down to the bottom and you can start working on the bottom bolt. On the bottom of the end link there's not enough room to get a big ratchet like this in, so you have to use a wrench on both sides. Ideally a ratcheting wrench would be great but when in a pinch, you can just use two regular wrenches. Put an 18mm on one side and an 18mm on the other just like the top and you just break it loose. Unfortunately there is really no easier way. You just go 1/16 to 1/8 of a turn at a time, and eventually you get that nut off.
We'll put the bottom one in first. I'm just going to speed it up here as I tighten up those two nuts. They should be tightened up to around 55 to 60 foot-pounds but you don't have to torque them. This is not an integral component. Just as long as you get them nice and tight with the wrenches or the socket and ratchet.
Put your wheel back on and start all your lug nuts just by hand first, and then, while the vehicle is still in the air, just preliminarily tighten them with your socket and ratchet or as I'm doing, with my impact wrench. Now, again, use your torque wrench and you want to tighten your lug nuts between 95 and 100 foot-pounds and use a star pattern as you tighten.
We hope this video helps you out. Brought to you by www.1AAuto.com, your source for quality replacement parts and the best service on the Internet. Please feel free to call us toll-free, 888-844-3393. We're the company that's here for you on the Internet and in person.
Shop Products

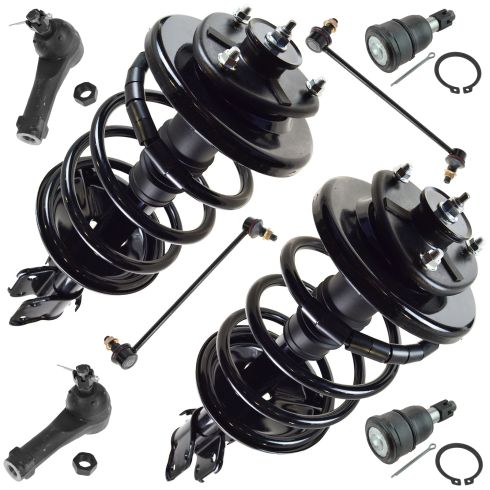
1999-04 Honda Odyssey Front 8 Piece Steering & Suspension Kit TRQ PSA59760
Part Details:
- (2) Front Lower Ball Joints
- (2) Front Outer Tie Rods
- (2) Front Sway Bar Links
- (2) Front Strut & Spring Assemblies
- 8 Piece

How to Replace Front Sway Bar Links 2007-16 Honda CR-V
How to remove, replace, and install a sway bar end link on 07, 08, 09, 10, 11, 12, 13, 14, 15, 16 Honda CR-V


