How to Replace Sway Bar Link 2005-10 Chevy Cobalt
Created on: 2011-12-14
How to repair, install, fix, change or replace broken, worn, or rattling front stabilizer sway bar linkson Chevy Malibu, Cobalt, and Pontiac G6 models, years 05, 06, 07, 08, 09, and 10.
-
step 1 :Testing the Stabilizer Link
- Turn the wheel by hand or with the steering wheel
- Try to move the stabilizer link by hand
- A clanking or rattling noise indicates a faulty stabilizer link
-
step 2 :Removing the Wheel
- Loosen the lug nut covers with a 19mm socket
- Pull off the hub cap
- Loosen the lug nuts with the vehicle on the ground
- Raise the vehicle with a floor jack
- Secure the vehicle on jack stands
- Remove the lug nuts
- Pull off the wheel
-
step 3 :Removing the Stabilizer Link
- Apply penetrating oil to the stabilizer link bolts
- Attach an 18mm wrench to the top stabilizer link nut
- Attach an 8mm wrench to the top stabilizer link stud
- Turn the 18mm wrench to remove the nut
- Attach an 18mm wrench to the lower stabilizer link nut
- Attach an 8mm wrench to the lower stabilizer link stud
- Turn the 18mm wrench to remove the nut
- Pull out the stabilizer link
-
step 4 :Installing the New Stabilizer Link
- Put the new stabilizer link into place
- Start the nuts onto the stabilizer link
- Attach a 15mm wrench to the upper stabilizer link bolt
- Tighten the nut with a 19mm socket and ratchet
- Attach a 15mm wrench to the lwoer stabilizer link bolt
- Tighten the nut with a 19mm wrench
- Tighten the nuts to between 40 - 45 foot-pounds of torque
-
step 5 :Reattaching the Wheel
- Slide the wheel into place
- Start the lug nuts by hand
- Tighten the lug nuts preliminarily
- Lower the vehicle to the ground
- Tighten the lug nuts to 100 foot-pounds in a crossing or star pattern
- Put on the hub cap, lining up the hole with the tire valve stem
- Tighten the lug nut cap
Tools needed
-
15mm Wrench
Hammer
Torque Wrench
18mm Wrench
8mm Wrench
Jack Stands
19mm Wrench
19mm Socket
Ratchet
Floor Jack
Brought to you by 1AAuto.com, your source for quality replacement parts and the best service on the Internet.
In this video, we're going to show you how to replace a front stabilizer link. The symptom of a bad stabilizer link is if you're hearing a clunking in the front of your car, but when you go around a curve, either left or right, the clunking seems to go away. That's usually a sign that your stabilizer link is starting to loosen up. Tools you'll need are 8mm to 19mm wrenches as well as a hammer.
Turn your wheel all the way to one side or the other. Then you can reach in behind and you can see it here. This is the top of your link. You can reach in behind and grab that with your hand and shake it back and forth and if you can duplicate that clanking or rattling sound then that's what you need to replace.
Start out by using a 19mm socket or a wrench and loosen the plastic covers and then remove the wheel cover. If you don't have the benefit of air tools, you'll want to loosen the lug nuts up while it's on the ground, then raise and support your vehicle and then remove the lug nuts and the wheel.
Right here is our stabilizer link. Use a little bit of penetrating oil on the upper and lower, let that sit for awhile. We've got an 18mm wrench on the bolt and 8mm wrench on the end of the shaft there. It looks like it actually coming loose, there goes that bolt. Get that started. Put this on there and I'm going to put this one on down there and same thing. Here's a close up look. I've got the 18mm wrench on there. The 8mm wrench is just holding that stud in place and I just keep flipping back and forth with the larger wrench, grabbing onto the nut and removing it. I'm just going to speed up the tape here. It takes a little while to get these things apart. It's a tedious task of getting the wrenches in there, holding it with the smaller wrench and then using the small one and then just angling the larger wrench in there as best you can. Eventually it comes apart.
Here's a new link from 1A Auto. Iit's a little bit different but it actually makes it easier to install. You'll need a 15mm wrench to hold this on that side and then a 19mm socket and ratchet to put the bolt on. We're going to put down in. It mounts in just like your original. Start the locking bolt on here and we'll start the locking bolt down here. Up top, I put my 15mm wrench through from the backside and then a 19mm socket and ratchet. I'll just speed it up as I tighten it up with the ratchet and you want to get it nice and tight and probably 40 to 45 foot-pounds. Then continuing on down to the lower, it's the same as taking it apart. You really can't get a wrench in there or a ratchet in there so you just have to use a wrench. I used the 15mm wrench to hold the stud and then a 19mm wrench to tighten up the nut and it just takes a little while and, then, again, tighten it up between 40 to 45 foot-pounds.
Once you have the wheel back in place then you put the lug nuts on by hand and I just use my impact wrench to just tighten them preliminarily. Now with the vehicle on the ground, torque the lug nuts to 100 foot-pounds using a star pattern. Now put your wheel cover back on, there's a hole for the valve stem then use a socket to tighten up the retainers.
We hope this video helps you out. Brought to you by www.1AAuto.com, your source for quality replacement parts and the best service on the Internet. Please feel free to call us toll-free, 888-844-3393. We're the company that's here for you on the Internet and in person.
Shop Products


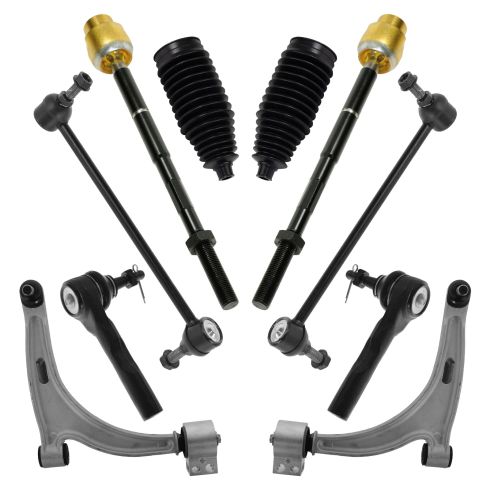
Chevrolet Malibu Pontiac G6 Front 10 Piece Steering & Suspension Kit TRQ PSA42228
Part Details:
- (2) Front Sway Bar Links
- 10 Piece
- (2) Front Lower Control Arms with Ball Joints
- (2) Front Steering Rack & Pinion Bellows
- (2) Front Outer Tie Rods
- (2) Front Inner Tie Rods

How to Replace Rear Sway Bar Links 2010-15 Chevy Camaro
How to repair, install, fix, change or replace loose, worn, or rattling sway bar links on 10, 11, 12, 13, 14, 15 Chevy Camaro
