
How to Replace Tail Lights 2007-09 Toyota Camry
Created on: 2017-10-03
New Tail Light from 1AAuto.com How to install, repair, fix, change or replace a broken, damaged, burned out, cracked, faded, cloudy or chipped tail light / brake light on 07, 08, 09 Toyota Camry
-
step 1 :Removing the Rear Bumper
- Remove the Phillips screw from the access hole in the wheel well liner
- Remove the screw beneath the fender liner
- Remove the screws from underneath the bumper
- Open the trim buttons on the bumper
- Remove the 10mm bolts from the bumper
- Mark the bumpers position with tape
- Pull out the bumper from the side
- Separate the bumper from the rear
-
step 2 :Removing the Tail Light
- Pull back the carpet trim in the trunk
- Remove the 10mm bolts from the tail light
- Turn the bulb sockets counterclockwise to remove them from the light
- Slide the tail light out
-
step 3 :Installing the Tail Light
- Press the tail light into the car
- Turn the bulb sockets clockwise to stick them in the light
- Tighten the 10mm bolts to the light
- Press on the carpet trim
-
step 4 :Installing the Rear Bumper
- Lift the bumper onto the rear
- Line up the slots with the holes on the bumper
- Push the bumper into place
- Tighten the 10mm bolts to the bumper
- Press on the trim button to the bumper
- Tighten the screw beneath the fender liner
- Tighten the Phillips screw though the access hole in the wheel well liner
Tools needed
-
Socket Extensions
Flat Blade Screwdriver
Phillips Head Screwdriver
10mm Wrench
Painter's Tape
10mm Socket
Ratchet
Hi, I’m Mike from 1A Auto. We’ve been selling auto parts for over 30 years!
To remove the bumper, the vehicle doesn't have to be in the air, but we just got it lifted so that we can show you where the screws are. It's easier to see. There's one that's up here. This little access hole in the fender liner. Can use a Phillips Head, or a 10mm socket. I'm actually going to use the socket ratchet. It’s a little easier to remove the screw.
There's a self-tapping bolt at the bottom of the bumper here. Either use a Phillips head or a 10mm socket. Repeat the bolt removal for the opposite side. Here in our bumper it seems to be missing a bracket maybe. There would either be screws, self-tapping screws with little plastic inserts or plastic push clips. Obviously, it’s been repaired before. Maybe hit in the rear.
Somebody just zip tied it so to remove the bumper we're just going to clip off these zip ties. But, you may have the correct hardware here. So it will either be self-tapping screws or push clips. To open the trunk and there are two more bolts. Beneath these plastic caps here, you're going to use a small flat bladed screwdriver. Pop them out, see the little tether, and they'll stay there.
These are 10mm bolts. Remove the two of them. Protect our bumper and our body work from scratching, while we remove the bumper, just going to put some masking tape between them. And, just repeat this for the other side. Bumper is clipped in on your bracket along this edge here. So basically, you're just going to grab it and give it a good pull. It sounds like it's breaking it, but it's not. It's just popping the tabs out of this bracket all the way around. I'm going to hang it back in place so I can get the other side. All right, I'm going to repeat for the other side.
There are three nuts that need to be removed to take the light out. Two of them are here. The third one is hidden behind this plastic. So we have to remove this trim hook with a Phillips head screwdriver. This is just clipped in. You can pull it out. Actually, I can get to the nut that's right here now. It needs a 10 millimeter deep socket. Let's start by removing this one here. I'm just going to put that in the trunk so it doesn't get lost. Before I get too far, I'm going to disconnect the bulbs and sockets from the tail lamp assembly. I'm turning them counter clockwise. Pull it out.
Actually, putting this trim back now. I'm going to use a 10 millimeter ratchet and wrench, so I don't have to remove this carpeted trim. Basically just have to get them lose. Once they're loose, you can get them off with your fingertips. With the nuts removed, I'm just going to reach my hand in, and push the tail light lens from the backside, inside the trunk, and it should slide right out of the body and remove.
Here's our original tail lamp assembly from our vehicle, and our brand new one from 1AAuto.com. See, it's identical in design. It has the same mounting studs, and a little mount for the clip, a clip for the bumper. It is exactly the same on the one from 1A Auto. If your tail light lens is broken, cracked, has water in it, this one would be a great replacement and work perfectly for you.
There's some tabs here and a clip here. This needs to slide over here, so that the tail lamp stays tight to the body. Of course, these three studs are going to go into these three holes here. I'm going to push it up against the body. Make sure it slides on. That's where it needs to be. Then reach in and capture this inside nut here. Put that back. Reach over and capture these. I got these nuts, pretty much further down, as tight as I can go by hand. I'm going to just reach in with the ratcheting wrench. Give it some turns. When I feel it get tight, I'm going to stop.
Switch to the ratchet. Push this piece back into place. Install this clip. Use the Phillips head to reinstall this. The light is not in your way. I'm going to reach back up, the break light bulb, which was the clear one, goes in the bottom. You turn it clockwise to lock it into place. The amber bulb, which is the turn signal, goes in the top. Turn that clockwise to lock it in place. Replace this little cover. Just repeat this for the other side, if you need to.
Reinstall the bumper. I'm going to hang it on these hooks here first. Line it up. Just push it in place. Repeat that for the other side. Reinstall these bolts. Reinstall this lower, self-tapping bolt. Make sure it's lined up. Reinstall the upper self-tapping bolt. Repeat for the other side. Replace your bolts or clips. Or in our case, we're going to re zip tie these. Remove your masking tape.
Thanks for watching. Visit us at 1AAuto.com for quality auto parts, fast and free shipping, and the best customer service in the industry.
Shop Products


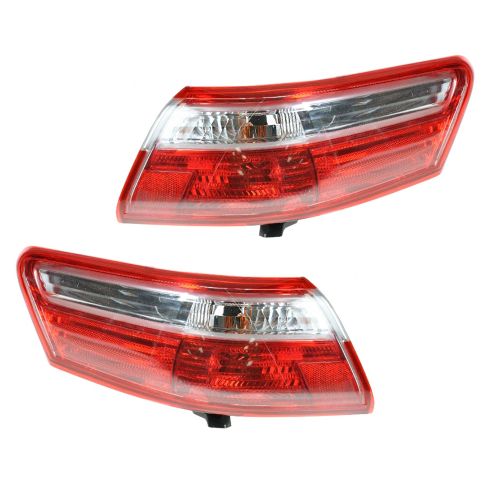
Toyota Camry Driver & Passenger Side 2 Piece Tail Light Set DIY Solutions LHT07437
Part Details:
- 2 Piece
- (1) Passenger Side Tail Light
- (1) Driver Side Tail Light

How to Replace Back up Reverse Light 1998-2005 Volkswagen Beetle
This video shows how to change the reverse light bulbs and remove and install the reverse light housings yourself on the 98-05 Volkswagen Beetle
