
How to Replace Timing Belt and Water Pump 2001-05 Honda Civic Coupe Sedan
Created on: 2016-06-03
Watch this video to learn how to replace your own timing belt and water pump. The experts at 1A Auto show you how to replace the timing belt and water pump on your 01-05 Honda Civic.
-
step 1 :Removing the Wheel
- Loosen the 19mm lug nuts with the vehicle on the ground
- Raise the vehicle with a floor jack
- Secure the vehicle on jack stands
- Remove the lug nuts
- Pull off the wheel
-
step 2 :Draining the Coolant
- Pry off the push connectors from the inside of the splash shield
- Have a drain pan ready
- Open the radiator drain
- Loosen the drain plug and let the coolant drain
- Tighten the drain plug
- Jack up underneath the oil pan with a floor jack and a block of wood
-
step 3 :Removing the Power Steering Pulley
- Loosen the 10mm adjusting bolt
- Loosen the 12mm adjusting nut near the power steering belt pulley
- Loosen the 12mm pivot bolt
- Remove the adjusting bolt
- Remove the power steering belt
- Remove the bolts
- Lift the reservoir and pump up and out
- Move the assembly out of the way without disconnecting the lines
-
step 4 :Removing the Alternator
- Remove the boot below the wiring harness
- Remove the 10mm nut holding the battery cable
- Press the tab and disconnect the alternator wiring harness
- Loosen the 12mm adjustment locking bolt at the bottom
- Loosen the 14mm bolt atop the alternator
- Loosen the adjustment bolt (wing nut) with a pair of pliers
- Press the alternator down and in
- Remove the belt
- Finish removing the 12mm and 14mm bolts
- Remove the power steering pump reservoir bracket with a 12m socket
- Slide the 14mm bolt out of the alternator
- Remove the alternator
-
step 5 :Removing the Valve Cover
- Loosen the top of the engine cover with a flat blade screwdriver
- Remove the 10mm bolts from the ignition coils
- Remove the two 10mm bolts from the wiring harness
- Remove the 10mm throttle cable hold down bolts
- Remove the throttle cable hold downs
- Lift up the harness
- Unplug the ignition coil wiring harnesses
- Unplug the EGR valve from the coolant sensor
- Lay the harness off to the side
- Remove the breather line from the valve cover
- Disconnect the rear wiring harness stays
- Remove the dipstick
- Remove the oil cap
- Remove the five 10mm bolts from the engine
- Unsnap the retainer on the A/C line
- Remove the valve cover from the motor
-
step 6 :Removing the Engine Cover
- Remove the 17mm bolts from the front engine mount bracket
- Remove the bracket
- Remove the three 10mm bolts on the upper timing cover
- Pull back on the engine cover
- Disconnect the cam sensor connector with a flat blade screwdriver
- Remove the engine cover
-
step 7 :Removing the Harmonic Balancer
- Remove the 19mm bolt on the crank pulley with a Honda holding tool, a strap wrench, and extension and breaker bar
- Remove the pulley from the crankshaft
- Remove the key stop
-
step 8 :Removing the Engine Crank Sensor
- Remove the connector on the rear side of the engine
- Disconnect it from the lower engine retainer
- Remove the four bolts on the lower engine cover
- Remove the lower timing cover and seal
- Remove the three 14mm bolts on the front of the bracket
- Remove the 14mm bolt on the driver side of the engine
- Remove the motor mount bracket
- Remove the 10mm bolt on the bracket position sensor
- Remove the engine crank sensor
-
step 9 :Removing the Timing Belt and Tensioner
- Reinstall the 19mm crank pulley bolt with a 19mm socket and ratchet
- Line up the mark on the crank gear with the arrow on the block
- Put the motor in time so the up mark is vehicle and the two notches on the cam gear are flush with the head
- Insert a 6mm Allen wrench into the hex socket on the tensioner
- Push the tensioner counter clockwise
- Remove the belt
- Remove the 14mm bolt from the timing belt tensioner
- Unhook the spring from the stud
-
step 10 :Removing the Water Pump
- Pry up on the plastic retainer on the top of the water pump
- Remove the 10mm bolts holding the water pump in
- Place a drain bucket underneath the motor
- Work the gasket off
- Remove the water pump
-
step 11 :Installing the Water Pump
- Remove any remaining gasket glue or debris from the water pump mount
- Wipe the surface down with a clean rag
- Press the water pump O-ring into the back of the water pump
- Install the water pump onto the motor
- Insert the three longer into the bottom right and top holes
- Shorter bolt on the bottom left
- Torque the bolts to 8.7 foot-pounds
-
step 12 :Reinstalling the Timing Belt and Tensioner
- Hook the spring into the tensioner
- Hook the spring around the stud on the engine
- Install the timing belt tensioner finger-tight
- Make sure the timing marks are in the correct position
- Install the timing belt from the crank pulley
- Over the tensioner
- Under the water pump
- Slide the belt onto the cam gear
- Recheck the timing marks
- Use a 19mm socket to rotate the engine two complete rotations of the crank by hand
- Torque the timing belt tensioner to 33 foot-pounds
- Remove the tensioner pin
-
step 13 :Reinstalling the Engine Crank Sensor
- Insert the sensor into its slot
- Tighten the 10mm bolt to the sensor
- Reinstall the wiring harness
- Insert the engine bracket with the bolts already in
- Hand tighten the bolts
- Install the three bolts on the front of the mount
- Shortest bolt goes on the bottom right
- Access the bolts on the side of the mount
- Torque the bolts to 33 foot-pounds
- Use a 14mm to access the ones on the side of the mount
- Insert the timing cover into place
- Tighten the four bolts to the lower engine cover
- Remove the crank pulley bolt from the crank shaft
-
step 14 :Installing the Harmonic Balancer
- Insert the key stock into the slot on the crank
- Align the crank pulley
- Insert the Honda holder tool and tighten with a 19mm socket
- Torque to 148 foot-pounds
-
step 15 :Replacing the Timing Cover and Engine Bracket
- Insert the upper timing cover into place
- Tighten the three 10mm bolts into place
- Insert the cam position connector into place and its rubber boot
- Insert the motor mount bracket into place
- Tighten the 17mm nuts to the bracket
- Torque the bolts to 40 foot-pounds
- Release the jack supporting the motor
-
step 16 :Installing the Alternator
- Insert the alternator into place
- Start the top bolt and let the alternator hang down
- Insert the bottom bolt at the tensioner
- Feed the belt down in around the alternator
- Re-tension the alternator
- Tighten top 14mm alternator bolt
- Tighten the 13mm bolt on the bottom of the alternator
-
step 17 :Installing the Valve Cover
- Insert the valve cover into place
- Tighten the five valve cover bolts with the two longest at the top and the two shorter closer to the front
- Tighten the valve cover with a 10mm socket and ratchet
- Torque the valve cover bolts to 7.2 foot-pounds
- Insert the ignition coils into place
- Tighten the 10mm nuts to each coil
- Insert the oil dipstick and cap into place
- Insert the valve cover breather line tabs into place
- Reinstall the clamp for the breather
- Reinstall the upper part of the harness and snap it into the ignition coils
- Tighten the two 10mm bolts to the harness
- Clamp the cables into place
- Tighten the 10mm nuts to the cable
- Tighten the hardware to the engine
- Reconnect the EGR solenoid and coolant sensor
-
step 18 :Reinstalling the Alternator Belt
- Move the alternator harness under the A/C line and down to the alternator
- Press the 4-pin connector into place
- Insert the power lead and the 10mm power-lead nut into place
- Insert the top of the retainer on the top of the alternator
- Reinstall the power steering pump reservoir holder
- Tighten it with a 12mm socket and ratchet
- Install the carriage bolt into the bottom of the bracket
- Insert the power steering pump and reservoir into place
- Secure the carriage bolt and nut
- Insert the tensioner into the pump
- Hand-tighten the nut to the back of the tensioner
- Install the tensioner bolt
- Insert the power steering belt into place
- Loosen the tensioner
- Tighten the 10mm bolt to the bracket
- Tighten the tensioner
- There should be about 1/4" of play on the belt
- Tighten the 12mm nut on the back of the power steering tension bolt
- Tighten the 12mm nut on the bottom of the power steering pump
- Insert the engine cover with a flat blade screwdriver
- Reinstall the power steering reservoir
- Reconnect the battery cable
- Run the engine for five minutes
- Check the tension and adjust
- Tighten the push connectors to the splash shield
-
step 19 :Reattaching the Wheel
- Slide the wheel into place
- Start the lug nuts by hand
- Tighten the 19mm lug nuts preliminarily
- Lower the vehicle to the ground
- Tighten the lug nuts to 80 foot-pounds in a crossing or star pattern
-
step 20 :Refilling the Radiator Coolant
- Insert a funnel into the radiator
- Pour the coolant into the radiator
- Reinstall the radiator cap
- Run the car for a bit and check the level
- Keep an eye on the level the first few times you drive the car
Tools needed
-
12mm Socket
Funnel
Socket Extensions
Torque Wrench
14mm Socket
Jack Stands
19mm Socket
Block of Wood
Anti-Freeze
Honda Crank Holding Tool
6mm Allen Wrench
Flat Blade Screwdriver
10mm Socket
Drain Pan
Ratchet
Floor Jack
1/2 Inch Breaker Bar
Brought to you by 1AAuto.com, your source for quality replacement parts and the best service on the Internet.
Hi, I'm Mike from 1A Auto. I hope this how-to video helps you out, and next time you need parts for your vehicle, think of 1AAuto.com. Thanks.
In this video, we're going to show you how to replace a timing belt. This is a 2003 Honda Civic with a 1.7-Liter VTEC motor and this is pretty much the same for 2001 to 2005 1.7-liter. Items you'll include a new timing belt and water pump kit from 1AAuto.com, various sockets, wrenches, and extensions, a Honda special crank holding tool, breaker bar, torque wrench, jack and jack stands, flat blade screwdriver, 6 millimeter Allen wrench, block of wood, and a drain bucket.
Using a 19 millimeter socket and a breaker bar, break your lug nuts loose. Raise and support your vehicle on jack stands. Finish removing your lug nuts, and remove the wheel and tire from the vehicle. Pry out on the inside of the push connectors with a flat-blade screwdriver. Remove them from the inside of the splash shield. Allow the splash shield to hang out of your way.
With the radiator cap off, open the drain to the bottom of the radiator and allow it to drain into a catch pan. Jack up on your oil pan with a floor jack and a block of wood. Remove the power steering adjusting bolt using a 10 millimeter socket and ratchet. Loosen the adjusting nut with a 12 millimeter wrench. Loosen the pivot bolt at the bottom of the power steering pump with a 12 millimeter wrench.
Remove the adjusting bolt and remove the power steering belt. Remove the rest of the pivot bolt from the bottom of the power steering pump. Once the power steering pump is free, push out on the tab to release the power steering reservoir, and move the assembly out of the way without disconnecting the lines. To remove the alternator, remove the 10 millimeter nut holding the power cable to the back, the green connector on the side, the 14 millimeter bolt at the top of the alternator, and loosen the adjusting nut at the back. Remove the power cable to the alternator with a 10 millimeter socket and ratchet. Disconnect the connector at the back and release the harness from the bracket.
To release the harness, push down on this tab in the back, slide it off. We'll be removing our valve cover later so we'll fish this part of the harness up out of the way now. Loosen the 12 millimeter bolt at the bottom of the alternator and the 14 millimeter bolt at the top. Loosen the adjusting bolt at the bottom until you can remove the belt from the alternator and remove the belt from the vehicle. Finish removing the 12 and 14 millimeter bolts. Use the 12 millimeter socket and ratchet to remove the power steering pump reservoir bracket. With the power steering pump reservoir bracket removed, slide the 14 millimeter bolt all the way out of the alternator. Remove the alternator.
Using the flat-blade screwdriver, remove the two-quarter turn fasteners from the top of the valve cover. Remove the trim, remove the 10 millimeter bolts to the ignition coils, and the two 10 millimeter bolts for the wiring harness. Remove the 10 millimeter throttle cable hold down bolts. Remove the throttle cable hold downs. Lift up on the harness and unplug all four ignition coils. Unplug the EGR valve and the coolant sensor. Lay the harness off to the side.
Move the breather line from the valve cover. Disconnect the rear wiring harness stays from the studs on the valve cover. Remove the dipstick and the oil cap. Remove the five 10 millimeter bolts. Unsnap the retainer on your A/C line, and remove the valve cover from the motor.
Using the 17 millimeter socket and ratchet, remove the three bolts on the bracket from the engine to the front engine mount. Remove the bracket from the engine. Remove the three 10 millimeter bolts on the upper timing cover: one on either side and one below the cam sensor. You may have to use a shallow 10 millimeter socket to get to the bolt under the cam sensor. Pull back on the engine cover using the flat-blade screwdriver. Disconnect the cam sensor connector, remove the engine cover.
To remove the 19 millimeter bolt on the crank pulley, you'll need the special holding tool from Honda, which sits into this hex. A strap wrench to keep the pulley from turning, an extension and a breaker bar to get onto the 19 millimeter bolt in the center of the pulley. These tend to have a lot of torque on them. They're very stubborn, so we're going to use a cheater pipe on our breaker bar. This is actually the handle off our jack.
On the handle, takes a good bit of force to break these loose. I've already cracked it loose a little bit, but with the cheater pipe, you really got to put your weight into it to get them going. Once the bolt's been broken loose, you can remove your special tools. You can use a 19 millimeter socket and ratchet to remove the bolt the rest of the way.
Remove the pulley from the crank shaft, be careful not to drop the key stock that's inside the pulley. Remove the connector on the rear side of the engine. Disconnect it from the retainer on the lower engine cover. Should just pop out. Allow it to hang off to the side. Remove the four bolts on the lower engine cover: here, here, here, and here. Remove the lower timing cover from the engine, be sure to remove the lever seal with it.
Remove the three 14 millimeter bolts with a deep socket on the front of the bracket, and one with a shallow 14 millimeter socket on the driver's side of the engine. Remove the motor mount bracket from the engine. Remove the 10 millimeter bolt on the crank position sensor. Remove the sensor and bolt from the vehicle.
Reinstall your 19 millimeter crank pulley bolt using a 19 millimeter socket and a ratchet or breaker bar. You'll want to line up the mark on the crank gear with the arrow on the block. Before removing the belt, you'll have to put your motor in time. This means getting the up-mark vertical and the two notches on either side of the cam gear flush with the top of the head. Put a 6 millimeter Allen wrench into this hex socket on the outside of the tensioner. Push it counter clockwise, remove the belt from the tensioner pulley. Remove the belt from the remaining pulleys.
Using a 14 millimeter wrench, remove the bolt to the timing belt tensioner. Unhook the spring from the stud. Pry up on the plastic retainer on the top of the water pump. Push it out of the way. Remove the 10 millimeter bolts holding the water pump in. Place a drain bucket underneath your motor. There's a possibility that quite a bit of coolant can come out of the water pump when you take it off. Lift the gasket off and remove your water pump from the engine.
Here we have our old parts from the vehicle and our new parts from 1AAuto.com. Your tensioner has a preloaded clip in it, so once you've got your belt routed correctly, you can pull the clip and have your belt at the correct tension. It comes with a new tensioner spring to replace the warn out stretched old one.
We have a new O-ring style gasket, a new water pump. With every timing belt we recommend you do a new water pump. If your water pump goes bad, we recommend you replace a new timing belt while you're in there.
See the the belts are the same size width and tooth count, very important to synchronizing your engine correctly. The factory recommendation for a timing belt job is every 60,000 miles. If you're reaching that service interval or you water pump's leaking, this new kit from 1AAuto.com is going to fix you up right.
Using the razor blade or gasket scraper, remove all the old gasket corrosion and other debris from the surface of the motor where the water pump mounts up. Wipe it down with a clean rag or a good paper towel.
Here we have your water pump and new water pump O-ring. We're going to press that in the back of the water pump and reinstall it into the motor. Reinstall the water pump onto the motor. The three longer bolts go in the bottom right, top right, and top left bolt holes and the shortest bolt will go in the bottom left. Torque your four 10 millimeter bolts to 8.7 foot-pounds.
Hook your new spring into your tensioner. Hook your new spring around the stud on the block, install the timing belt tensioner finger tight. Ensure that your timing marks are still in the correct places. Install the timing belt working from the crank pulley counterclockwise over the tensioner, under the water pump. Slide the top of the belt onto the cam gear, recheck your timing marks.
With the timing belt installed, use a 19 millimeter socket and ratchet to rotate the engine two complete rotations of the crank by hand. There we have one, and you'll see that your cam shaft is 180 degrees out of where the proper timing mark should be. Now we'll make one more complete rotation of the crank, at which point our cam shaft timing marks should be aligned properly.
If your timing marks are still properly aligned, you can now put tension on the belt. Otherwise you'll have to re-time your belt until the marks correlate correctly. Torque your timing belt tensioner to 33 foot-pounds and remove your tensioner pin. Reinstall your crank position sensor. This plastic stud sits into this hole in the block with a 10 millimeter bolt above it. Go ahead and tighten that up and reinstall the connector. Make sure that when you're installing the engine bracket back onto the motor that the two bolts on the side are already installed, because they won't clear the frame rail once the mounts been installed in the vehicle.
Get the bolts on the side started hand tight and install the three bolts on the front of the mount, the shortest of which goes on the bottom right, the longer two will go on the top two holes. You'll need a short 14 millimeter socket to access the bolts on the side of the mount. All the motor mount bracket bolts are torqued to 33 foot-pounds.
Again, you'll probably need a shallow 14 millimeter to access the ones on the side of the mount. Make sure that the gasket on the back of your lower timing cover is seated in place properly for re-installing onto your motor.
Tighten down the four 10 millimeter bolts with a socket and ratchet. Remove your crank pulley bolt from the crankshaft, install your key stock into the slot on the crank, and align your crank pulley to that.
Reinstall your crank bolt. Reinstall your Honda crankshaft holder tool. Use a 19 millimeter socket to bring the bolt down. Torque to 148 foot-pounds. Reinstall the upper timing cover, followed by your three 10 millimeter bolts. The one with the longest shoulder goes in the middle hole which connects the timing covers upper and lower together. Reinstall the cam position connector and the rubber boot protecting it.
Reinstall the motor mount bracket with two 17 millimeter nuts. It may be three or it could be one and two bolts, occasionally the studs come out with the nut on them. We'll torque all this down to 40 foot-pounds. Release the jack supporting your motor, remove the jack from under the vehicle. Loosen up the top alternator bolt, pull it out as far as it'll go. Reinstall the alternator, start the top bolt. Let the alternator hang down.
Reinstall the bottom bolt at the tensioner. Reinstall the alternator and compressor belt. With the belt reinstalled on the pulleys re-tension the alternator, tighten up the alternator bolt up top with a 14 millimeter socket and ratchet. Tighten up the bolt on the bottom of the alternator with a 13 millimeter socket and ratchet. With the new valve cover gasket, reinstall your valve cover.
Reinstall the five valve cover bolts with the two longest at the top and the two shorter closer to you. Tighten down the valve cover with a 10 millimeter socket and ratchet. Torque the valve cover bolts to 7.2 foot-pounds.
Reinstall your four ignition coils. Make sure you seat them fully and you press them in. Tighten down the 10 millimeter nuts on each. Reinstall your oil dipstick and oil cap. Reinstall tabs for the back side of the harness and your valve cover breather line. Reinstall the clamp for the breather, reinstall the upper part of your harness, snap into all the ignition coils first.
Reinstall the two 10 millimeter bolts and your cable clamps, along with the 10 millimeter nuts on those. Tighten all your hardware down. Reconnect your EGR solenoid and your coolant sensor. Move the alternator harness under your A/C line down to the alternator. Install the 4 pin connector at the front, followed by the power lead and the 10 millimeter nut for the power lead. Tighten up the power terminal with a 10 millimeter wrench or socket. Install the top onto the retainer on the top of the alternator. Reinstall power steering pump reservoir holder tighten it down with the 12 millimeter socket and ratchet. Install the carriage bolt to the power steering pump into the bottom of the bracket. Bring the power steering pump and reservoir back to the front of the motor. Install the pump onto the carriage bolt, secure it with a nut.
Reinstall the tensioner into the pump. Install the nut on the back of the tensioner bolt. Just hand tight for now. Reinstall the power steering belt. Loosen up your tensioner until you’re able to reinstall the tensioner bracket. Put the 10 millimeter bolt in, tighten it with a 10 millimeter socket and ratchet. Retension the power steering pump belt. Tighten the power steering belt until you about a quarter inch of give. Tighten the 12 millimeter nut on the back of the power steering pump tensioner bolt with a socket and ratchet. Tighten the 12 millimeter nut at the bottom of the power steering pump.
Reinstall the power steering reservoir, reinstall the cover for your valve cover harness, a quarter turn with a flat-blade screwdriver.
Reinstall the negative terminal on your battery, tighten it down with a 10 millimeter wrench.
After everything has been installed and rechecked, it's time to start your vehicle.
Install your lower splash shield with the two plastic push pins.
Reinstall your wheel and start your lug nuts with a 19 millimeter socket. Using a 19 millimeter socket torque your lug nuts to 80 foot-pounds in a cross pattern.
We are going to refill the radiator directly first and I like to recycle the coolant. Never as much comes out as you need to fill it anyways, so you generally can use your old coolant and then also augment it with fresh coolant. If you put a piece of T-shirt in and then poor your old coolant in, that will filter most of the dirt out of it. It takes a little while to drain through the T-shirt, but it works. That's what we filtered out of the old coolant and we'll fill it up the rest of the way with good fresh coolant.
We want to use a 50/50 mix. You can buy coolant two ways, you can buy it full strength and you have to dilute it. You can also buy it premixed. We'll fill the radiator first, and then we'll fill the overflow bottle. Then fill it, after you do a fill like this good idea, fill it, run your car for a while, check the level. Run your car for a while again and just keep checking the level the first few times you drive the car.
Thanks for tuning in. We hope this video helped you out. Next time you need parts for your car, please visit 1AAuto.com. Also check out our other helpful how-to and diagnosis videos.
Shop Products
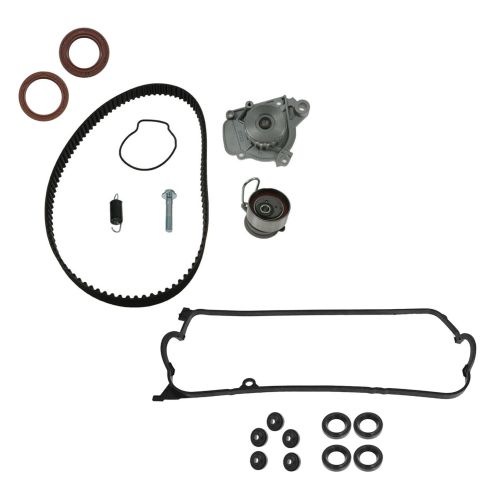
2001-05 Honda Civic L4 1.7L Timing Belt Kit with Water Pump, Valve Cover Gasket & Seals DIY Solutions ETS00059
Part Details:
- (1) Crankshaft Seal
- (1) Camshaft Seal
- (1) Valve Cover Gasket Set
- (1) Timing Belt Kit with Water Pump

How To Replace Toyota Tundra Timing Belt 2002 V8 Disassemble Front of Engine PART 1 from 1A Auto
Learn how to replace the timing belt in your 00-09 Toyota Tundra. Part 1 of a multi-part video
