
How To Replace Track Bar 2007-14 Cadillac Escalade
Created on: 2020-06-01
Watch this video to learn how to install a new track bar on your 2007-14 Cadillac Escalade.
Tools needed
-
21mm Socket
21mm wrench
Torque Wrench
Socket Extensions
Flat Blade Screwdriver
Socket Driver
Pry Bar
Jack Stands
Wheel Chocks
10mm Socket
Ratchet
Floor Jack
To start doing this job, what you're going to need to do is raise the vehicle, so that the rear suspension is hanging. Once you've done that, you're going to take a jack and come right underneath your pumpkin here, the rear differential, and we're just going to apply light pressure to this. Okay. Light pressure. Perfect. The next thing we're going to do is just use a little pry bar, or maybe even a screwdriver, whatever you have, and we're going to try to get these clips off of here. The way that you'd want to do that is to just kind of try to weasel your way in between and then pry. That should come right off of there. We can set this aside. We're going to do the same thing to the other one. Awesome.
The next thing we want to do is remove our mounting bolts that hold the brackets for the sway bar to the differential. Use a 10-millimeter. Do the same to the other side. This is going to be the last one, so you want to be careful because, at this point, the bar can kind of do whatever it wants. All that we have left at this point is our two mounting bolts. You're going to have one here that has a nut on the backside, and then one over here. This one has a nut, but it also has this little flippy-do there that's kind of going to hold it for you, so it doesn't spin too much.
Using two 21-millimeters, we're going to go ahead and remove this. Now that that one is nice and loose, we're going to come on over here and do the same over here. There's the nut.
Okay. I'm going to hold on to the bar. There it is, friends.
Once you're sure you have the same part, go ahead and install. Put this side in first right there. I'm going to bring this up. Start in my bolt. Same for this one. Start in that nut there. Another one. All right. Let's tighten it up. Bottomed out right there. Add a little bit more. It's nice and tight. Do the same to the other side. All right, it's nice and bottomed out. Let's go ahead and make sure that it's nice and snug. Awesome.
The next thing I like to do is put a little bit of copper Never-Seez up inside these bolt holes. Now, we're going to take our sway bar bushing bolts here. Make sure that you're not caught on anything. Swing it right up. Line up those bolt holes. We're going to start in all the bolts before we tighten anything down completely. Let's go ahead and snug these up. Now, we're going to torque them to 37 foot-pounds.
Torqued. Now, it's going to be time to get our E-brake cable brackets back on. You're going to see you have a couple of little clippy-dos on the backside. They go over this metal area, and then they're going to slide over the arm itself. This up here. Clip that right in. Perfect. Do the same thing to the other one. Clip it in. Okay. Make sure you have it completely clicked in. I like to give it a nice tug. The last thing you want is your E-brake cable coming off and potentially hitting up against anything where it might get damaged. Let's get this back down. We'll get it out of the way, and we'll take it for a road test.
Shop Products


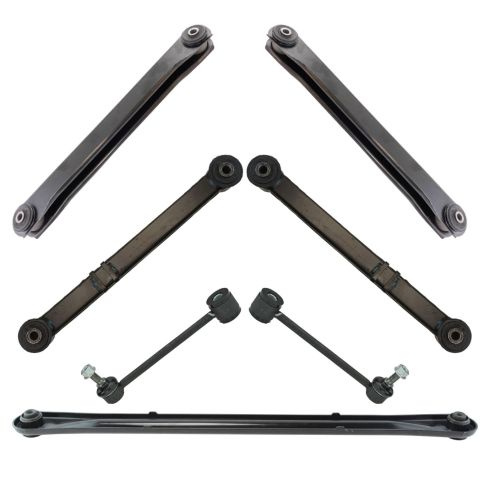
Chevrolet GMC Cadillac Rear 7 Piece Suspension Kit TRQ PSA65087
Part Details:
- (2) Rear Sway Bar Links
- (2) Rear Upper Control Arms
- (2) Rear Lower Control Arms
- (1) Rear Track Bar
- 7 Piece
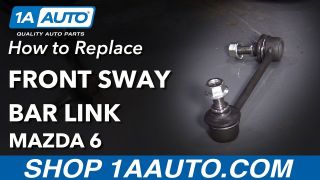
How to Replace Front Sway Bar Links 2002-07 Mazda 6
How to remove, replace, and install a sway bar end link on 07 Mazda 6.
