How to Replace Transmission Mount 2001-05 Honda Civic
Created on: 2016-05-06
If the transmission mount is broken or worn out, this video will show how to replace them
-
step 1 :Removing the Air Intake
- Jack up underneath the transmission with a block of wood for a bit of added pressure
- Remove the seven 10mm nuts from the air intake
- Loosen the hose clamps on the air intake hose
- Disconnect the air intake hoses
- Disconnect the sensor
-
step 2 :Removing the Transmission Mount
- Loosen the two 15mm bolts on the transmission mount bracket
- Remove the 15mm center bolt with a 17mm wrench
- Remove the two 10mm bolts from the stop
- Remove the transmission mount bracket
- Remove the three 17mm bolts from the rubber mount
- Remove the transmission mount
-
step 3 :Installing the Transmission Mount
- Insert the transmission mount into place
- Tighten the three 17mm bolts to the rubber mount
- Insert the transmission bracket into place
- Insert the center bolt into the transmission mount
- Bring up the transmission with the floor jack until it touches the bracket
- Tighten the 15mm bolts to the transmission mount
- Tighten the center transmission bracket bolt
- Torque the center transmission bracket bolt to 40 foot-pounds
- Torque the transmission bracket bolts to 40 foot-pounds
- Insert the stop and tighten its two 10mm bolts
-
step 4 :Reinstalling the Air Intake
- Insert the air box into place
- Tighten the seven 10mm bolts to the air intake
- Connect the air intake hoses
- Tighten the air intake hose clamps
- Connect the sensor
Tools needed
-
15mm Wrench
Socket Extensions
Torque Wrench
15mm Socket
17mm Wrench
Rust Penetrant
17mm Socket
Jack Stands
Block of Wood
Flat Blade Screwdriver
10mm Socket
Ratchet
Floor Jack
Brought to you by 1AAuto.com, your source for quality replacement parts and the best service on the Internet.
Hi, I'm Mike from 1A Auto. I hope this how-to video helps you out, and next time you need parts for your vehicle, think of 1AAuto.com. Thanks.
In this video, we're going to show you how to replace the transmission mounts. This is a 2003 Honda Civic, and this is basically the same for any 2001 to 2001 Civic with the 1.7-liter. Items you need are new a transmission mount from 1AAuto.com, 10 to 15mm sockets with ratchet extensions, 15 to 17mm wrenches, jack and jack stands, penetrating oil, and a torque wrench.
When jacking up the motor and transmission, you want to use a piece of wood, so you don't risk breaking the transmission casing or the oil pan. Just going to put a little bit of pressure on the bottom of the transmission, so it stays in place when we undo the mount. If you have a factory air cleaner setup, you'll have to remove that.
In this case, the vehicle came with an aftermarket intake. We're going to remove the aftermarket intake with this 10mm bolt, undoing this hose clamp, disconnecting this sensor. We're going to put some penetrating oil on the six bolts for the transmission now. You have the two for the bracket to the actual transmission, one bolt going from the bracket through the actual rubber mount, and then one, two, three bolts mounting the rubber mount to the body.
When removing the bolt from the transmission bracket through the rubber mount, you'll need to use a wrench or a low profile ratchet so that you don't come in contact with this bracket on the transmission. Even though the bolt's unthreaded, sometimes they can get stuck to the lever inside of the mount, so we're going to take two wrenches, in this case, the 17mm and the 15mm, that fit over the shaft of the bolt and behind the head, so we can pry it out.
Now we're going to loosen the bolts on the transmission bracket to get enough clearance to remove the rest of our mount bolt. We're going to remove these two 10mm bolts. With this bolt removed, we'll remove this stop from the motor mount, take our transmission bracket out of the way, and set it aside to access the three 17mm bolts on the rubber mount.
With the mount out of the vehicle, you can inspect it. What happens a lot on the mounts is the rubber inside tears, and you can actually see that our mount is in good shape so we're not one to waste the new part so we're going to reinstall the original one.
Here is the original one out of the vehicle. If you did knew a new one from 1AAuto, you can see it's a direct fit, all the same mounting points. It's going to go in, bolt in just like the original.
Reinstall the three bolts that attach the transmission mount to the body. We're going to take some penetrating oil and spray it into the rubber mount to make sure our bolt goes through smoothly. Then we'll take our transmission bracket and install it over the studs on the transmission.
Before fastening the transmission bracket, we're going to put the bolt through the mount and start the first couple of threads, and you're tight. So, now we're going to bring up the transmission with our floor jack until it touches the bottom of the transmission bracket. Install the fasteners onto the transmission bracket, bring them down tight. So, again, ensure that your fasteners are nice and tight by hand.
Now we're going to bring the transmission mount bolt down nice and tight by hand. If you can get a torque wrench on, the torque spec is 40 foot-pounds, but we're just going to get it nice and tight by hand. Going to torque transmission bracket bolts to 40 foot-pounds.
Now we'll install this brace with two 10mm bolts. Now we're going to reinstall our aftermarket air intake or, in your case, it could be the OEM air box and intake setup, in the reverse order we removed it.
Thanks for tuning in. We hope this video helped you out. Next time you need parts for your car, please visit 1AAuto.com. Also check out our other helpful how-to and diagnosis videos.
Shop Products


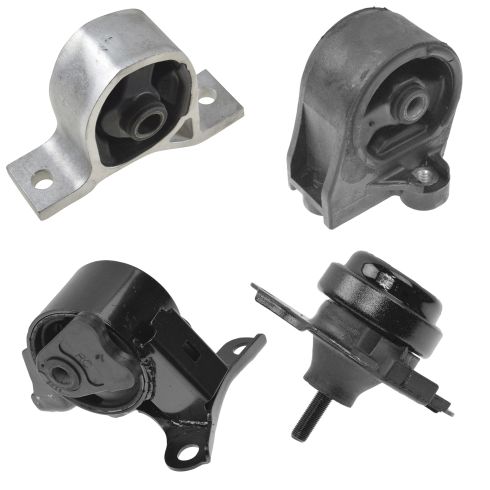
2001-05 Honda Civic L4 1.7L 4 Speed Automatic Transmission 4 Piece Engine & Transmission Mount Kit TRQ MTA34443
Part Details:
- 4 Piece
- (1) Transmission Mount
- (1) Front Lower Engine Mount
- (1) Front Engine Mount
- (1) Rear Engine Mount

How to Replace Transmission Mount 2011-19 Dodge Grand Caravan
Follow the steps on how to replace the transmission mount on your 11-19 Dodge Grand Caravan with this great video.
