How to Replace Upper Control Arms 2005-17 Chrysler 300
Created on: 2017-01-19
Find out what the job entails and what tools are needed to replace the upper control arms with this how-to video
-
step 1 :Removing the Wheel
- Loosen the lug nuts
- Raise and support the vehicle
- Remove the lug nuts
- Pull off the wheel
-
step 2 :Removing the Upper Control Arm
- Remove the 19mm nut from the upper control arm ball joint
- Support the wheel spindle with a bungee cord
- Tap the wheel spindle with a hammer to loosen the ball joint stud
- Separate the ball joint from the wheel spindle
- Open the hood
- If you are working on the driver side, release the power steering reservoir tab
- Move the power steering reservoir aside
- Remove the two 10mm bolts from the coolant reservoir
- Move the coolant reservoir aside
- Open the brake fluid reservoir door
- Remove the two 18mm control arm bolts from the strut tower
- Pull out the two captured bolts that hold the control arm to the wheel well
- Pull the control arm down and out
-
step 3 :Installing the Control Arm and Wheel
- Lift the control arm into place
- Insert the two bolt that hold the control arm to the wheel well
- Insert the ball joint stud into the wheel spindle
- Start the 19mm nut onto the ball joint stud
- Tighten the 19mm nut to 35 foot-pounds of torque
- Turn the 19mm nut 90 degrees farther
- Remove the bungee cord from the wheel spindle
- Slide on the wheel
- Start the lug nuts
- Lower the vehicle to put weight on the suspension
- Fasten the 18mm nuts onto the control arm bolts at the strut tower
- Torque the 18mm nuts to 55 foot-pounds
- Close the brake reservoir access door, If you worked on the driver's side
- Put the coolant reservoir into place
- Insert the two 10mm bolts for the coolant reservoir
- Clip the power steering reservoir onto the coolant reservoir
- Close the hood
- Tighten the lug nuts to 110 foot-pounds in a crossing pattern
Tools needed
-
Socket Extensions
Torque Wrench
Hammer
18mm Wrench
Jack Stands
18mm Socket
19mm Socket
21mm Socket
Gloves
Bungee Cord
Ratchet
Floor Jack
1/2 Inch Breaker Bar
Hi, I'm Mike from 1A Auto. We've been selling auto parts for over 30 years. We're dedicated to delivering quality auto parts, expert customer service, fast and free shipping, all backed by our 100% satisfaction guarantee. Visit us at 1AAuto.com, your trusted source for quality auto parts.
In this video, we're going to be working with our 2006 Chrysler 300. We're going to show you how to remove and replace your vehicle's upper control arm in your front suspension. Now this part is an assembly, so it comes with new bushings and a new ball joint all ready to go. If you like this video, please click subscribe. We have a ton more information on this and many other vehicles. If you want this part for your car, you can follow the link down in the description over to 1AAuto.com. Here are the items you'll need for this repair.
Using a 21mm socket and a breaker bar, loosen all of your lug nuts about one turn. Raise and support your vehicle. We're using a lift to make it easier to show you what's going on, but this job can easily be done at home with a jack and jack stands. Remove your lug nuts the rest of the way by hand. Remove your wheel and tire.
Remove the nut on the bottom of your ball joint with a 19mm socket and ratchet. Using a bungee cord or a mechanic's wire, we're going to secure our control arm. Now this should be okay, but you want to be careful when it releases to make sure that it doesn't flop over too far and tear something like your ABS sensor or your brake hose.
Now if you were to just replace this upper control arm, you could use a pickle fork or a ball joint fork and separate it by tapping that in between. However, that's prone to damaging the boots. If you're going to remove this to service the spindle, the strut, or something like that, you'll want to keep this intact. To do that, we'll use a hammer and tap on the front or side of the spindle right where the ball joint taper goes through to release it. Once you've tapped it free, you'll see why we installed that bungee cord.
Remove the 18mm nut on the outside of the strut tower here, and its twin over on the backside down here. You can't see it very well but you can reach it with an 18mm wrench, so we'll remove both of those. Remove the nut and move onto the back side. Be very careful of any wiring you find here. Our bolt was actually pretty rusty and I was having a tough time getting it off with a wrench. Fortunately, an 18mm socket and this flexible handle ratchet was able to get in there and do the trick. Remove the nut.
Now we did our job on the passenger side but you'll follow the same steps for the driver side with this small exception of relocating your coolant reservoir. Now this only takes a moment so we'll show you how to do it. You push this thumb tab over here so you can lift up and release the power steering reservoir. Just hang that off to the side. Then using a 10mm socket, ratchet, and extension, we'll remove these two 10mm bolts. Now you simply lift up and you can move the reservoir out of the way to access your 18mm nut.
Now to access the rear bolt on the driver side you have this cool little access panel for your brake fluid reservoir, which may allow you a little more room to get at this nut down here.
Remove the two captured bolts securing the control arm in. All you got to do is grab the tab, wiggle them out. You got to lay them down flat to get them behind the strut like that. Do the same thing on the rear. Remove the control arm from the vehicle.
Here we have our old upper control arm that we removed from our vehicle and our new part from 1AAuto.com. As you can see, these parts are mirror images of each other, the reason for that being this is the passenger control arm that we removed and this is the driver side upper control arm that I ordered for the vehicle. I made a mistake here. It's very important that you check your parts before beginning a job for this exact reason here. Everybody makes mistakes. I ordered the wrong thing and started on the wrong side of the car, and had we been doing this in the driveway, we would have been in some trouble right now with a job we couldn't finish and a car we probably drive every day.
However, if you ordered the correct part, you'll see that they have the same ball joint. Our new one even comes with this nice nylon thread-locked nut on it and two brand new bushings. The shape of this control arm is a mirror image of this because, again, it's the opposite side. You can see that the shape does follow the same contours, so the passenger side would be identical to this just as the drivers on our vehicle would be identical to this part. If your bushings go bad, it can cause a little bit of a vibration or a thud, maybe some creaking noises when you go over bumps. As can a bad ball joint, these can cause alignment and tire issues as well as handling and steering issues that you'll notice when driving the vehicle. If you have a bad upper control arm, be it the arm itself being rusted or damaged, bad bushings, or a bad ball joint, this complete replacement assembly from 1AAuto.com is going to go in direct fit just like our original equipment, so long as you ordered the correct side, and fix you up right.
Install your control arm. Make sure you lay the tab down flat on the bolt so you can line it up with the hole. You may have to wiggle them around there. These can be a little tough to see how you're lining them up. You just got to get that bolt started and work them around until it goes all the way through. There you go. Then we'll follow the same steps for the bolt in the rear.
Now there was nothing wrong with our old control arm, which is why we're reinstalling it. It's also why it's a good thing that we removed it by tapping the knuckle as opposed to using it with a pickle fork because we would have damaged the boot and rendered it useless. Slide the ball joint back into the spindle and start your 19mm nut. Torque the ball joint nut to 35 foot-pounds. Now once it's torqued, we'll want to add a 90-degree turn to it. You can use a torque angle finder if you have one, or you can just eyeball it like we've done there.
Remove your bungee cord and reinstall your wheel and tire. Lower the partial weight of your vehicle back onto the tires. Reinstall both of your 18mm nuts onto the studs. The reason we're going to tighten these down now is because with the weight of the vehicle on the tires, tightening these bushings down will mean that they're tightened nice and straight at ride height, which will prevent them from getting preload or twisted with the vehicle at ride height, which would cause premature wear of our bushings, meaning we'll have to do the job again sooner.
Now I'm just going to get these down nice and tight by hand, and we should be fine. If you want to torque them, the spec is 55 foot pounds, but you're going to have to remove a lot of stuff to get a torque wrench in there. Maybe you could use a crow's foot for it. We'll just get them down nice and tight with our hand tools and everything should be just fine. We'll use whatever tool you used to loosen the nut to tighten it back up. We used an 18mm socket with a flexible handle ratchet. You may have used a short wrench or a ratcheting wrench. Whatever you used to get access in there is exactly what we'll use to tighten it.
If you removed your driver side upper control arm, you'll have to lay your reservoir back into place and reinstall the two 10mm bolts. Tighten them down with your socket, ratchet, and extension. Slide the power steering reservoir back in and push it down until it clicks. Torque your lug nuts to 110 foot pounds in a cross pattern.
Thanks for watching. Visit us at 1AAuto.com for quality auto parts, fast and free shipping, and the best customer service in the industry.
Shop Products


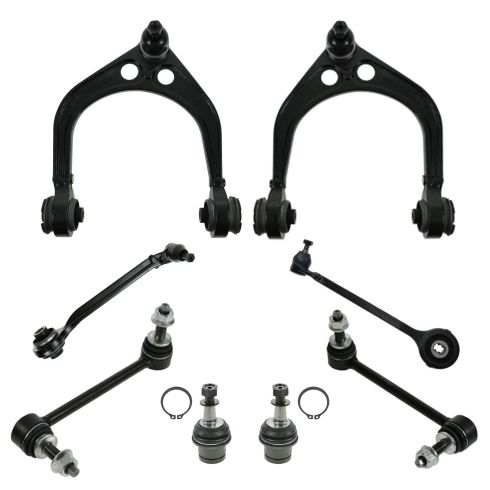
Dodge Chrysler Front 8 Piece Suspension Kit TRQ PSA56496
Part Details:
- (2) Front Sway Bar Links
- 8 Piece
- (2) Front Lower Ball Joints
- (2) Front Lower Forward Control Arms with Ball Joints
- (2) Front Upper Control Arms with Ball Joints

How to Replace Upper Control Arm 2009-14 Ford F-150
How to repair, install, fix, change or replace failing, rusted, rotted, or damaged control arms with ball joint on 11 Ford F150
