How to Replace Valve Cover and Gasket 2002-06 Nissan Altima L4 2-5L
Created on: 2017-08-28
Got a leaking valve cover gasket? Watch this video and learn how to replace the valve cover with this how-to video
-
step 1 :Removing the Engine Cover
- Remove the four 5mm Allen bolts from the engine cover
- Lift the cover off
-
step 2 :Removing the Ignition Coils
- Push in the clip and disconnect the connector
- Remove the 10mm bolt from the ignition coil
- Lift the ignition coils up and out
-
step 3 :Removing the Valve Cover and Gasket
- Remove the 10mm bolts holding the harness to the intake manifold
- Pull the harness clip up and out of the valve cover
- Loosen the PCV valve hose clamp
- Disconnect the PCV hose
- Loosen the breather hose clamp
- Disconnect the breather hose
- Follow the order sequence to remove the valve cover bolts
- Break the valve cover free with a rubber mallet
- Remove the valve cover
- Place paper towels over the exposed engine parts for protection from debris
-
step 4 :Installing the Valve Cover and Gasket
- Press the valve cover gasket into the channel
- Transfer the oil cap to the new valve cover
- Transfer the harness clip over to the new valve cover
- Remove the paper towels from the engine
- Clean the engine mating surface with brake parts cleaner, away from the interior
- Remove any RTV residue with a razor, away from the interior
- Apply a small bead of RTV silicone to the raised slope at the front of the engine
- Press the gasket cover onto the engine
- Follow the order sequence to tighten the bolts, lightly with an extension
- Tighten the bolts evenly 9 to 26 inch pound of torque in the sequence
- Tighten the bolts evenly 65 to 82 inch pound of torque in the sequence
- Reinstall the breather hose and hose clamp
- Reinstall the PCV hose and clamp
- Clip in the harness
- Tighten the 10mm bolts to the harness
-
step 5 :Installing the Ignition Coils
- Insert the coil into the engine
- Tighten the 10mm bolt to the coil
- Connect the connector
-
step 6 :Reinstalling the Engine Cover
- Clean any leaked oil residue from the side of the engine with brake parts cleaner
- Place the cover over the engine
- Tighten the four 5mm Allen bolts
Tools needed
-
5mm Hex Wrench
Razor Blade / Gasket Scraper
Socket Extensions
Torque Wrench
Paper Towels
RTV
10mm Socket
Ratchet
Cloth Rags
Needle nose pliers
Brake Parts Cleaner
Hi, I’m Mike from 1A Auto. We’ve been selling auto parts for over 30 years!
Use a 5 millimeter Allen key to remove the plastic engine cover. There are one, two, three, four bolts holding it on. Lift it off and put it aside.
These are your four ignition coils. I'm going to show you how to remove this one, procedure will be exactly the same for the other three. Start by pushing this clip in and wiggle the connector out. Use a 10mm socket and ratchet and use a retaining bolt. Put that bolt aside. Grab it on both sides, and kind of wiggle it, because there is a boot that goes down over the spark plug. It's got a little suction to it. Pull it out and that's how you remove the coil.
Now remove the bolts holding the harness on to the intake manifold. These are 10-millimeter. You can free the harness from this clip that's on the valve cover. Push the tab over, and pull it up and out. To remove the hose off the PCV valve, use needle-nose pliers. Sometimes you need to grab the hose, use the pliers and push it back off. You can use a flat-bladed screwdriver to move it off.
You need to remove this breather hose from the valve cover using needle-nose pliers again. Squeeze the clamp and move it up. It can be on there pretty tight, but this comes off pretty easy. The 10 millimeter valve cover bolts need to be removed in a specific order. You're going to start with number one. Go across here to number two, over to number three, to number four, number five, number six, over at number seven, number eight is in the back here, number nine, and number ten. Using a 10-millimeter socket, ratchet and extension, start over here. With all the bolts removed, you can lift the valve cover off the engine.
It might be a little stuck. Use a rubber mallet to break it free. There it comes. Lift it off around the harnesses here. Since the engine is open, I'm just going to take some paper towels and place them over the top so that nothing falls in while we change the valve cover.
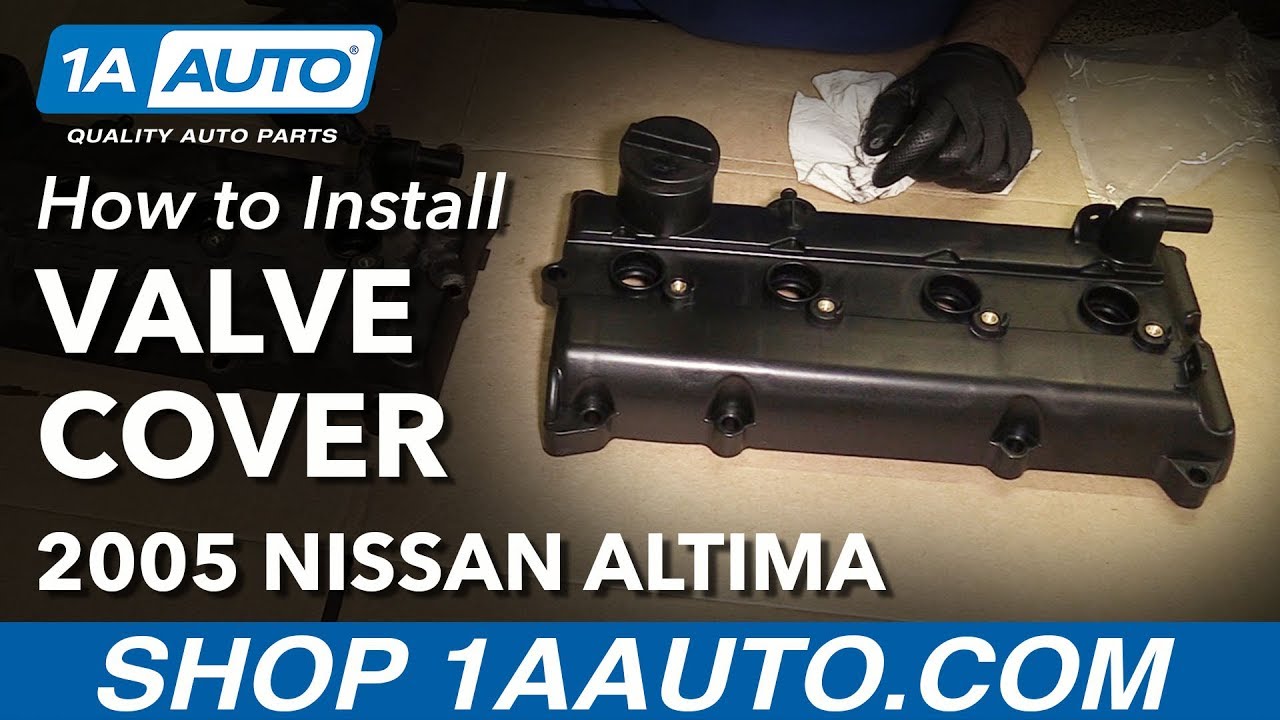
Here we have our old valve cover from our vehicle, and our new one from 1AAuto.com. Now flip this over. You can see our valve cover gasket was leaking. That’s why we decided to replace this. It actually, when I took it off it cracked a bit here on the spark plug opening gaskets. The new one from 1AAuto.com comes with seals integrated into the cover just like the original.
We'll have to add in the valve cover gasket it comes with. This is included with the valve cover. Just sort of match it up. It's going to go into this channel. That's installed. We get to flip it over. We're going to grab the oil cap out of the original. Just clean it up a bit.
I should also mention, the original has a PCV valve in it, and the new one comes with a PCV valve already installed. We need to transfer this clip over for the harness. Take some small pliers just to press the clips, pull it out, place it into our new valve cover, and this is ready to be installed in the car. Before we install the valve cover, I'll just take our paper towels off here where we're using to keep debris out of the cylinder head. We need to just clean around the outside edge, especially over here because we're going to need to add two small beads of RTV silicone according to the factory service information, just to prevent any leaks.
Now we'll take a little bit of brake parts cleaner and a rag and carefully wipe away from the cylinder head interior. Clean all around it, wiping to the outside. I'm going to take a razor blade and just carefully remove this little bit of RTV that's left here, making sure I scrape away from the inside of the cylinder head, and do the same thing on the back side of the head. Apply RTV silicone in roughly the same place. A small bead will do.
Take our new valve cover with the gasket installed, and place it down onto the engine. Kind of work it underneath that harness. Procedure for installing the bolts is specific. You start with number one here, move across to number two, and number three, number four, over to number five, across to number six, over to number seven, number eight, and number nine, and number ten. The torque procedure for the rocker cover bolts is to go in two steps. The first step is 9 to 26 inch-pounds, it's super, super light, so I'm just going to do it by feel. Then the second tightening sequence is 65 to 82 inch-pounds, so again, it's just a plastic valve cover going into aluminum head. I'm just going to tighten them all evenly in the order I pointed out, and just be very careful. Or you can use an inch-pound torque wrench if you have it. But if you don't, just don't go too crazy tightening them.
At this point it should be 65 to 82 inch-pounds. I'm just going to do it by feel. Right there once it gets tight I'm going to stop. And finally number ten. The valve cover's tightened down. Reinstall the breather hose. Reinstall the clamp. Reinstall the PCV valve hose. Reinstall the clamp. Now push this harness back into this clip. You have to move the harness vertically, it's supposed to sit. It kind of sits around that white tape on this harness.
Install the bolts holding the harness to the intake manifold. These are just going into aluminum, so I'm just going to turn them, right when they get tight I will stop. Reinstall our coils. Again, these are just threaded inserts in the plastic valve cover, so as soon as they start to get tight just stop. You don't want to over-tighten them and pull it out of the valve cover. Procedure will be the same for all of them.
Reinstall the connectors. One final step before I reinstall the engine cover, I'm just going to clean some of this leaked oil off the side of the engine with some brake parts cleaner. This way, if the valve cover gaskets leak again, when you're inspecting the engine you can tell that it's fresh oil. Reinstall the engine cover and the four bolts that hold it on. These bolts are just going into aluminum, just holding on a plastic cover. Not a lot of torque on these. Job is complete.
Thanks for watching. Visit us at 1AAuto.com for quality auto parts, fast and free shipping, and the best customer service in the industry.
Shop Products


How To Replace Valve Cover 2003-08 Nissan Maxima
This video shows you how to install a new valve cover with gaskets on your 2004-2008 Nissan Maxima.
