
How to Replace Vapor Canister Purge Solenoid 2005-09 Audi A4
Created on: 2016-04-14
Need to replace the Vapor Canister Purge Solenoid? Learn how to do this repair yourself with the steps in this video
-
step 1 :Removing the Vapor Canister Purge Solenoid
- Remove the engine cover
- Push the wiring harness forward, press the tab, and disconnect the wiring harness
- Pry off the clamp with hose clamp pliers or a flat blade screwdriver and pliers
- Pry and twist the hose off
- Remove the vapor canister purge solenoid
- Remove the adaptor
-
step 2 :Installing the Vapor Canister Purge Solenoid
- Insert the adaptor to the new vapor canister purge solenoid
- Slide the new clamp onto the hoses
- Insert the vapor canister purge solenoid into place
- Slide the clamp up into place and tighten it
- Reconnect the wiring harness
- Use a wire tie to resecure it and keep it in place if it feels loose
Tools needed
-
Flat Blade Screwdriver
1 Inch Hose Clamps
Wire Ties
Brought to you by 1AAuto.com, your source for quality replacement parts and the best service on the Internet.
Hi, I'm Mike from 1A Auto. I hope this how-to video helps you out, and next time you need parts for your vehicle, think of 1AAuto.com. Thanks.
In this video, we're going to show you how replace the vapor canister purge solenoid. This is a 2007 Audi A4, but this procedure is the same for a bunch of different Audi models. The items you'll need are a new purge solenoid from 1AAuto.com, pliers, a flat blade screwdriver, hose clamps, and you might want to use some plastic wire ties to re-secure it.
To remove your engine cover, pull up firmly. Then your purge valve is right here. There's an electric connection here. Push forward on it, as if you're trying to reconnect it, then push up on the tab on the bottom, and disconnect.
Then, if you have the tool for these crimping bends you can cut them off, most people don't have them. We'll try and move the screwdriver in underneath, pry up, expand, bend and pry where you see the serrations. If you couldn't see before, you just pull it up and off that tab. Use your screwdriver again, pry in the hose and twist to get it free.
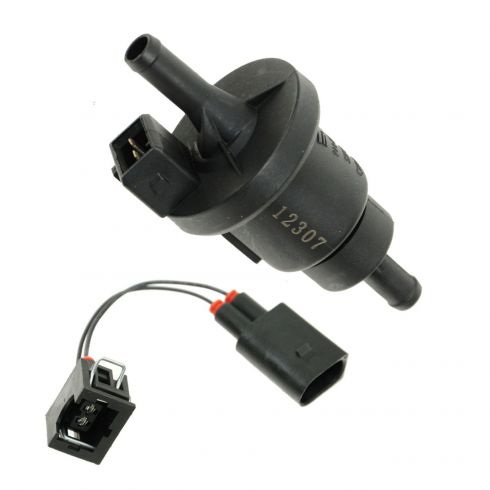
Here's the original part from our car. At 1A Auto, we sell a functional replacement. It is a little different. What's important here is that on our original, you have the arrow pointing this way, and when you really did look at briefly you would think that ours would install like that, but the arrow is pointing the other way, so you want to install it this way.
Then, for the connector this version comes with an adapter, so you plug the adapter on. Then it has the same connection as the original. The other thing is, we don't have the clamp-style clamps, so we're going to use these screw style. It's not the best thing, but they'll work well but these don't always seal as well as those clamp-style crimping clamps. We want to put these clamps on so that we can get a screwdriver on them. We'll put this one like that so we can get a screwdriver on the bottom. This one is pretty open; we'll put it on like that. Turn it this way so it's easiest to get a screwdriver from the top.
Then we're going to put it through here first. Push it right in. Put this hose on it. Get this hose braiding out of the way, put that on. Slide the clamp back up to the purge valve and tighten it up. Slide this one up and tighten. Finally, we'll reconnect our connection.
Just to keep it in place, we'll put a wire tie around it. Put one through and around the bracket here, tighten it. Just cut those off. Then we'll put a third one on the body just to strap the connector in place. Cut that off and put the cover back on.
Thanks for tuning in. We hope this video helped you out. Next time you need parts for your car, please visit 1AAuto.com. Also check out our other helpful how-to and diagnosis videos.
Shop Products

How to Replace Leak Detection Pump 2004-06 Jeep Liberty
Follow along with this video to learn how to replace the leak detection pump on your 04-06 Jeep Liberty.
