
How To Replace Vehicle Speed Sensor 1992-2001 Honda Accord
Created on: 2010-09-09
Watch this video to learn how to fix a faulty speed sensor. The experts at 1A Auto show you how to replace the vehicle speed sensor on your 92-01 Honda Civic or Accord.
-
step 1 :Locate speed sensor
- The location of the speed sensor varies with different models or engines, so double check your speed sensors location based on the model.
-
step 2 :Disconnect the speed sensor
- Unplug the connector. Use your 10mm ratchet and extension to remove the two bolts attaching it.
- Reach down and grab ahold of it and gently twist it back and forth till it pops off.
- There should be a post connected to it as well, make sure to remove this too.
-
step 3 :Replace the speed sensor
- Use a light to see where to place your new 1A Auto Speed sensor.
- Put the new drive shaft post in first.
- Using a light you can see how the post fits into place.
- Push the sensor down onto it's seating.
- Replace the two bolts and tighten them up firmly but not too tight.
- Reconnect the connector.
Tools needed
-
Socket Extensions
10mm Socket
Ratchet
Brought to you by 1AAuto.com Your source for quality replacement parts and the best service on the internet..
Hi, I'm Mike Green. I'm one of the owners of 1A Auto. I want to help you save time and money repairing and maintaining your vehicle. I'm going to use my 20 plus years experience restoring and repairing cars and trucks like this to show you the correct way to install parts from 1aauto.com. The right parts installed correctly that's going to save you time and money. Thank you and enjoy the video.
We're going to replace the vehicle speed sensor on this 95 Accord. This process is the same for many Hondas and this is a common problem. If your speedometer doesn't work or works intermittently usually it is this vehicle speed sensor. Half the battle is just knowing where to find the sensor, so I'm going to show you that on this 95 Accord. This is a V6 automatic car. On your car, the location of your sensor may differ if you have a different model or engine, but it's pretty easy. The only tool you'll need is a 10mm socket with a ratchet and extension.
So, on this Honda Accord V6 you can see we're on the driver's side the battery here. Your speed sensor is located right down -got to get this lighting here if I can- I actually have it unplugged already. There it is right there. So you're basically looking right down in behind the engine, and you can see right there is one of the 10 mm bolts that needs to be taken out and then there's one a little closer towards the front of the car. So I'm looking at our new sensor. So this is the one hole where you can see the 10 mm bolt, and then obviously the other one is located right over here, and those are the only two bolts you have to remove.
So the connector you just reach in with your thumb and there is a little tab that you push on with your thumb and you probably can't see very well, but you push on it with your thumb and then you pull the connector up and off. I'm just using a 10mm socket with an extension on a ratchet here, and you just kind of feed it right down there. I need a little bit of light. Put a little bit of light and get that wrench right on there and move it forward. Got to get the wrench underneath these plug wires here and on that bolt and get it going. And what I do to remove the bolts all the way is I loosen them with the ratchet first and then I just use this extension and do it by hand because they do come out pretty easy. And then once you have the bolts out you want to reach down with your hand and grab good hold of it and it's going to twist. Twist it back and forth if you can and then it will pop off. Bring it up and out. Also reach down in and where this sensor is there's a little post sticking up and you want to pull that out too.
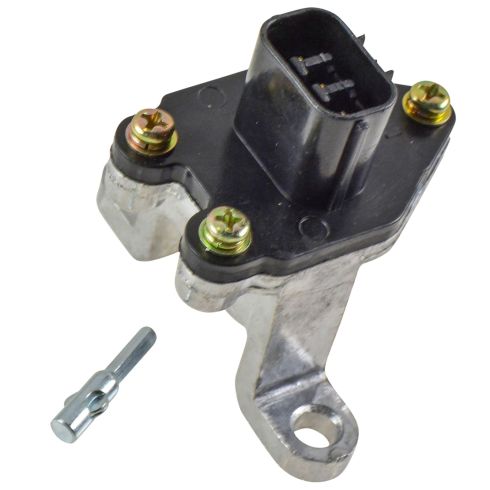
So you can see our old speed sensor. Here's the new speed sensor from 1A Auto. You can see it's all going to connect the same. The new sensor even comes with a little drive shaft. For this car this sensor is working fine so I'm just going to reinstall the original one. So first I'm going to put my drive shaft down in, and this is basically, I'm going to use some light to see down in there and see where the sensor goes, put this into the middle of the hole and then just twist it and push down at the same time until it goes in. Actually with good light you can see exactly how it wants to go in. Just move my light here. The only problem here is always having good light and being able to see what you're doing. At this angle I can almost get it. It's a matter of just stuffing my arm down in there far enough. I've got it in the hole. Twist it. Push it down in.
Okay, now what I'm going to do is the sensor goes in basically like that so I'm going to hold the sensor like this, and I'm going to feel for where this part goes with these two fingers. I'm going to hold it like this and kind of feel down there for it, and then once I feel the right spot push it down on. I'm going to do it carefully because you want to make sure that that shaft goes in the correct spot. Then I can feel it. Just kind of lightly putting it down on until that shaft finds the right spot. There it is, and now I'll gently push it down on, and now I can put my two bolts back in and we'll tighten them up firm, but not too tight. Reconnect the connector and we'll be all set.
We hope this helps you out. Brought to you by www.1AAuto.com. Your source for quality replacement parts and the best service on the internet. Please feel free to call us toll free 888-844-3393. We're the company that's here for you on the internet and in person.
Shop Products

How to Replace Input Speed Sensor 2001-07 Hyundai Elantra
Watch this video to learn how you can replace the input speed sensor on your 07-10 Hyundai Elantra. 1A Auto shows you how with step by step details!
