How to Replace Water Pump 2007-13 Mini Cooper S
Created on: 2019-09-07
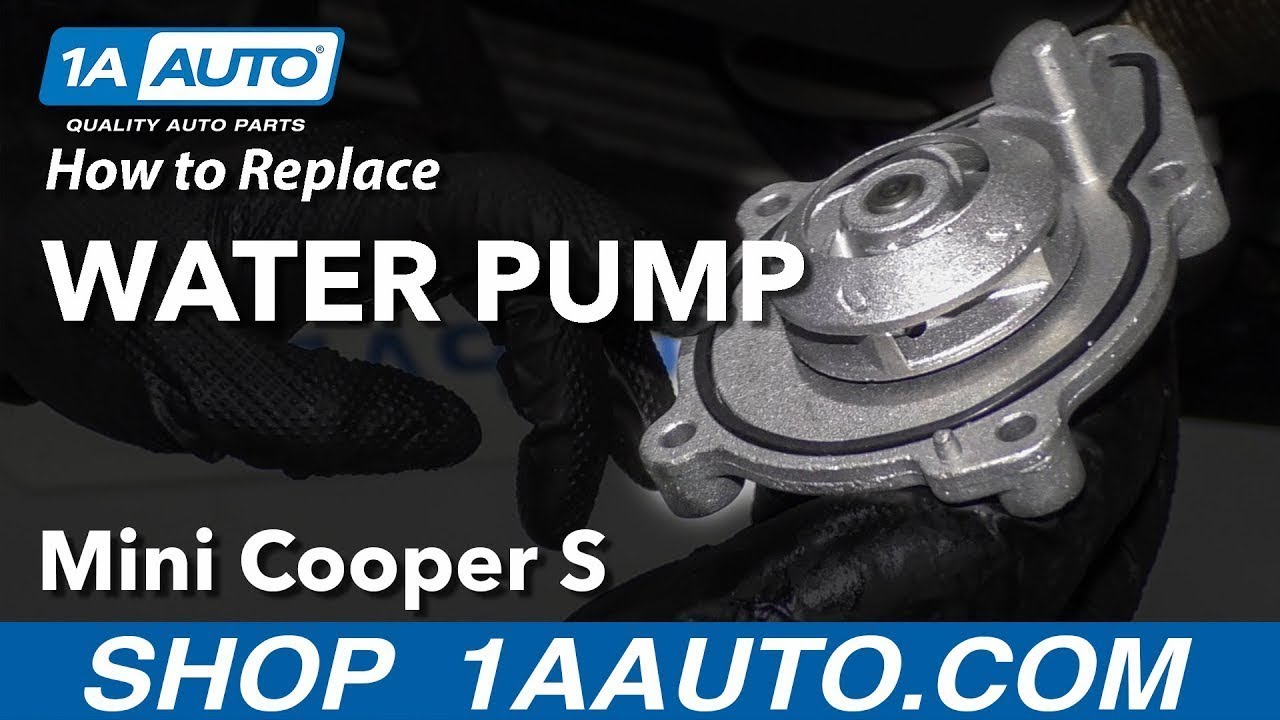
Check out this video to learn how to replace the water pump on your 07-13 Mini Cooper. 1A Auto shows you how to do it yourself!
-
step 1 :Removing the Wheel
- Pry off the center cap with a flat blade screwdriver
- Loosen the 17mm lug bolts with the vehicle on the ground
- Raise the vehicle with a floor jack
- Secure the vehicle on jack stands
- Remove the lug bolts
- Pull off the wheel
-
step 2 :Removing the Wheel Well Liner
- Remove the 10 mm nuts securing the front and rear edges of the liner
- Remove the push clip retainers by loosening the Phillips head center and prying it out
- Remove the two T30 screws near the top of the liner
- Pull the lining out from under the fender trim and pull it out
-
step 3 :Removing the Water Pump
- Loosen the 10 mm water pump pulley bolts
- Remove the 10 mm bolt to remove the AC line bracket
- Pull the handle to release the water pump drive friction gear
- The release strip hooks onto a tab of the housing
- Remove the water pump pulley bolts
- Remove the water pump pulley
- Loosen the lower radiator hose clamp to disconnect the hose and drain the coolant
- Remove the five 10 mm water pump bolts
- Remove the water pump bolt
- Ensure the water pump gasket is removed
- Clean the water pump mounting surface
-
step 4 :Installing the Water Pump
- Install the water pump gasket
- Position the water pump
- Install the five 10 mm water pump bolts
- Torque the 10 mm water pump bolts to 9 Nm
- Install the water pump pulley
- Install the three 10 mm water pump pulley bolts
- Torque the water pump pulley bolts to 8 Nm
- Pull the water pump tensioner strip to release it from the tab and return it to position
- Reinstall the AC line bracket and secure it with the 10 mm bolt
- Reconnect the lower radiator hose and secure it with the hose clamp
-
step 5 :Installing the Wheel Well Liner
- Insert the wheel well liner into the wheel well
- Install the two T30 screws near the top
- Install the two 10 mm nuts at the front and rear edges
- Install the push pin retainers
-
step 6 :Installing the Wheel
- Slide the wheel into place
- Start the 17mm lug bolts by hand
- Tighten the lug bolts by hand
- Lower the vehicle to the ground with minimal weight on the wheel
- Tighten the lug nuts to 88 foot-pounds in a crossing or star pattern
- Lower the vehicle completely
-
step 7 :Filling the Coolant
- Remove the coolant reservoir cap
- Fill the reservoir using a coolant funnel
- Open the coolant bleeder screw
- Continue adding coolant as necessary
- Close the bleeder screw
- Close the reservoir cap
- Run the engine for 10 or more minutes with the heat running
- Allow the system to cool
- Check and fill the coolant as necessary
Tools needed
-
Socket Extensions
Torque Wrench
17mm Socket
Jack Stands
10mm Wrench
Coolant Funnel Set
Flat Blade Screwdriver
Phillips Head Screwdriver
Plastic Fastener Remover
Hose Clamp Pliers
10mm Socket
Drain Pan
T30 Socket
Ratchet
Floor Jack
1/2 Inch Breaker Bar
Hi, I'm Mike from 1A Auto. We've been selling auto parts for over 30 years.
What's up guys? I'm Andy from 1A Auto. Here, I'm going to be doing a water pump on this 2007 Mini Cooper S. If you need parts for your vehicle, click the link in the description and head over to 1aauto.com.
I'm going to take this center cap off. I'll just use a straight blade screwdriver. Slide it in here. Pop the cap off. Now I'm going to take a 17 millimeter socket and a breaker bar and then I'm going to loosen up these lug nuts. Now I'm going to raise the vehicle. I'm using a two post lift. If you're doing this at your house, you can use a jack and jack stands. Now I'm going to take these lug bolts out. Just used a 17 millimeter socket to help me out. I want to get to the last lug bolt. I'm going to hold the wheel on there. Push down so that the wheel doesn't fall. Then I can grab the wheel, pull it up. Now I want to take this inner wheel liner out from underneath here. I'm going to use a 10 millimeter socket and a ratchet. Just take this fastener out from the back.
Then on the front here, if there's anything securing the front ... This vehicle, I believe there's another shield here, but it's missing on this vehicle. So check that and then you're going to take all these push clips out. I'm just going to use a Phillips head screwdriver. Loosen up the center part of the push clip and then I can slide the clip out. Just like that. So there's seven of these clips that you have to pull out. There's one here, one here, there's two right here. There's one right here, on a backside here, and then also one right there. I have these two torx bolts that I want to take out. I'm going to use a T-30, an extension and a ratchet. Take these two bolts out.
Now I'm going to grab the inner fender well, pull it out. There's one more. It's one more retainer right here. Take the Phillips head screwdriver. Loosen this up. You can just slide it out. I'm going to take a 10 millimeter wrench. I'm just going to loosen up the bolts that are on the water pump pulley. Just basically crack them free so it's easier to loosen them up later. You could also use some kind of strap wrench afterwards, but kind of hard to get in there because it's pretty tight. All right, those are just finger tight now, so that'll be easier. I'm going to remove this AC bracket right here. This just holds this AC line in. I'm just going to use a 10 millimeter socket, an extension and a ratchet. Take this bolt out. Take that bolt out.
Then I can slide this bracket out of the way a little bit. Just like that. This bracket can come off like that. It'll just re-clip in afterwards. Next we're going to release the tension on the friction gear. This is a little gear that puts pressure on the water pump drive. Release this right here. Pull this out, and then pull that. And then there's a little tab right there that gets locked on there and then that's loose. Then I'm going to take this friction pulley off the water pump. I'll just loosen up these 10 millimeter bolts. I take that last bolt out. I can grab this pulley, slide it out. There it go. Try to maneuver this pulley out of here. Pull this down.
And now you got to twist it back like that. So it comes off the water pump itself. It's recommended that you replace this pulley when you're doing this job. We're just going to reuse ours. It looks pretty good. The rubber still looks okay. At this point I want to drain the coolant system. So this radiator doesn't have a drain on it. So I'm just going to remove this hose clamp right here and just make sure I have a drain bucket. Loosen this up. It is going to make a mess but ... In the repair manual it suggests that you remove this friction gear tensioner right here, but the bolts are really close to the edge of the frame and you need a special tool to do that. And the water pump bolts are further in. You can actually get those out without taking it out. So we're going to take the water pump out without doing that. So these are the 10 millimeter bolts that go around the water pump. There's five of them. So I'm just going to use a 10 millimeter socket and a ratchet to take these out.
It's a little bit hard to get these bolts out. You can loosen them up with the socket and the ratchet and then take them out by hand. At the very top bolt, I'm going to have to use this ratchet wrench that's got a swivel head on it. It's very hard to get to. I can't even see it, but I just have to do it blindly. So make sure you have a drain bucket underneath the water pump. Some of the coolant's still going to come out even though we drained the coolant at the radiator hose.
Oops. Okay so now that's loose, I can grab the pump and slide it out. Try to maneuver it out of here. Then I'm good. I'm just going to use a pry bar and just try to pry the engine out a little bit just to give me a little more room at the water pump. Just a little bit. All right and then slide it out to here. And there's the water pump. All right, so before we install the new water pump, I want to take the gasket off the old. Just make sure that it's all intact and then we're going to clean this area. Just take a rag and some brake parts cleaner and wipe down the area where the gasket goes. Make sure it's nice and clean. If there's any corrosion or anything, you can take a razor blade and just try to smooth it out. Try to trim it off or use some emery cloth, or a little bit of sand paper.
Just make sure you clean it up afterwards. So you're going to want to make sure on the new water pump, you install the gasket. Just press it in. Make sure it's nice and smooth all the way around. We'll slide the water pump in this way. We're going to flip it around. It might take a little bit of maneuvering to get it in position. So I slipped that water pump into position. It's fairly difficult to get it in there. It would be easier if we're able to take this tensioner assembly out, but like I said before, these bolts are right up against this cross member. Then this frame of the vehicle, so I don't have a tool to be able to get that. So we did it. We were able to do it without it, but it would be easier to take this out. I'll take the 10 millimeter bolts and get those started.
Then I'm going to take a ratchet and then 10 millimeter socket and just go around and snug them all up. Now I'm going to take a torque wrench and do the best I can to get in there and torque these to nine Newton meters. It's a little bit tricky to get a torque wrench in there, so do the best you can. Next I'm going to take this pulley or a slipped disc gear, sometimes they call it. And slide this into position. Just like that. Get that back into position. Line up the holes. Take these little 10 millimeter bolts, get that one started, and then I can get the other two started.
I'm just going to use a ratchet wrench and snug them down. When you go to tighten these bolts, you can actually shove a screwdriver between here and this tensioner and that'll prevent the pulley from spinning. You could have done this taking it off as well. We can tighten these up. Now if you can fit a torque wrench in here, you can torque these to eight Newton meters. It's very hard to get a torque wrench in there, so just do the best you can. Right. You don't really need to take this bracket off to do the water pump, but it did make it easier being able to move this AC line a little bit. You just got to be careful. You don't want to break the AC line. Now I'm just going to reinstall this bracket. Just get this into position.
Then I'll take the 10 millimeter bolt, get that started. Now I'm going to just snug it up with my ratchet. I want to hold the bracket into the right position when I snug down the bolt. That's good. And right here I can squeeze this bracket together so it locks in place. Just like that. Now I'm going to put this coolant hose back together. Right there. Take my hose clamp pliers. You can use regular pliers to do this. Sometimes it's just the clamp slips off a little bit easier. And if this clamp seems weak, you could replace it with a screw type clamp. Right. And now we're going to install this inner fender well. Just get this around the strut, the back side here. Just got to work it back into position. Get this up right there.
Just going to take these bolts and get these started. Oops, the torque screw. Get that one started. Then one goes right here. Get that one started. I'm going to take this little nut, get that one started underneath there. Then I'm going to push all the push pins in. Make sure you get them all lined up. It's easier to angle these push pins a little bit and try to twist them, get the fingers in, and then lock them down. Now I'm going to tighten this nut up. Just use a 10 millimeter socket, extension and a ratchet and just snug it up. There we go. I'm going to tighten down these bolts T-30s and just snug these up. That one and this one. Now we're going to install the wheel. Line this up with the holes. Take the lug stud, get this started. Now I'm going to take my 17 millimeter socket and a torque wrench. I'm going to torque these lug studs to 88 foot pounds. I'm doing this in a cross pattern so that it torques the wheel down evenly. I'm just going to go around again, double check.
Now I'm going to reinstall the cap. Line this up with this location right here and press it on. Then we're going to install the coolant. I'll just take the coolant fill cap off right here on the reservoir. Set that aside. I'm going to use a funnel so it's easier to pour the coolant. And over here, before I start adding coolant, there is a bleeder screw. It's right down here. I'll just take a straight blade screwdriver. I'm going to loosen up that bleeder screw. It is plastic, so be careful. Just loosen that up a bunch of turns. I'm going to take the appropriate coolant. You're going to want to check your owner's manual for your appropriate coolant for the vehicle. This is a 50/50 mix.
All right. Keep adding coolant. You can actually hear the air that's coming out of the bleeder. Keep checking the bleeder and make sure. See if I can see any coolant coming out. All right. At this point there's a steady stream of coolant coming out of the bleeder, so I'm just going to tighten up that bleeder screw. Remember it's plastic, so just don't tighten it too much. Just snug. All right. That's good. Now the coolant level in the bottle is a little bit over full from where the full line is. I'm going to suck some of that out and then I'm going to run the vehicle for about 10 minutes to make sure the vehicle is not overheating. And then I'm going to adjust the fluid level accordingly. Then I'll let the vehicle cool down and recheck the fluid level, and then take the vehicle for a drive.
All right, so now that I have the level at where it's supposed to be, I'm going to let the engine run for about 10 minutes. I'm going to constantly checking the level to make sure it's not sucking the coolant in. There is no temperature gauge in this vehicle, so you got to play it by ear. There'll be a temp light if it overheats, but I'm going to leave the heat on so that I can feel whether the engine is cycling the coolant and then I know at least the coolant's flowing through the heater core and doing what it's supposed to do. And I do feel heat at this time and just make sure I'm constantly checking the level. After it's been about 10 minutes, I'm going to shut the vehicle off, let it sit for about 10 or 20 minutes. Cool down, and then take it for a ride and just constantly recheck the coolant level.
Thanks for watching. Visit us at 1aauto.com for quality auto parts, fast and free shipping, and the best customer service in the industry.

How to Replace Water Pump 2002-07 Mazda 6
How to repair, install, fix, change or replace a broken, bad, or leaking water pump on 07 Mazda 6
