
How to Replace Water Pump 2008-20 Dodge Grand Caravan
Created on: 2020-04-02
Watch this video to learn how to install a new water pump on your 2011-17 Dodge Grand Caravan.
Tools needed
-
Razor Blade / Gasket Scraper
13mm Socket
Torque Wrench
Socket Extensions
16mm Socket
Jack Stands
3/8 Inch Drive Ratchet
Trim Tool Set
Safety Glasses
Rubber Mallet
Gloves
Socket Driver
Wheel Chocks
3/8 Inch Drill Bit
Hose Clamp Pliers
10mm Socket
Drain Pan
Ratchet
Floor Jack
Swivel
One of the first things we're gonna need to do is relieve the cooling system. You wanna make sure that it's cool to the touch and you didn't just come back from a road test. Press down, turn it counterclockwise, and lift away from your face. That looks good. I'm just gonna set this just like this so I can remember. Let's get under the vehicle. We made our way underneath the vehicle. We found the red area right here. This is where the petcock is and that's gonna be the drain. Make sure you have a nice collection bucket, your hand and eye protection, of course. And if you have a little piece of rubber hose, go ahead and put it right on the little nozzle there and that'll help direct the coolant where we want it, which is, of course, in the collection bucket for safer cycling. I'm just gonna open this up. You can use something as simple as pliers or a flathead screwdriver. The next thing we're gonna do is remove the right front wheel. So if you look right underneath the front bumper, along the passenger side, you're gonna see a 10-millimeter headed bolt up there and then one over here. We're gonna remove the two of those. And then there's also gonna be a couple of push clips. We'll remove those as well. Last one.
So the next thing we're gonna do is get the belt off of here. To do that, you're gonna relieve tension using this tensioner right in here using a 3/8 drive. Turn it counterclockwise and get the belt off the pulleys. The next thing I'm gonna do, I'm gonna come right up here. I'm gonna give this a little spin and a wiggle. You're gonna have a little bit of movement, but if you hear any growl, you need to replace this. This is the idler pulley. This one sounds great, but we're gonna remove it so we have access to get to that water pump. Thirteen-millimeter socket, remove the bolt.
So now I'm gonna take my floor jack and I'm gonna come right along the tranny pan right along one of these edges where the corner is. I've got a nice pad. If you don't have a pad, use a piece of wood and we're gonna carefully go right on that corner, not in the center of the pad, and we're just gonna jack up to take pressure off that transmission mount. Let's go back up top. The next thing I wanna do from up top is remove this 13-millimeter headed nut to get the power steering reservoir off of here. Awesome. We're gonna come up here and loosen up this clamp and then we're gonna relieve all these clips. Now this is gonna go.
At this point, I'm gonna grab the air filter. It's a great time to take a peek at it. This one looks great. Set it aside. I'm gonna look down in here, make sure there's nothing going on. Looks good. I'm gonna give this a little tug straight up. There we are. Let's see if I can get this unit out of here. We've got our wiring. Just pull that right down. Awesome. We have a nice clear view at this point. First thing we're gonna do is use our 13-millimeter and take off these 2 nuts. So next you can either take this off if it's in the way or just use your 16-millimeter with a swivel and remove these 3 bolts. Give me that one there. All three of those are the same. Set them aside. Grab that mount. Has a little ground strap on it. If your ground strap's broken, I would go ahead and replace it. This one looks good, so I'm just gonna set this aside.
So the next thing we need to do is remove the lower part of this mount. I'm gonna use a 16' up here for the 3 larger bolts and then a 13-millimeter for that lower one. Great. Let's see if we can get this right up and out of here. Here we go. The next thing we need to do is get the lower hose off of the water pump. You can either use some pliers, which might be a little bit difficult, or you can use some of these, which is a tool that's meant for this job. Right up here. Let's remove this clamp. Slide that right down here. That's good. Ready? I'm gonna carefully remove this. Coolant may or may not come out. Now that that lower hose is out of the way, let's do the same to this one. Now that we have all those hoses off of here, let's start removing all these 10-millimeter head bolts that hold the water pump on. There's approximately a dozen of them.
There it is. If you wanted to and you didn't wanna mix up the bolts, you can go ahead and put these right into the new water pump in the corresponding holes. Okay. This one's another short one. We'll just keep going down the line. Now I'm gonna use my rubber mallet. I'm just gonna bonk on this, try to break it free. We'll let the rest of that coolant come out. Here it is. Now that we've got that out of the way, let's grab that gasket off of the engine. Yeah. That's on there. That is on there good.
The next thing I wanna do is take a razor blade and go right along the engine and try to make sure that this is a nice, smooth surface for the new gasket to ride. So I'm just gonna check the gasket. We can match it right up there. It looks perfect. It lines up great with the brand new water pump that we're gonna be installing here. So I'm just gonna put the two of them together. You don't have to worry about putting the gasket on backwards because, well, you really can't if you expect the bolts to line up. I'm gonna take that top bolt. I'm gonna go right up in here. This lined up, be careful for that gasket. All right. I've got one bolt started. I'm gonna start another one on the other side of the water pump. So that one's started in there. We've got a top one started in. Let's go ahead and start all the rest of the bolts. Now that these were all started in, let's just go ahead and burden them out.
Next, we're gonna torque all these bolts to nine-foot-pounds. Let's get these hoses back on here and just slide it right up onto there. Okay. Make sure you put the clamp as close to the back where you got it from as you can. You know, obviously, you don't wanna spin it because it's kind of marked into the hose. Okay. I'm gonna line this up exactly where it came from. Perfect. Next hose. Find where the clamp was. Perfect. Give those hoses a tug. I'm loving it. Let's level out that engine. That looks pretty great. Let's get the mount back in here carefully. I'm gonna do it with all the bolts in the mount. Start all these mount bolts. So now we're gonna torque these bigger headed bolts to 41-foot-pounds using our 16-millimeter.
Those are torqued. Now this little 13-millimeter headed bolt, you're gonna torque that 18-foot-pounds. Let's get this top area of the mount on here. Once again, you wanna make sure that you have this ground wire intact. If it's broken, you need to replace it. Okay. Let me get this mount on there. Do the same one for this one. Now we have to get our three bolts in up top here. You might notice it's a little bit hard to get the bolts lined up. You might need to either jack the engine up a little bit more or lower it down. We'll see as we go. Okay. So this doesn't feel like it's starting in. I can see the hole down there on the engine. Looks like it's close. I'm gonna bring the engine up a little bit. That's the last one. Two. I've got three right here. Let's get this little wiggle if it feels like it's jamming. Awesome. Let's snug them up.
So next we're gonna torque these little 13-millimeter headed nuts to 15-foot-pounds. Let's torque these top bolts to 41-foot-pounds. Torqued. Let's get this lower part of the box back in. You want this part down here to line up. Down. It should slide right in there. Okay. Now, if you look down inside here, you can see this little hole. You want that to line up with the tab that's underneath it. It's right about there. I'm just gonna get it so. It wants to go down. There we are. Grab your power steering. Set that back up on here. Put your nut on there. Bottomed it out. Tiny bit more. Perfect. Time to get the air filter back in here. Set that right there. Grab the cover. You got these little tabs. There's one here. There should be one there. They slide into these areas right here. I'm just gonna slide that in. Just like that. Bring this down. It's going a little further. There it is. Okay. Put the clips on here. Awesome. Get this. Make sure you don't forget to slide that on and then, of course, this right here. Line this up with that and then snug up that 8-millimeter/flathead. Give it a nice tug. That feels great. It's time to get our idler pulley set up back up on here.
All right. That's nice and snug. Give the pulley a little spin and a wiggle. That feels great. Let's grab that belt. So we've got the belt here. We're gonna start putting it on. The way that I'm gonna do it is I'm gonna go around the crank first and put the rest of the belt up nice and high up there. Okay. Let's go just like this. The backing of the serpentine belt's gonna go up and over the tensioner here and then the ribbed Parson's [SP] gonna go around the power steering. We're gonna continue on going up over the idler pulley up and over that alternator, and that goes just like this. It's gonna come around from the alternator, underneath the AC compressor, and then up and over that smooth portion of the water pump. So now I'm gonna take my 3/8 drive ratchet with an extension right up on here to the tensioner. And you can see it moving. Grab that belt and I'm gonna slide it right over the smooth portion of that water pump pulley, just like that. Now I just give it a couple of extra little springs like that, get this out of the way. And now just double-check that routing to make sure you're inside all the grooves all the way around the pulleys.
Let's get this splash shield up on here. You got two bolts that are gonna go into the frame right in here. There's another one over on this side. I gave the holes a little spray with some penetrant, by the way. Okay. I'm gonna put my little push pin in here. There it is. This one. Awesome. Let's snug those up with a 10-millimeter. Sweet. Put the wheel up on here. Start in and bottom out all of your lug nuts. The next thing we're gonna do is super important. Torque these lug nuts to 100-foot-pounds. Torqued. Let's make sure that the petcock's nice and closed. Perfect. Of course, we're gonna clean up our mess when we're done.
The next thing I wanna do is test the pressure of the cooling system. Make sure that it holds vacuum. So I'm just gonna use this kit right here. And what it's gonna do is it's gonna put force air through here, rush it right by, create vacuum inside the cooling system. You're gonna see the hoses start to, you know, crush down or collapse. And we're gonna watch this needle go all the way up into the green. It has to go past the 25. Anywhere in between the 25 and 30 is great. And then it has to stop. Once it stops, I'm gonna close off the vacuum, turn off the air, and we're gonna make sure that that needle doesn't go dropping into the yellow or even worse, the red. Here we go.
All right. So that's been holding pressure right there for a while now. So I'm just gonna take this off. We're gonna take a 5, 10-minute break here. I'm gonna come back and I'm gonna see if this drops down below that 25. So now you just use your manufacturer-specified coolant or if you wanna use a universal cooling of some sort, you can do that. You just need to make sure that it meets the specifications required by the manufacturer. This is gonna fill the system. You're gonna see this hose right here is gonna expand back to its regular size. All right. Now that I've got that as full as it's gonna go, I'm gonna go ahead and put this adapter on here. I've got a nice funnel with a stopper. I'm gonna put in some of this coolant. Perfect. Now, this is gonna burp out any air that might be still left in the system. The way that you do that is you would start up the vehicle and run it for a little while. As it runs, the coolant's gonna heat up the right temperature where the thermostat's gonna open up. Once it opens, more than likely, it's gonna end up pushing through any air that's inside this system and it's gonna come out the highest point, which, of course, would be here. As air comes out, coolant's gonna make its way in and it's gonna fill up just the way it should. Okay. So we made it inside the vehicle. We're gonna start up the vehicle.
You're gonna put your heat all the way on high. You're on face there. And then go ahead and crank it up. At this point, you could pay attention to the dash and that's where your temperature gauges. Obviously, if it starts making its way all the way up into the red, there's gonna be an issue. I'd like for it to come up into the middle, maybe a little bit above. That should be about where the thermostat's gonna be at about 3/4. It's gonna open up. You're gonna see a drop back down again. All right. So we ran this for a long period of time. We got all the air out of the cooling system. We're sure of it. Awesome.
Next, I'm just gonna grab this cooling hose. It's gonna be a little warm. I'm gonna give it a squeeze and then I'm gonna push this down in there. What that's gonna do is it's gonna give me a little bit of slack where it's gonna draw the coolant down and hopefully spill less. Here we are. At this point you can either take your leftover coolant and put it in your reservoir. If you haven't already replaced the cooling inside there, it's a good idea to. That's already full. So I'm just gonna go right in here and I'll recycle it later. Get that adapter off of there. We have our cap. Go ahead and close that up so it's completely tight. Perfect. We'll just double-check everything. If you left anything loose, make sure it's covered. Go ahead and take her for a road test.
Shop Products
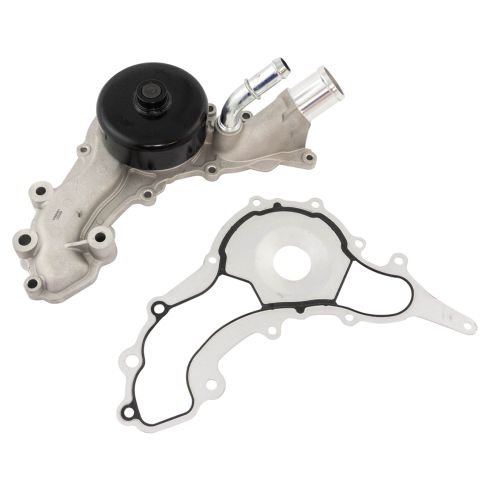
Jeep Dodge Ram VW Chrysler Engine Water Pump TRQ WPA07414
Part Details:
- Standard
- 9
- 2.63 in
- No
- Aluminum
- 2
- 4.33 in
- Yes
- No
- No
- 12
- Yes
- Plastic

How to Replace Water Pump 2001-11 Ford Ranger V6 4-0L
Watch this video to learn how to replace the water pump in your 01-11 Ford Ranger with the 4.0L V6. Water pumps are important, so don't wait!
