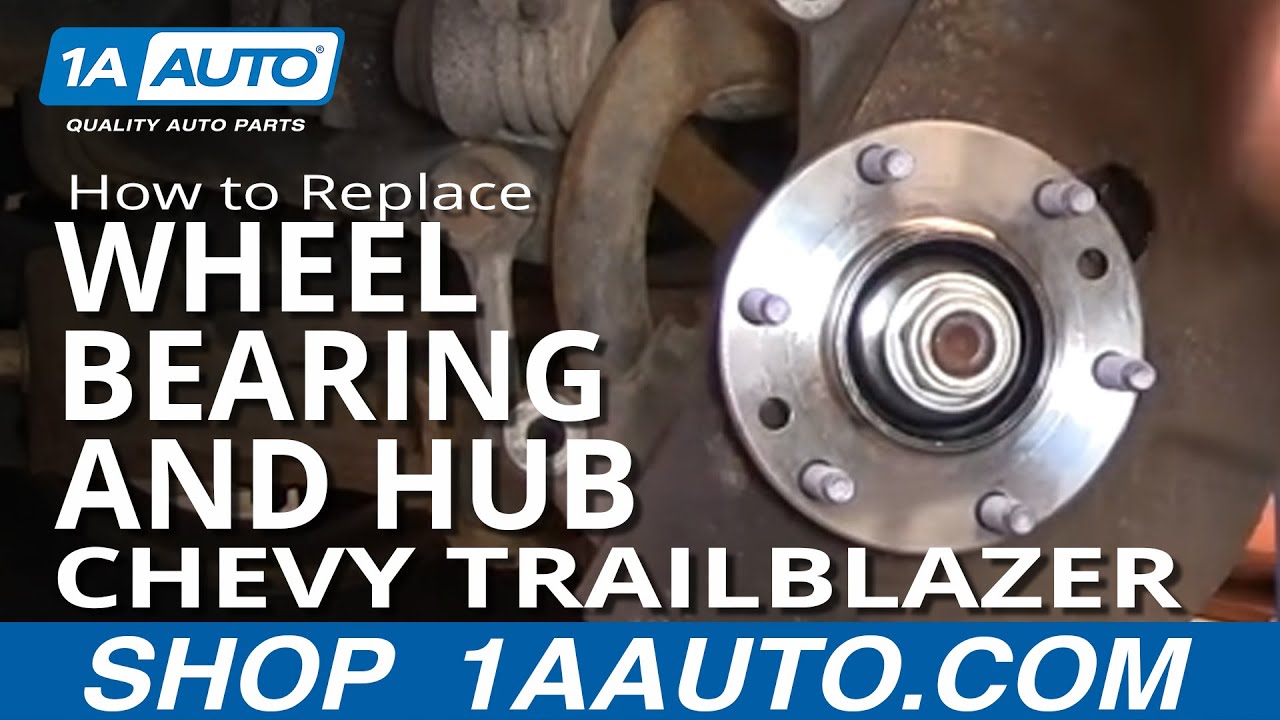
How to Replace Wheel Bearing Hub 2002-09 Chevy Trailblazer
Created on: 2011-06-08
In this video, 1A Auto demonstrates how to replace the wheel bearing and hub assembly in a 02-09 Chevy Trailblazer.
-
step 1 :Remove the wheel and tire
- Raise and secure the vehicle.
- Remove the lug nuts and then the wheel.
-
step 2 :Remove Caliper
- Turn wheels all the way in the opposite direction of the side you are working on.
- Use your 13mm socket wrench to remove the caliper bolts.
- Use a wire tie to help prevent stress on the caliper.
- Use your 18mm socket to remove the brackets.
-
step 3 :Remove brake disk
- Take care not to touch the disk, and if you do make sure to clean it with rubbing alcohol or mineral spirits.
-
step 4 :Remove Hub
- Use a 35mm socket to remove the hub nut.
- Give the axle a slight tap with a hammer to loosen it.
- Remove the 3 bolts securing the hub using your 18mm socket and extension and ratchet or breaker bar.
- You can use penetrating oil to help.
- Disconnect your ABS sensor.
- Use a rubber mallet to break your hub free, and work around the flange with the hammer to pull it off.
- Remove the hub and shield.
- Clean up any corrosion with a wire brush.
-
step 5 :Install new hub
- Use some penetrating oil to prep the knuckle for the new hub.
- Put the three 18 mm bolts in place and tighten the nuts to 90 ft lbs.
- Reinstall the ABS harness.
- Tighten but don't torque the lug nut.
-
step 6 :Put brakes and wheel back on
- Remember to replace the lug nuts on in a star pattern.
- Lug nuts tighten to 100-120 ft lbs
- Hub nut is 103 ft lbs.
- Make sure to check your brakes and steering before driving again.
- Make sure to pump the brakes and seat your rotors.
Tools needed
-
35mm Socket
13mm Socket
Large C-Clamp
Socket Extensions
Hammer
Rust Penetrant
Jack Stands
18mm Socket
19mm Socket
Rubber Mallet
Flat Blade Screwdriver
Anti-Seize Grease
Wire Ties
Ratchet
Wire Brush
Floor Jack
1/2 Inch Breaker Bar
Brought to you by 1AAuto.com-- your source for quality replacement parts and the best service on the internet.
Hi, I'm Mike Green. I'm one of the owners of 1A Auto. I want to help you save time and money repairing and maintaining your vehicle. I'm going to use my 20 plus years' experience restoring and repairing cars and trucks like this to show you the correct way to install parts from 1AAuto.com. The right parts installed correctly, that's going to save you time and money. Thank you and enjoy the video.
In this video, we're going to show you how to remove and replace the front wheel bearing hub on this 2004 Trailblazer. This is the same for many 02' to 09' Trailblazer, Envoy, Bravada, Rainier, Saab 9-7X, as well as Isuzu Ascenders. Tools you'll need are various millimeter sockets, a breaker bar or pipe, if you need some extra leverage. I actually didn't need the extra leverage on this vehicle, but I do show you how to use it, flat blade screwdriver, wire brush, a large c-clamp to reset the pistons in the caliper, torque wrench, 35-millimeter socket, which is something that most toolboxes don't have, but you do need that 35-millimeter socket and then jack and jack stands.
Start by prying your cap off. That's a 19 millimeter and if you don't have air tools, you want to start with the wheel on the ground, loosen the lug nut, then raise it, port it with jack stands and then remove the wheel and the tire. I'll just fast forward taking off the rest of those lug nuts and then removing the wheel and tire.
Now either pull or using the steering wheel, turn your wheels, so you have easy access to the back of the brake calipers. Now, we're going to check the condition of the brakes. Now, I spin this, you'll the rotor move. Okay. Then right to the right there, there's actually your pad. As you can see, there's not that much life left and it's not looking well on the outside either. We're going to remove the caliper, which is removing a bolt up here and a bolt down here and then after that, we're going to remove the caliper bracket, which is two large bolts, 18 millimeter one here and one up here.
The bolts on the caliper, relatively easy, 13 millimeter, use a small wrench. We'll just speed it up here as I remove those two bolts. Okay, the caliper comes right off. You can put that over here. Okay. These are 18-millimeter bolts for the caliper bracket. You're going to want a breaker bar, which is a bar to give you extra leverage. Okay. As you can see, it actually come apart pretty easy. If you don't have a breaker bar like this, you just have a ratchet, you can put a piece of pipe on to give you extra leverage and pull it easy on the pipe and it should have come loose.
When you're all the way up, you can just take your pads off. Take your screwdriver, which should pretty easily pry out. All right. You can see this one. That little line down the middle is the wear and tear. It's actually just about at the end of its life.
We'll fast forward again as we remove those two 18-millimeter bolts that hold that caliper bracket. Okay, that comes off. Then your discs should just come off. If your discs don't come off, there are threaded holes and you need to use some bolts. What you do is you put the bolts in there and the bolts crack against the hub to push them out. Okay. These rotors are pretty crusty looking so I am going to replace them using a 35-millimeter socket. If you don't have an impact wrench, what you'll need to do is, you'll do this at the beginning, you pull that cap off your wheel and then with the big breaker bar and a pipe, you'll loosen this hub nut. Because I have an impact wrench, I can do it this way.
When you're replacing the hub, you don't want to go just hammering away on the axle because you can damage your CV joint, but most of the time, if you just give this one good whack, you'll see that it's broken loose. Basically, just watch the relationship of your axle to your hub when you give it a good hit. Okay and it moved just fine. Just a note, I've yet to have a GM car, where just hitting it with the hammer once didn't break it free.
Right in behind there are three bolts, one here, one up there and then there's one around the back side as well, right down there. Now I get to those bolts. I'm going to take an 18-millimeter socket with a short extension. Okay, put it right on there. I'm going to use the poor man's method. I've got my ratchet and keep the pipe for leverage. Okay. Now I'm going to pull nice and easy and actually these come apart pretty nicely.
Now I'm going to speed up as I loosen the other two and remove those three bolts. Okay, your lead comes out. Okay, follow it around and we'll clip back here, push with the screwdriver, push on the other side, and push that out. Okay, and pry these right out. Now I'm going to really speed through here. All I'm going to do is follow the ABS lead up and pry out the connectors. One note is to check your new hub because that will tell you kind of how the connectors come apart, whether or not you need to pry them out of the frame or just open them up, so that you can put the new lead in.
This last connector with a tab right beside here, go in, lift up, and pull that off here. Okay, turn to the side, that out, off. All three of my bolts are off and my harness is disconnected. Just take a hammer. Okay. It all pops off. You need to get this metal shield off. Okay, get the metal shield off by using a combination of tap it off with a hammer and there's your hub. Take a wire brush here. Just clean off some of the scale. Okay, put that back on and a new hub from 1A Auto, exact same thing as the old one. Take the harness and put it back in place, work it onto the CV, push it on, take one of the bolts, put it through here, move the back end plate and start it into the hub. Grab the other two bolts.
I'm just going to speed it up as I reconnect that harness and route all the clips. It's very important to clip it back into place as it was originally, keeps the ABS harness from rubbing against anything and possibly damaging your ABS brakes.
Now we're going to put the torque on these three bolts to 90-foot pounds. I'll fast forward a little bit as I torque the other two bolts and again, I said I torqued them to 90-foot pounds. We're going to put our hub nut on and we're just going to ... we're not torquing it right now. We're just pulling the CV axle into the hub. Here, I'm going to fast forward through putting the brakes back together. If you'd like to see this in real time, just check out our video for the Trailblazer brakes and do please keep watching because I do go through torquing the center nut on the hub, as well as some other important information about what you need to do after you've had your brakes apart.
With the tire back on the ground, I'm going to torque the lug nuts to between 100 and 120-foot pounds, kind of just using a crossing pattern. Now here, I'm going to tighten that lug nut to 103-foot pounds. Very important after doing brake work, always pump your brakes many times and then before you do a road test, make sure the brakes hold the vehicle in gear and then do a stop from five miles an hour and ten miles per hour before hitting the brakes.
We hope this helps you out. Brought to you by www.1AAuto.com-- your source for quality replacement parts and the best service on the internet.
Please feel free to call us toll free, (888) 844-3393. We're the company that serves you on the internet and in person.
Shop Products


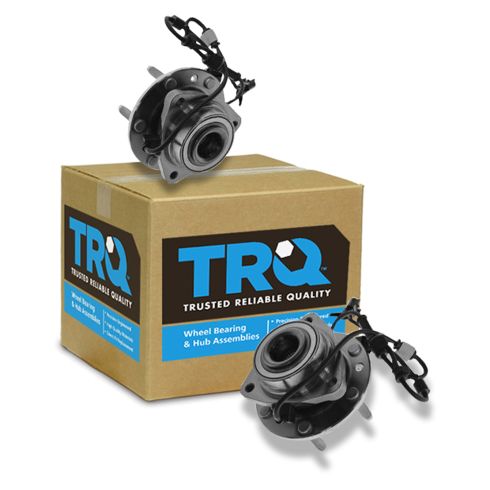
Front Driver & Passenger Side 2 Piece Wheel Bearing & Hub Assembly Set TRQ BHA53318
Part Details:
- 2 Piece
- (1) Front Driver Side Wheel Bearing & Hub Assembly
- (1) Front Passenger Side Wheel Bearing & Hub Assembly
- Ball

How to Replace Front Wheel Hub Bearing 2005-10 Pontiac G6 Saturn Aura
Watch this video to find out how to replace the wheel bearing on your Pontiac G6. 1A Auto will guide you step by step.
