How to Replace Window Regulator 1992-2011 Ford Crown Victoria
Created on: 2014-02-28
Learn how to remove the door panel and replace a damaged or bad window regulator motor with the help of the 1A mechanics in this video.
-
step 1 :Removing the Door Panel
- Pry up the switch panel with a flat blade screwdriver
- Disconnect the switch panel wiring harnesses
- Pry off the trim piece inside the door handle with a flat blade screwdriver
- Remove the T30 bolt inside the door handle
- Remove the three 7mm bolts along the outside of the door panel
- Pry off the triangular trim at the front top corner of the door panel with a flat blade screwdriver
- Remove the 7mm bolt inside the door pull
- Lift the door panel up and off
- Remove the three Phillips screws from the speaker
- Pull off the speaker
- Disconnect the speaker wiring lead
-
step 2 :Removing the Window Regulator
- Remove the metal rail using a hammer and punch on the rivets
- Drill out the center of the rivets with a 3/8 drill bit
- Carefully peel off the water shield
- Punch out the centers of the rivets on the regulator with a hammer and punch
- Drill out the rivet centers with a 3/8 drill bit
- Connect the wiring harnesses to the switch panel
- Lower the window
- Punch out the center of the rivets that hold the window to the regulator
- Drill the rivets out without breaking the window glass
- Pry off the covers on the window with a flat blade screwdriver
- Remove the weatherstrip
- Raise the window by hand
- Pull the window up and out
- Disconnect the window motor lead
- Remove the 11mm nuts at the top of the regulator
- Pull the window regulator out through the door
-
step 3 :Installing the New Window Regulator
- Insert one of the bolts into the window regulator
- Push the regulator into the door
- Hang the regulator by its bolt
- Tighten the 11mm nuts to the regulator
- Insert 10mm bolts into the regulator where the rivets are
- Connect the window motor to the lead
- Lower the window into the door
- Replace the weatherstrip
- Replace the protectors on the window
- Lower the window onto the regulator
- Insert the two 10mm bolts that hold the window to the regulator
-
step 4 :Resetting the Motor
- Connect the window switch wiring harness
- Turn the vehicle on
- Run the motor up for 4 seconds
-
step 5 :Reinstalling the Door Panel
- Put the water shield into place
- Replace the metal rail with two 10mm bolts
- Put the speaker into place
- Insert the three Phillips screws into the speaker
- Connect the speaker wiring lead
- Lift the door panel into place
- Push in the door panel clips
- Replace the three 7mm bolts along the outside of the door panel
- Replace the 7mm bolt inside the door pull
- Insert the T30 bolt inside the door handle
- Insert the trim piece inside the door handle with a flat blade screwdriver
- Insert the triangular trim at the front top corner of the door panel with a flat blade screwdriver
- Connect the switch panel wiring harnesses
- Push in the switch panel
Tools needed
-
Socket Extensions
Hammer
Flat Blade Screwdriver
Phillips Head Screwdriver
T30 Driver
Center Punch
7mm Socket
Drill
3/8 Inch Drill Bit
10mm Socket
Ratchet
Needle nose pliers
11mm Socket
Brought to you by 1AAuto.com, your source for quality replacement parts and the best service on the Internet.
Hi, I'm Don from 1A Auto. I hope this how-to video helps you out, and the next time you need a part for your vehicle, think of 1AAuto.com. Thanks.
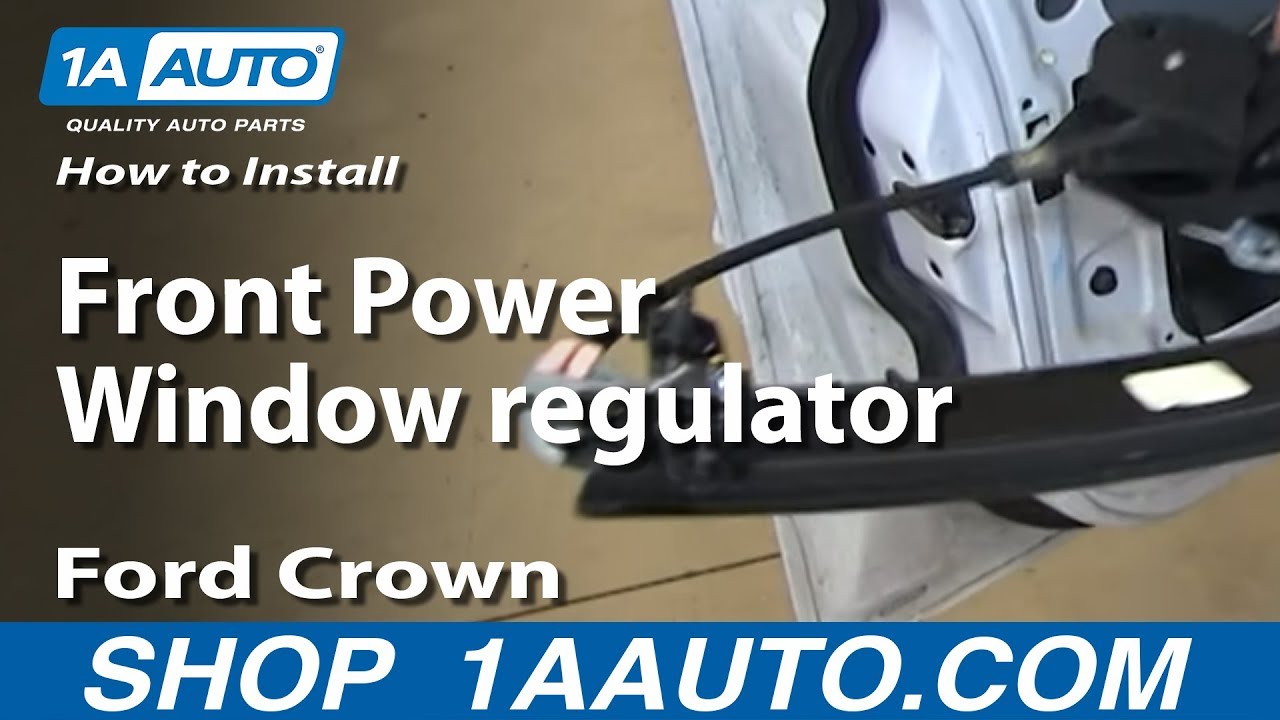
In this video, we're going to show you how to replace a window regulator on this 2004 Ford Crown Victoria. We show you on the passenger's side, but the driver's side is a similar procedure. The items you'll need for this repair include a new window regulator from 1AAuto.com, a flat blade screwdriver, 7mm, 10mm, and 11mm socket and ratchet with an extension, T30 Torx bit, Phillips screwdriver, hammer, punch, drill, 3/8 drill bit, and pliers.
Using a flat blade screwdriver, pry up the switch panel and then pull directly up. Push the tab on these harnesses and disconnect both of them. Pry out this panel behind the door panel and then remove the T30 bolt. We'll just fast-forward as Don does this. Now, lining the outside of the door panel, there are three 7mm bolts. Just go ahead and remove each of those. Pry off this triangular panel, and then remove this 7mm bolt in here. Now you can lift the door panel up and off.
Next, you want to remove your speaker. It's held in with three Phillips screws. We'll just fast-forward as Don removes those. Pull your speaker out, and push the tab on the harness and disconnect it. Next, you want to remove this rail here. Using a punch and a hammer, just hit out the center of these rivets. Then, using your drill and drill bit, just drill out the center of these. You really want to wear safety glasses while you're doing this because of the metal shards. Once you get to a certain point, the rivets will just pull right out. Now that that's removed, you can pull off your water shield.
Now, you want to do the same thing to these two rivets and these three rivets right here. Again, just punch out the centers of each of them. Then drill the rivets out. Now that motor is free, and Don's going to explain to you what to do next.
Our window regulator works fine. It's just a little slow, so that's why we're going to replace it. We have the luxury of being able to lower the regulator to get access to the two rivets that hold the glass to the regulator. In most cases, you're going to be replacing this because it just doesn't work. If it's stuck up or down and you can't get to the rivets, which is through here once we pull it down through here and through here, what you'll want to do is cut your regulator cable on the top and the bottom of the motor with a pair of wire cutters. Here's the wire.
You cut it here, and then that would give you the freedom of being able to move the glass up and down on the regulator. Just have somebody hold it for you while you do it. Now we have access to these two rivets. You want to do what you did to the other rivets. Just punch out the center and then drill them out. You do want to be careful, because they do go through glass here. Be especially careful when you're drilling out those rivets. Just do it nice and slow and use pliers to remove any of the rivet from the back.
Once you've done that you can lift your window up a little bit. Using a flat blade screwdriver, pry off these covers and then remove this weather strip. It just pulls up and off. You want to pull your window up and angle it straight down. Then pull it up and out of the door.
Now disconnect your regulator motor by just pulling back on that tab and pulling the harness free. Now remove these two 11mm nuts at the top of the regulator. Push your regulator back so that those studs come out of the door, turn it sideways, pull it out through this hole here, and your regulator is free.
On the right is the old window regulator; on the left is the new one from 1A Auto. You can see they're identical, and they're going to mount exactly the same. Feed your new window regulator back into place. Just push those studs back into the door and make sure everything lines up. We'll just fast-forward as Don replaces those two 11mm nuts.
In the places where there were rivets, use the 10mm bolts and nuts to fasten the regulator in place. Reconnect your regulator motor harness, and now put your window back down in facing down and then angle it back and push it down into place. Replace that weather strip, and this will help to kind of hold the window in place. Replace these protectors. Just push them together to lock them, and do the same to the other one. Then lower the window down and line it up with the regulator, and replace what was a rivet with those longer 10mm bolts. Now reconnect your switch panel and test out your regulator.
Then you want to line up those bolts with the holes where you removed the rivets through. This gives you a good place where you can tighten up those two bolts. Just tighten them until they're firm. Don't over tighten them because they are through glass. Replace your water shield. Now put that rail back in place and line up the holes. You will need to find two bolts to replace the rivets that you punched out so that you can re-secure this rail. We just used two small 10mm bolts. Reconnect your speaker, line it up, and replace those three Phillips screws.
To replace your door panel, put those lower hooks into place, and then push your harnesses up through that switch panel hole. Line up those other hooks, push the door panel back and down over that lock rod and down into the window sill. We're just going to fast-forward here as Don replaces the three 7mm bolts along the outside, the 7mm bolt inside the door panel, and that T30 bolt. Replace the triangular panel. Replace that panel behind the door handle and reconnect the harnesses. Put the backend of the switch panel in first and push down the front. You're all set.
We hope this video helps you out. Brought to you by www.1AAuto.com, your source for quality replacement parts and the best service on the Internet. Please feel free to call us toll-free, 888-844-3393. We're the company that's here for you on the Internet and in person.
Shop Products


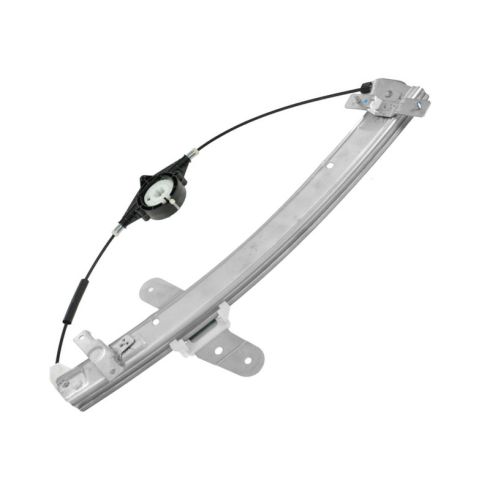
Ford Mercury Front Passenger Side Window Regulator TRQ WRA51095
Part Details:
- Yes
- Galvanized Steel
- Electric
- Yes

How to Replace Window Regulator 2001-06 Chrysler Sebring
How to repair, install, fix, change or replace a slow, stuck, cracked or damaged window regulator on Chrysler Sebring and Dodge Stratus, model years 01, 02, 03, 04, 05, and 06.
