
How to Replace Window Regulator 2000-04 Jeep Grand Cherokee
Created on: 2010-04-22
Watch this video to learn how to fix a slow or stuck window. The experts at 1A Auto will show you how to replace the window regulator in your 99-04 Jeep Grand Cherokee.
-
step 1 :Removing the Door Panel
- Remove the two Phillips screws
- Remove the T25 Torx screw
- Pry out the clips/pins
- Remove the panel and the door handle linkage and the wire harness
-
step 2 :Removing the Water Shield
- Carefully use your putty knife to remove the water shield
- Take care not to rip it, as it keeps water from getting into your door
- Remove speaker using your Phillips screwdriver to remove the 4 screws
- Press the little button to release the shield and pull it off completely
-
step 3 :Unbolting the Window Regulator
- Unclip the two clips attaching the regulator to the window
- Lift up the window and tape it up out of the way
- Remove the bolts with your 8mm wrench or socket and ratchet
- Feed your harness in and it comes right out
- Take out the motor first and then the regulator
-
step 4 :Installing the New Window Regulator
- Attach the new regulator to the motor using the bolts that came with it
- Replace the regulator and motor back into their original positions, regulator first
- Feed the harness back through.
- Bolt the track back in
- Click the harness in, and walk it up
-
step 5 :Testing the Brakes
- Before reassembling, test the window mechanism
- Once you have determined it works, untape and attach the window
- Test again to make sure the window isn't straining and everything works
-
step 6 :Reassembling the Door Panel
- Replace the water shield
- Insert the door panel into place
- Push the door panel into place
- Tighten the two Phillips screws
- Tighten the T25 Torx screw
Tools needed
-
Flat Blade Screwdriver
Phillips Head Screwdriver
10mm Wrench
Painter's Tape
10mm Socket
Door Panel Removal Tool
Ratchet
T25 Torx Driver
Brought to you by 1AAuto.com-- your source for quality replacement parts and the best service on the internet.
Hi, I'm Mike Green. I'm one of the owners of 1A Auto. I want to help you save time and money repairing or maintaining your vehicle. I'm going to use my 20-plus years' experience restoring and repairing cars and trucks like this to show you the correct way to install parts from 1AAuto.com. The right parts installed correctly. That's going to save you time and money. Thank you and enjoy the video.
In this video we'll be showing you how to remove and replace a window regulator on a 1999 to 2004 Jeep Grand Cherokee. Overall it's a pretty easy job as long as you've got the right tools and know how to do it. You need a Phillips screwdriver, a T25 Torx driver, a putty knife or door panel clip tool, a flat blade screwdriver, some painter's tape and a 10 mm socket and ratchet or wrench.
Here we are going to kind of speed through removing the door panel. We do have this detailed in another video. Just look at our other videos and search for Jeep Cherokee door panel removal. It's not too hard. There are three screws, two Phillips screws and a T25 Torx screw and then you pry the clips or pins out. Then you pull it off and remove the door handle linkage and your wire harness.
Now we want to go ahead and remove this water shield. You can see it's held on here by a bunch of gunk. What I do is I just take a putty knife and kind of cut through the gunk. You want to do this carefully because you don't want to rip this. This keeps the water from getting into your door. Then you get in the speaker and you're going to want to use a screwdriver and just four screws, one, two, three, four. Four Phillips screws to hold the speaker on. Now you've got the four screws out and the speaker comes out. Then there is just a little button here. You press and you can pull the shield off the rest of the way.
Before we unbolt the regulator you need to detach the window from the regulator and it's just two clips. This one we can kind of get with a screwdriver on this side. Then on this side what you probably want to do is lift the window up some, and then I'm just using a pair of pliers. Once you have those clips out then you want to raise the window up a little bit and you can kind of reach in here with your thumbs, push out on the window with your thumbs, and pull on the regulator with your fingers. Then your window is basically free from the regulator and you can tape it right up and out of the way.
I've removed this bolt and this bolt and I've loosened these three 8 mm and these two here. Then slide this up into there and slide this one up and out. That's the track. Then I'm reaching in here with my hand on the motor. Pull it out, feed my harness in. Then it comes right out. Take your motor out first. Then we'll pull it right out and here's your regulator. Common problem, this cable basically just snapped. You can see here, here's our new regulator from 1A Auto. Everything is the same. It has got the mounting points here and up here and here. It comes with its own bolts for the window motor so I loosened those up and then I'm going to transfer these two bolts onto the new regulator and put it in.
We've got the bolt on here and a bolt on here and we're going to insert it just like the original one. Get that in first then put the motor in and take the harness put it right through. It's a little more difficult to maneuver when it's all together. I've got the motor in place window slid down and we just tighten up one of those real quick. Let's get the harness back through. I'm going to pull the harness all the way through so it doesn't have a chance of getting caught up back in there. Take our bar, bottom in first. Now we'll tighten up all these bolts, and this bolt and we'll go from there. I've got all my bolts I'm just going to kind of check them by hand here and make sure everything is tight. Now, the harness that comes with the 1A Auto part is a little longer so I'm just going to kind of wrap it around here and then I'm going to click it in. Let's see here. Just want to make sure that you don't leave the harness sitting inside there. Then I'm going to walk it up.
I've got it all hooked up; I'm just going to do a quick test here. I'm not going to install my door panel. I'm just going to plug it in and get my- What I want to look to see is if the regulator is moving. I'm just going to bring it down, actually up, to a good place where I can see it and connect the window to it. We've got our regulator in and it's working. Now let's pull the painter's tape off. Let the window slide down until it contacts the regulator. Then kind of reach in and pull the regulator back. Work the window down in and then same thing on the front here. Pretty much with your hands, just get my head out of the way, just put the clip in. Then around the front same thing. Now again I'm going to hook up the window switch. Let it go up and down a couple of times. Listen and make sure the window is not straining at all or anything.
Now, at this point, we are just going to kind of speed through putting the water shield back on. You put the speaker back on and then reinstall the door panel. If you want to see installing the door panel in regular speed you can just check out our other videos for Grand Cherokee door panel. That's about it. Pretty easy repair when you know how to do it. The tools needed aren't really that complicated or anything. There you go.
We hope this helps you out. Brought to you by www.1AAuto.com, your source for quality replacement parts and the best service on the internet. Please feel free to call us toll free, 888-844-3393. The company that's here for you on the internet and in person.
Shop Products


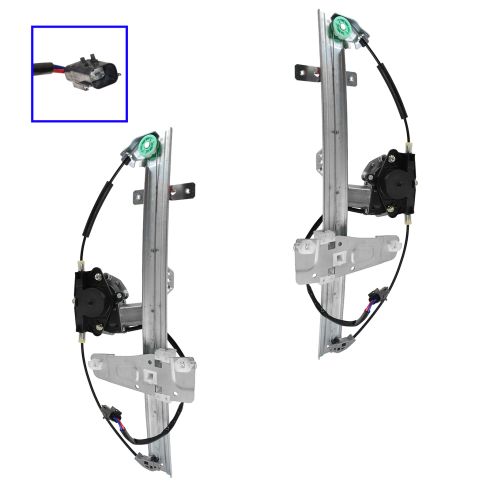
Jeep Grand Cherokee Front Driver & Passenger Side Power 2 Piece Power Window Motor & Regulator Assembly Set TRQ WRA50127
Part Details:
- Power
- 2 Piece
- (1) Front Driver Side Power Window Motor & Regulator Assembly
- (1) Front Passenger Side Power Window Motor & Regulator Assembly

How to Replace Window Regulator 1993-2011 Ford Ranger
Watch this video to learn how to replace the window regulator in your 93-11 Ford Ranger. You can do it yourself and 1A Auto is here to show you how!
