How to Replace Window Regulator 2002-06 Nissan Altima
Created on: 2013-11-22
Watch this video to learn how you can replace the window regulator on your 02-06 Nissan Altima.
-
step 1 :Removing the Door Panel
- Pry off the trim piece inside the door pull with a flat blade screwdriver
- Remove the Phillips head screw inside the door pull
- Pry up the window switch panel with a flat blade screwdriver
- Disconnect the window switch wiring harnesses
- Disconnect the mirror switch wiring harness
- Disconnect the trunk switch wiring harness
- Pry off the trim piece at the front top corner of the door panel with a flat blade screwdriver
- Remove the Phillips head screw inside the door handle
- Remove the two Phillips head screw inside the door pull
- Disconnect the courtesy light
- Lift the door panel up and off
-
step 2 :Removing the Inner Door Panel
- Disconnect the cables from the door handle
- Disconnect the door lock wiring harness
- Disconnect the harnesses from the inner door panel
- Remove sixteen 10mm bolts on the black inner door panel
- Remove the two 10mm bolts from the silver discs on the black inner door panel
- Hold on to the window when removing the last 10mm bolt
- Lower the window down into the door
- Pull the harness out of the door panel and push the rubber harness through the inner door panel
-
step 3 :Removing the Window Regulator
- Remove the two 10mm bolts that hold the window to the regulator
- Raise the window by hand and pull it up and out
- Pull the window regulator out through the door
-
step 4 :Installing the New Window Regulator
- Attach the regulator to the inner door panel
- Attach the 10mm screws to the regulator onto the inner door panel
- Attach the two 10mm bolts from the silver discs onto the inner door panel
- Feed the panel into place
- Tighten the rest of the 10mm screws to the inner door panel
- Remove the caps on the inner door panel with a razor blade
- Reconnect the window harnesses to the switch panel
- Adjust the regulator until the window clips are visible
- Lower the window, place the front into the track, then the rear
- Slide the window onto the clips in the regulator
- Attach the 10mm bolts to the regulator
- Replace the covers on the inner door panel
- Reconnect the harness clips into the door panel
-
step 5 :Reinstalling the Door Panel
- Connect the door lock wiring harness
- Re-clip the lock rod and attach the lock rod to the door handle
- Push the harnesses through the door panel
- Align the door panel and push it into place
- Reattach the courtesy light
- Tighten the Phillips screws in the pull handle
- Tighten the Phillips head screw inside the door handle
- Reconnect the switch panel
- Push the switch panel down into place
- Tighten the Phillips screw in the switch panel
- Replace the trim piece at the front top corner of the door panel
Tools needed
-
Razor Blade / Gasket Scraper
Flat Blade Screwdriver
Phillips Head Screwdriver
10mm Wrench
10mm Socket
Ratchet
Brought to you by 1AAuto.com, your source for quality replacement parts and the best service on the Internet.
Hi, I'm Don from 1A Auto. I hope this how-to video helps you out, and the next time you need a part for your vehicle, think of 1AAuto.com. Thanks.
In this video, we'll show you how to replace a front window regulator on this 2003 Nissan Ultima. It's the same process on the Ultimas from 2002 to 2006. You'll need a new window regulator from 1AAuto.com, a flat blade screwdriver, a 10mm socket and ratchet, and a Phillips screwdriver.
Start off by removing the screw cap right here, and underneath that, there's a Phillips screw. You want to just go ahead and remove that. Pry up the switch panel starting at the top here. Now disconnect the harnesses from the switch panel. Just push down on the tabs and pull the harness out. Now, pry out this triangular panel at the top of the door panel, and remove the screw cap from behind the door handle. Now, you just want to remove these two Phillips screws. Down here is your courtesy light. It just pulls out, and you can just pull out the harness and then pull out around the door to release the clips, and the door panel just lifts up and off. Now on the back side of the door panel, there are these two cables. They disconnect the same. Pull them out, lift it up and it's free. Then you just want to push on the tab on this harness and pull it out.
Now you want to just disconnect these harness clips. Just push on the tab and pull the harness free. You want to remove this harness from this inner door panel here so just grab either side of the clips and pull out until it comes free. You may need a flat blade screwdriver to help you out on some of these. We're just going to fast-forward as Don does the rest of them.
In the door panel, there are twenty 10mm bolts. Remove the sixteen that are directly into the black inner door panel. At the bottom of the inner door panel, there are two 10mm bolts that go through these little silver discs. You want to remove those next, but these are the last bolts securing your regulator. When you remove the last one, you want to just hold on to the window. Once you removed that bolt, just carefully lower the window down into the door. Now pull this harness out of the panel and just push that rubber stopper through the door. Now the inner door panel should come right off. Right here, there are two 10mm bolts on these regulator clamps that holds your window in place. You want to just go ahead and remove those. Once those bolts are removed, you can lift up your window, pull it up and out of the door, and your regulator will just pull right out.
On the left is a new regulator from 1A Auto; on the right is the original one. You can see the regulator from 1A Auto is going to mount, bolt in, and connect just the same. Now put your regulator into place and replace the screws to hold the regulator in place. We're going to fast-forward here as Don does this. Now, with the regulator attached to the inner door panel, you just want to feed that panel back into place. Make sure that no harnesses or anything gets pinched behind it, and then just replace all of those 10mm bolts.
Right here, you can see there are these two covers. You just want to use a razorblade and pull those off. If necessary, reconnect a couple of your harnesses and your switch panel, and run your regulator until you can see the clips that hold the window to the regulator through those holes. Now put your window back on in. Put the front down in first. Once you get it down into the widow, slide down into the door. Make sure that the front of it goes into the track and then make sure the rear goes into the track, make sure it slides up and down in the track easily, and then slide it down to the clips that are on the regulator.
Now, once you have the window lowered down into place on the regulator, just replace those two 10mm bolts. Now, just replace those covers. Now, just reconnect your harness and push those harness clips back into the door panel. Now, to reinstall your door panel, it's pretty much just a reverse of the procedure. You just push your harness into place and slide your door handle and lock cable down into that slot. Push it forward and clip it into the door panel. Push the harnesses through the door panel, and then just line it up on the window sill and push it down into place and make sure that the harness for your courtesy light comes through. Then line up the clips on the back of the door panel and just hit them into place.
Reconnect your courtesy light and push it into place. Replace the two Phillips screws the one behind the door handle and the one in the pole cap. Reconnect your switch panel. Just plug the harnesses in, and push the switch panel down into place. Replace the Phillips screw in the switch panel. Now, just replace that triangular panel and you're all set.
We hope this video helps you out. Brought to you by www.1AAuto.com, your source for quality replacement parts and the best service on the Internet. Please feel free to call us toll-free, 888-844-3393. We're the company that's here for you on the Internet and in person.
Shop Products


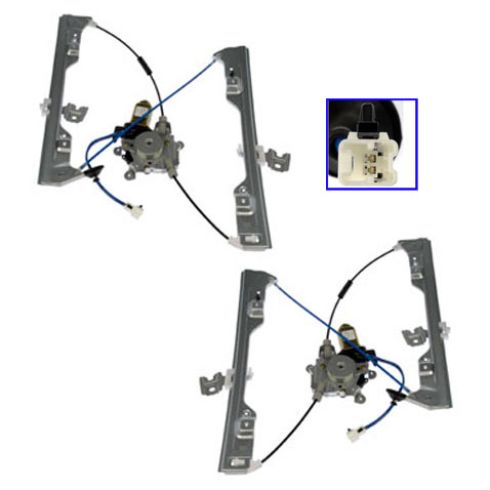
Nissan Altima Front Driver & Passenger Side Power 2 Piece Power Window Motor & Regulator Assembly Set TRQ WRA07872
Part Details:
- Power
- 2 Piece
- (1) Front Driver Side Power Window Motor & Regulator Assembly
- (1) Front Passenger Side Power Window Motor & Regulator Assembly

How To Replace Power Window Regulator 2005-09 Chevy Equinox
Learn how to remove the door panel and replace a damaged or bad window regulator motor with the help of the 1A mechanics in this video.
