
How to Replace Window Regulator 2002-09 Toyota 4Runner
Created on: 2019-10-27
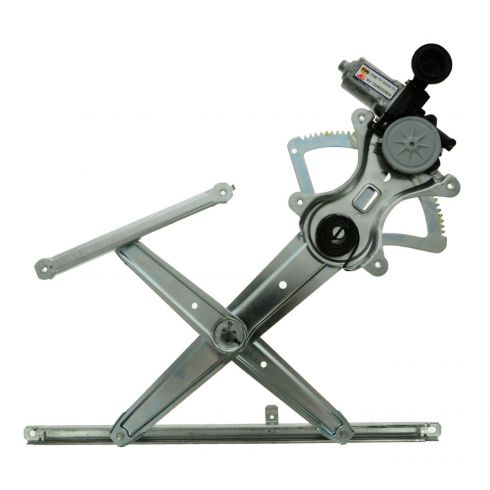
Check out this video to learn how to replace the window regulator on your 03-09 Toyota 4Runner. 1A Auto shows you how to DIY it!
-
step 1 :Removing the Door Panel
- Remove the side mirror mount trim
- Remove the door panel push pin retainer
- Remove the door handle backing trim
- Remove the door handle Phillips screw
- Pry up to remove the door arm rest pad
- Remove the arm rest Phillips screw
- Pry out the door panel, starting at the bottom, and carefully lift it upward
- Disconnect the electrical connector
- Disconnect the door lock and latch cables
- Disconnect the door lock electrical connector
- Disconnect the master window switch electrical connector
-
step 2 :Removing the Window Regulator
- Disconnect the door latch electrical connector
- Peel away the plastic vapor barrier
- Disconnect the door speaker electrical connector
- Remove the four 10 mm or Philips bolts to remove the speaker
- Connect the window switch electrical connector, removing it from the door panel, if necessary
- Lower the window, if necessary
- Remove the two 10 mm glass mounting bolts
- Raise the window completely
- Secure the window glass in position with masking tape
- Lower the window regulator so that the arm is fully collapsed
- Turn the vehicle power off
- Disconnect the window regulator motor electrical connector
- Remove the two 10 mm window regulator bolts
- Remove the four 10 mm window regulator motor bolts, while holding the regulator
- Remove the regulator from the door
-
step 3 :Installing the Window Regulator
- Install the window regulator assembly into the door and align the mounting holes
- Install the four 10 mm regulator motor mounting bolts
- Install the two 10 mm regulator mounting bolts
- Connect the regulator motor electrical connector
- Turn on the vehicle power
- Lower the regulator to access the mounting holes
- Remove the masking tape
- Lower the window glass to meet the regulator
- Install the two 10 mm window glass mounting bolts
- Raise the window
- Turn off the vehicle power
- Disconnect the window switch
- Insert the door speaker into position
- Install the four 10 mm or Phillips mounting bolts
- Connect the door speaker electrical connector
- Install the plastic vapor barrier
- Connect the door latch electrical connector
-
step 4 :Installing the Door Panel
- Make sure all of the door panel retaining clips are set into the door panel
- Connect the master window switch electrical connector
- Connect the door lock switch electrical connector
- Connect the small wire electrical connector
- Install the door lock and latch cables into the door handle assembly
- Lower the door panel onto the edge of the door frame
- Push the door panel to lock in the retaining tabs
- Install the door panel push pin retainer
- Install the arm rest Phillips mounting screw
- Install the door handle Phillips mounting screw
- Install the door handle backing trim
- Install the arm rest panel
- Install the side mirror mount trim
Tools needed
-
Socket Extensions
Flat Blade Screwdriver
Phillips Head Screwdriver
10mm Socket
Ratchet
Hey, friends. It's Len here from 1A Auto. Today, we're gonna be working on our 2006 Toyota 4Runner, and I wanna show you how to remove and install a left front window regulator. As always, if you need this or any other part, check us out, 1aauto.com. Thanks.
Okay, friends. So, here we go. We're in here. You're gonna notice that you have this little thing right here. Pop this, comes right off. Awesome. I'm gonna grab my screwdriver. You've got a little clip here. You'll notice in the center it has like a little bullseye ring there. What you do is you just take your small screwdriver, whatever you've got, you press it in the center a teeny bit and then it unlocks. So, essentially, right now what I would do is I would push it like this and that's in the unlock position as well. Once it's in the door, I would press it so it's flat and that pushes it out these clips. Set that aside. Quick behind here, there's a little panel. I'm gonna carefully come in with my pocket screwdriver, pop that out. There it is. You're gonna be able to see there's a Phillips head screw back there. Okay? Right under here, I'm gonna come just like this. You got another Phillips head screw. This one's a little bit thicker and bigger than the other one. I'll try to remember that for when it comes time to install.
Okay. So, we have the mounting screws out at this point. So, now what we're gonna do is we're gonna try to grab the door panel and pull it away from the actual door itself. Some things that you're gonna wanna pay attention to is the fact that there is gonna be some electrical wiring because we have a light right here. We also have switches and, of course, the latch up here or the handle. So, you're gonna wanna pay attention to all that stuff. Once we start pulling it off, we wanna start disconnecting things. Just gonna grab my plastic trim tools here, try to come right underneath. Look at that money. More money. This is awesome. I know. All right. This should come right up.
All right. So, now we can see what's going on behind here. Like I said, you got a couple of cables here, got some wiring, some wiring down there, so we're gonna wanna pay special attention to all that stuff. We don't wanna obviously break anything. Just gonna take a look at this, see if I can get this to pop out of here. If you look right down along here, you're gonna be able to see that there's like a little push tab. Let me try to push down on that and pull out the wiring. That's free now. These right here, it's a good idea to pay attention to which way they go. You've got your green one, comes down to the bottom, and then the white one's up on top. So, when we go to install, you wanna make sure you put it in the same way. Just pull it out, lift it straight up. Same thing up here, up just like that. This one's gonna go down by look of it. Awesome. Let's keep moving.
We've got a little squeeze tab right here. Squeeze it, pull it, check it out. Let's look down on the bottom side here. This one looks like it's gonna be a little bit harder to see, so we're just gonna push on this little tab right here. Looks good. Take our door panel, we'll set it aside. All right. So, let's get this out of the way. Just gonna push on this little tab on the side there, and this up here. I'm just gonna kinda wrap it in there just to kinda hold it aside for me. I'm gonna come up here. This black goo right here, it's very sticky, super sticky. You get it on your clothes, it's going to be a nightmare, especially once it goes through the laundry, it's gonna ruin people's clothes. So, if you get some on your clothes, that's gonna be an issue for you. Nice.
Okay. So, these two bolts right here are mounting bolts if you come across this way. Anything else, we have these right here. Those are also mounting bolts. Along this bottom channel right here, you're gonna notice there's one mounting bolt right here. There's gonna be another one that's hidden over on this side. So, what I'm gonna do is I'm actually gonna take out this speaker as well. You can use a 10-millimeter or you can use a Phillips head and, of course, disconnect your wiring. So, just pushing on this tab, give it a little wiggle. Make sure you wanna lift up. Awesome. I'll just stick with the Phillips because that's what I have. Get this out of here. Let's set that aside. I have a clear view of my other 10-millimeter bolt here. Okay. So, that's awesome.
All right. So, we connected our switch here and it comes out of the door panel with just a couple of Phillips head screws or you can just have the door panel over here. You wanna obviously make sure that the window regulator works and you know that it has power and everything. That way there, you're not just replacing the regulator because it's not working. I'm assuming you've already diagnosed that the regulator is the issue at this point. So, we know it goes up and down. I'm gonna grab my 10-millimeter. I'm gonna loosen up this bolt right here, just like that. That's what it looks like. We'll set that aside. Same thing with this one. Bolt number two, same as the first. Get some tape ready. We're gonna bring the window up now that we have these screws out.
Okay. Now, the window's up, we're just gonna tape the window so that we don't have to worry about it falling down while we're working. Painter's tape is reasonably cheap in comparison to a new window. So, and of course, your safety, and safety is paramount. Last thing you want is glass falling down, potentially hurting you. So, I'll put on three or four strips of this. Make the strips as long as you want. I wouldn't use duct tape because duct tape, a lot of times, will leave glue residue behind and it's just a sticky mess to try to clean up and I don't have time for that. So, we'll go of what we got. This painter tape is gonna work perfectly. Awesome. Okay. So, now that we have that up, I'm just gonna try to go down with the window's coach. Okay. I can see my bar. It's separated from where I mounted it to the window.
All right. It's coming off. Awesome. I'm gonna put it so it's just straight, just like this. So, essentially, you have your window motor right behind here. Here's the electrical connector for it, by the way. You have your four bolts, you've got two more screws right here. So, at this point, you turn the vehicle's power off and we can continue. All right. I'm gonna come right under here, there's a little push tab. Just comes from the bottom there, just lift it up, slide this out and it's right there. Take a peek. Looks decent. Awesome. Okay. 10-millimeter. All those look the same. This point, we're gonna hold on to the window regulator and remove this last screw and bolt. There we are friends, window regulator.
All right. Here we go. It's time to install this bad boy. Right in here. I'm gonna try to line my motor mounting areas up with the door. So, you can see we've got the electrical area coming right out right here. I can see my four mounting holes lining up. That's always good. See if we can get these started in. So, here we go, friends. Just get these snugged up. Awesome. That's perfect. I love it. All right. So, we have this arm. This is the arm that the window is supposed to be setting into. So, now what I would like to do, I'm gonna connect our window wiring here. I'm just gonna put this right in the way it goes. Give it a little tug. That feels great. We're gonna put on key power, we're gonna keep our fingers away from the area where the window regulator is. You don't wanna have anything in there, no flashlights, no tools or anything, especially no fingers. Key is on. That looks good.
All right. So, we know that the window regulator's working as it should. It can fully go up and down. Awesome. So, I'm gonna bring this down to where I'll be able to see where my screws are gonna screw in. That looks pretty good. I'm not going all the way down because when I bring the window down, I'm gonna be holding onto it with my hands and obviously, I don't wanna get to a point where I'm holding on with just the tips of my fingers. Still trying to get it down to where I need it to line up with. I'd like to still have something nice to be able to grab onto while I put in my last two bolts down here. So, I'm gonna get my bolts ready. All right. So, we have our two bolts that we're gonna be using. These are the ones that don't have any Phillips heads in them. All right. Set those right there. Here we go. It's time to remove the tape. So, you wanna make sure that you've got off as much of the slipperiness from the window regulator off your fingers, your gloves or whatever it is you're gonna be holding this with.
I'm gonna put my hand right under here and I'm gonna hold the window. Let me get this tape off of here. As you can tell I put on a whole bunch because that's how I roll. Awesome. We're gonna let this down nice and slow being very careful for any pinch points. I don't want anybody getting hurt. Bring this in, line it right up. Perfect. I'm still holding that window because it's not completely mounted in at this point. Anything can happen. Get this out of here. Done. Let's test it. That's beautiful. Make sure the key power's off. Set that key aside. We're gonna take this back off here now. All right. Let's get this speaker back in. Awesome.
All right. So, we have our vapor barrier here. We'll get the sticky side. Obviously, that's gonna go up against the door itself. We're gonna take our cables, go right through just like this. Bring this over. Just try to line it up the best you can. If it's not perfect I'm not gonna get mad at you, but it is your door, so do the best you can. You do you booboo. Obviously, if you were taking this off and you tore it anywhere, it would probably be a good idea to just throw a little piece of tape on it. You can use any color of tape you want. It's gonna be behind the door panel anyway, so nobody's really gonna see it, but you don't want any big holes in there if you can avoid it. I just like to go around like this now and just make sure that it's all sticking on the best that it can. Awesome. Take this, get your little clippy doo and go right in there. This right here, right there. Awesome. We have our cables, we've got this for our little light that comes underneath here, window switch, locks. Perfect. Let's move along. Here we go. Let's start getting this mounted in.
Something to pay quick attention to and I'd like to mention it real quick. See these little tabs right here? If you happen to notice that any of them are missing and you just see this, you're gonna wanna take a peek at your door and figure out where it is. Once you find it, just pop it out of there. You can use something as simple as a little forkey tool and it'll pop out. Once you do that, you just take it, put it back in your door panel. That's it. Let's start connecting some of this stuff. This harness right here or pigtail is gonna be the hardest pigtail for you to get connected in. It has this little slidey lock thing. So, when you push this, when you squeeze this together like this, it pushes that little hook inside there in the locked position.
To unlock it, you need to push this like that and bring it up as far as it can go. So, it has a hook in there. When it's locked, it goes like this. When it's unlocked, it goes like this and then it's gonna go right around this. So, just take it, push it in, and then push in the outer end of it. There it is. Okay. Turn your door panel so it's in the direction that you need it to be. You're gonna take this, give it a little tug and get this one right here. This one you can see right through the door panel. This come just like that. Give it a little tug. Awesome. All right. So, now it's time for these cables. I'm just gonna turn my hat around real quick. We're gonna start with the top one, which is the white one. Put it right in just like that. Bring it around and it should slide right in. Just like that. Do the same for this one. Just like that. Slide that, click it right in. Perfect. Just giving him a little tug, see if they do anything. Awesome. Okay. At this point, I'm just gonna bring this up over here, set it right up and along. All right. Make sure it's all the way down and then just start bonking it in. Cool.
All right. Got our little clippy doo. Make sure that this little piton is sticking out. If it's flush like that, you're not gonna be able to get it in because it's in the locked position. Just give it a little tap, pops out. All right. So, we're gonna press along the outside of this clippy doo, and then press on the center. It's nice and locked. We're gonna grab our Phillips head screws. Remember there was two different types, the big one, a small one. Small one goes up here, the larger one goes down here. It's more of an anchor point. So, when you open and shut your door, it's holding in there nice and tight. Start with whichever you'd like. This one. Awesome. Get this right here. Perfect. You got a little clippy doo here. One right there, a hole, and a hole. Line it up, bonk, bonk. That's my thing. It's good. Got our little triangle. That's the little pushpin there, it can go right here. So, that's right in. Awesome. We're gonna make sure we clean up the window because why not? And down the road we go.
Thanks for watching. Visit 1aauto.com, your place for DIY auto repairs, for great parts, great service, and more content.
Shop Products
2007-14 Toyota FJ Cruiser with Auto Down Feature Driver Side Power Power Window Motor & Regulator Assembly TYC 660320
Part Details:
- Power
- Features and Benefits

How To Replace Power Window Regulator 2005-09 Chevy Equinox
Learn how to remove the door panel and replace a damaged or bad window regulator motor with the help of the 1A mechanics in this video.
