
How to Replace Wiper Transmission 2001-05 Honda Civic
Created on: 2016-04-11
Need to replace the windshield wiper transmission? This video shows how to install and remove it, including how to disassemble and reassemble it
-
step 1 :Marking the Blade's Position
- Make a mark where the blade meets the windshield with a black marker
-
step 2 :Removing the Wiper Arms
- Remove the rubber caps on the wiper blades with a flat blade screwdriver
- Remove the 14mm nuts from the wiper blades
- Push down on the wiper arms and pull them off the studs
-
step 3 :Removing the Cowl Panels
- Open the hood
- Pry up the cowl panel's outer surface with a flat blade screwdriver to remove the three trim buttons
- Remove the cowl weatherstrip by pulling off its clips
- Pull the cowl panels down to get them loose
- Pull the cowl panels up and out
- Pry up any remaining cowl panel clips with a flat blade screwdriver
- Insert the remaining clips back into the cowl panel
-
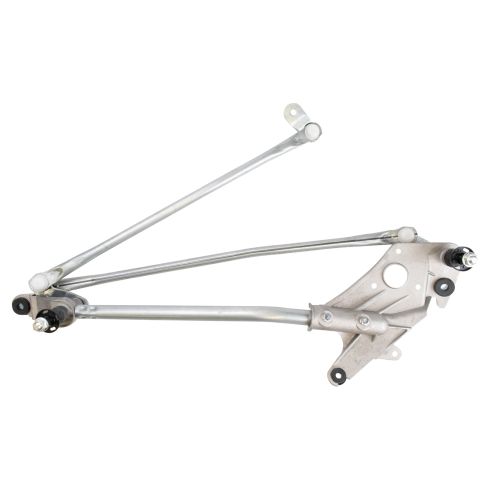
step 4 :Removing the Windshield Wiper Transmission
- Remove the three 10mm bolts from the transmission motor and assembly
- Pull the windshield wiper transmission up and out
- Disconnect the transmission motor wiring harness
- Unclip the wire from the wiper transmission
-
step 5 :Disassembling the Windshield Wiper Transmission
- Pry the transmission arm off from the motor with a flat blade screwdriver
- Find the horizontal mark on the arm and mark a corresponding dot on the shaft for reinstallation
- Remove the 12mm nut from the shaft
- Remove the 10mm bolts from the transmission motor
- Remove the motor from the transmission
-
step 6 :Assembling the Windshield Wiper Transmission
- Insert the motor to the transmission
- Tighten the 10mm bolts to the transmission motor
- Insert the motor arm to the shaft, lining up the dot and the marking
- Tighten the washer and 12mm bolt
- Insert the transmission arm into place
-
step 7 :Installing the New Windshield Wiper Transmission
- Vacuum out the windshield wiper well
- Connect the motor wiring harness
- Insert the transmission into place
- Tighten the three 10mm bolts to the windshield wiper transmission until the cushions compress
-
step 8 :Reinstalling the Cowl Panel
- Clip the cowl panels into place
- Clip the weatherstrip around the cowl panel
- Run the wiper motor through a couple cycles so that it's in the park position
-
step 9 :Reinstalling the Wiper Arms
- Insert the wiper arms into place so that they align with your marks on the windshield
- Tighten the 14mm nuts to the wiper blades
- Replace the rubber caps
- Test the wiper arms for functionality
Tools needed
-
12mm Socket
Socket Extensions
Flat Blade Screwdriver
Vacuum
14mm Socket
10mm Socket
Ratchet
Wire Brush
Marker / Writing Utensil
Brought to you by 1AAuto.com, your source for quality replacement parts and the best service on the Internet.
Hi, I'm Mike from 1A Auto. I hope this how-to video helps you out, and next time you need parts for your vehicle, think of 1AAuto.com. Thanks.
In this video, we're going to show you how to replace the windshield wiper transmission. This is a 2003 Honda Civic Coupe, and this is the same for 2001 to 2005 coupe as well as the four door sedan.
Items you'll need include a new wiper transmission from 1AAuto.com, flat blade screwdriver, 10-14mm sockets with a ratchet and extension, a marker pen, wire brush, and grease.
I'm just going to put a little mark right where the blade is hitting the windshield. Since it's black you'll be able to see it, but it really won't show. Mark this one as well.
I'll remove this rubber cap, and I'll use a little small flat blade screwdriver; work it under there, get it going, and pull it up and off. Repeat the same process on the other side. 14mm nuts hold them on, so I've got a 14mm socket, ratchet, and a little extension. Just hit them to break them loose and repeat the same process on the other side. To remove, just push down a few times and then pull the wiper arm up and off. Same thing for the other side.
Now open up your hood. There are three clips to remove: there, there, and there. To remove these, put your screwdriver underneath, get as close to the clip as you can, put your hand over, and pop them out. Do the same for the other two. To remove this seal (and it has clips on it), if you just grab real close to them and pull, you can pull each of them out. These are two separate pieces, so you pull this seal back to this point. Actually, pull this one out as well. Then you pull these kind of down and then up and out.
On this side, we're just going to drop the hood down. Kind of work the hood just so you can give yourself a little more clearance. Get that up and out. We're going to want to remove all these cowl clips with a screwdriver or a pair of pliers. Just pry up lightly. They come out and then you want to make sure you put it a corresponding place in the cowl panel.
Three 10mm bolts hold the transmission and motor assembly in place: here, here, and here. We'll remove those, and then your transmission should come up and out. You'll need to disconnect the lead, which is right here. Press this tab, and take it off. Then there's just a little clip here. Pull your harness down.
With a screwdriver or pliers, push the tooth through and the assembly is out. You need to remove this arm. First you can just take a flat-bladed screwdriver. There is a rubber boot around here that you want to be careful of. Lightly pry up, take that off, and wire brush to clean this area off.
See, there's a little mark here on the wiper arm. Just going to extenuate it, and I'm just going to put a dot on my motor. Note the nut on the shaft of the motor to line up with that. 12mm nut, flat blade screwdriver to hold things in place, and remove the arm. Now I can remove these three 10mm bolts.
Here's the original part from the car, a new part from 1A Auto. You can see they're exactly the same, all the same mounting points, obviously the same mounts for the arms, joints and everything. A lot of times somebody doesn't tighten up the arms well enough and these little teeth get stripped. This will go in and fix the problem.
Put the motor back in place. Start the three bolts in, and tighten them up. Put the mount arm back in place.
Line up your dot with the tab on the arm, washer and nut. To tighten it, put the socket on there like that, and I'm going to hold it with my screwdriver to get it on. Squeeze a little bit of grease, place the ball, and press firmly. I'm just going to vacuum out the windshield wiper well a little bit before we reinstall.
Okay, bring your transmission in, kind of upside down right now. This connects in there, wraps in through, and reconnect your harness.
Now put it down in place and start your three bolts. Use a 10mm socket and ratchet extension and tighten them up. Tighten them until you see the cushion start to compress.
Put this cowl panel back on. Put it in place, and the wiper stud is going to give you a little trouble so you'll want to wind that up. The wiper stud is going to want to go right through here so you might want to hold this back. We'll put it in place, slide it over, and then you've got to pull it up and on top of the wiper stud. Push the rubber down and around, and then you can kind of peek in behind and lock all your clips in. Then push this down.
There's a couple of clips that lock down there. This one is quite a bit easier. Pull it up over into place, pull the rubber through, and down in. Again peek in behind. This is where the strip clip goes through both panels, and then we have our little round clips that go into place.
Put your upper weatherstrip back into place. Okay, we're just going to run the wiper motor through a couple cycles, so we make sure it's back down in the park position before we put the wiper arms on.
Now we're going to install our wiper arms. Put that one down. Put this one in on here, and then remember our marks here. Find the place lined up with the mark we made on the windshield, and start the nut on. Same thing over here, mark on our windshield. Push it down, and start our nut on. Just hold them in place and tighten them up. Then put our rubber caps back in place.
Do a quick test to make sure everything is right.
Thanks for tuning in. We hope this video helped you out. Next time you need parts for your car, please visit 1AAuto.com. Also check out our other helpful how-to and diagnosis videos.
Shop Products

How to Replace Windshield Wiper Transmission Arm 1997-2005 Chevy Venture
Watch this video to learn how to replace the windshield wiper transmission arm on your 97-05 Chevy Venture.
