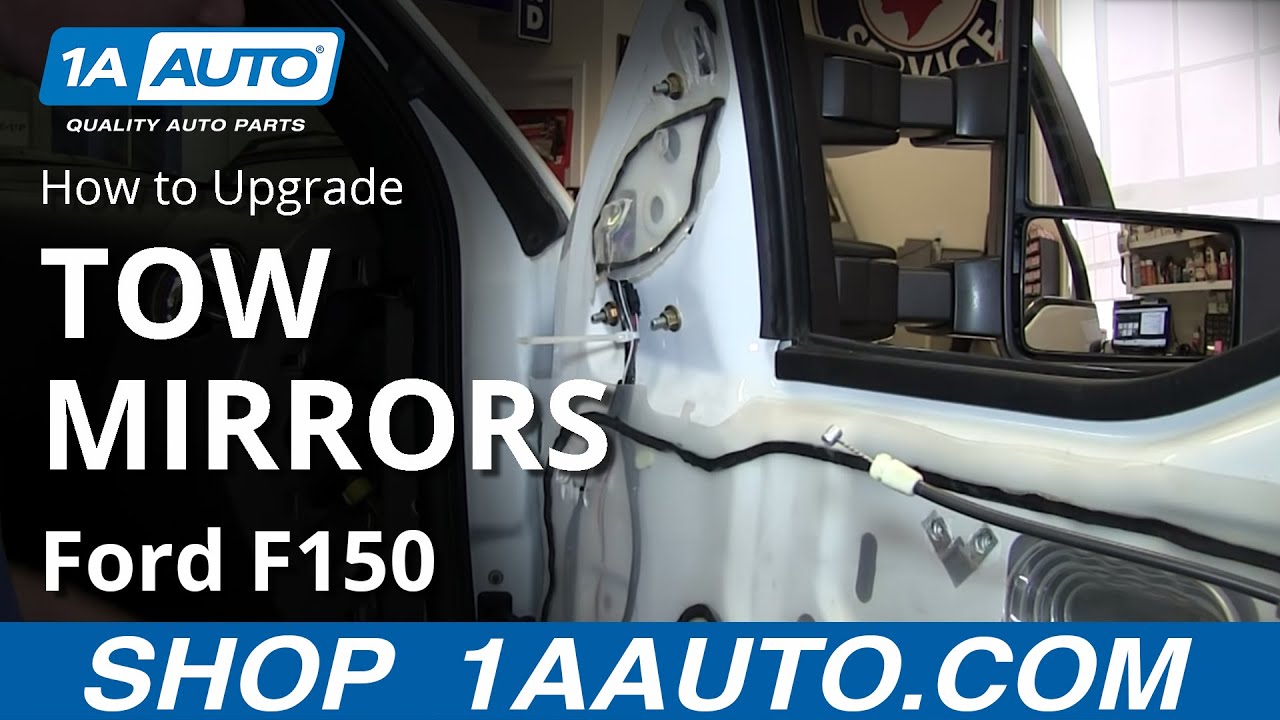
How to Upgrade Tow Mirrors 2004-08 Ford F150
Created on: 2014-10-13
Check out this video to learn how to install a pair of upgrade tow mirrors on your 04-14 Ford F150.
-
step 1 :Removing the Door Panel
- Pry off the trim piece inside the door handle with a flat blade screwdriver
- Pry up the window switch panel with a flat blade screwdriver
- Disconnect the door lock wiring harness
- Disconnect the window switch wiring harness
- Pry off the speaker cover with a flat blade screwdriver
- Remove the two 10mm bolts inside the door handle
- Remove the 10mm bolt behind the screw panel
- Remove the 6mm bolts from the speaker
- Remove the two 10mm bolts at the bottom of the door panel
- Pry off the speaker
- Disconnect the speaker wiring lead
- Remove the gasket from the speaker area
- Remove the two speaker screw grommets with pliers
- Lift the door panel up and off
- Disconnect the latch cables from the door handle
-
step 2 :Removing the Side View Mirror
- Disconnect the side view mirror wiring harness
- Remove the three 10mm nuts from the mirror
- Remove the side view mirror
-
step 3 :Installing the Tow Mirrors
- Tighten the 10mm nuts on the tow mirrors by hand
- Connect the mirror wiring harness
-
step 4 :Removing the Fuse Panel Cover
- Pull up on the side carpet trim
- Pull the weather strip off of the door
- Pull back on the kick panel near the door jamb
- Pull off the side dash panel
- Remove the fuse panel cover
-
step 5 :Connecting the Switch Wiring Harnesses
- Push in on the door connector tab near the door jamb and pull the grey connector down
- Pull the door in and out to release the harness connection
- Remove the rubber boot from the door
- Poke a hole in the rubber boot with a flat blade screwdriver
- Insert the signal wires into the hole and through the rubber boot
- Carefully peel back the water shield
- Pull the signal wires through the door
- Connect the signal wires to the tow mirror
- Repeat the process for the power-fold wiring harness
- Wire-tie the new harnesses to the existing harness
- Insert the rubber boot into the door
- Plug in the door harness to the body
- Repeat the process for the other side
-
step 6 :Wiring the Connectors
- Place electrical tape on the pinch weld
- Run the wiring through the pinch weld
- Press the weather strip in place
- On the driver side bring the wiring up into the dash
- Pull off the lower panel on the center console on both sides
- Run the power fold wiring from the passenger side to the driver side
- Insert the marker wiring and parking light wiring from the driver side to the passenger side
-
step 7 :Installing the Switch
- Cut out a template that's the same size as the switch
- Draw a line around the template on the lower dash panel
- Drill a hole on each side within the line
- Shape the hole with a Dremel tool
- Feed the switch harness in through the back
- Plug in the switch harness and insert the switch in place
- Wire-tie any hanging wire behind the lower dash panel
- Remove one of the 10mm bolts from the body
- Insert the ground wire to the bolt
- Tighten the 10mm bolt to the body
-
step 8 :Installing the Fuse Tab
- Lower the glove box
- Push in the tabs on the glove box and bring it down
- Remove a 10mm bolt from the body
- Run the ground wire into the bolt
- Tighten the 10mm bolt to the body
- Cut the marker wiring to the same length
- Strip about a half inch on the end of the wiring
- Twist the wiring together
- Strip about a half inch from the power folding wire
- Twist the power folding wiring
- Insert the power folding wiring into the fuse tab
- Insert the marker wiring into the fuse tab
- Plug the lights into headlamp #23
- Plug the power fold fuse into #4
- Push on the fuse cover
- Test the mirrors
-
step 9 :Reinstalling the Side Panels
- Push on the lower panels on the center console
- Push the kick panel in place
- Push on the side carpet trim
- Push in the side dash panel
-
step 10 :Reinstalling the Door Panel
- Put the water shield into place
- Connect the latch cables to the door handle
- Lift the door panel into place
- Push in the door panel clips
- Push in the speaker clips
- Put on the lower gasket
- Connect the speaker wiring lead
- Insert the speaker into place
- Tighten the 6mm screws to the speaker
- Tighten the two 10mm screws on the bottom of the door panel
- Tighten the 10mm screw behind the switch panel
Tools needed
-
Electrical Tape
Flat Blade Screwdriver
6mm Socket
10mm Socket
Needle nose pliers
Wire Cutters
Brought to you by 1AAuto.com, your source for quality replacement parts and the best service on the Internet.
Hi, I'm Mike from 1A Auto. I hope this how-to video helps you out, and next time you need parts for your vehicle, think of 1AAuto.com. Thanks!
In this video, we're going to show you how to install these really nice kind of super duty style tow mirrors. They manually extend out. These fit on the later model, 2004 and up F-150s, and they have a signal light as well as a marker light and a power-fold feature. What I'm going to be showing you mostly is how to wire in the power-fold and the signal light. I show you the complete process on the passenger side, but you basically want to repeat everything from the passenger side on the driver side as well. I don't show you the whole second process on the driver side because it's the same.
Remove the door panel, and it's the same for each side. There's a small little screw cover right inside the door handle, pry that out, the small screwdriver, and either use a plastic trim tool or a small screwdriver. Carefully pry up the switch panel and disconnect the two switches. There's the whole tabs, you push with your thumb and pull them free, and then careful pry out your speaker cover, again, with a small flat blade screwdriver. Be careful not to scratch your interior door, and if you have plastic trim tools, use those. There are two 10mm bolts right in behind your door handle there, and one down below, and then there are 6mm bolts holding your speaker, and two more bolts down the bottom. We'll just fast-forward here as I remove all those bolts.
Pull the speaker out and unplug it, press the tab, and pull it free. There's a little kind of half gasket at the bottom, pull that out, and then use a pair of needle nose pliers to pull the two plastic speaker screw grommets out of the bottom. Lift up for the panel to separate it from the door and then go in behind and unclip the door panel cable. Then pull up the little shield.
There's a tab on the harness for the mirror. Push the tab in, pull it free, and then there's three 10mm nuts that hold the mirror in. We'll fast-forward as I remove those. Then the original mirror has a little clip, so with a little bit of persuasion get it to come off. Put the new towing style mirrors on, just make sure you feed through the extra harnesses for the side marker and power-fold, and then we'll fast-forward here as I put those 10mm nuts back on and tighten them up.
The side marker light is black; power-fold is purplish pink. This is a prototype mirror so those could be different. Pull straight up on your side carpet trim here, and you use that to release the first few clips on that piece. Then pull your weather strip off the door. Then, on this kick panel, there are two clips to release near the door jam, you pull straight back. Then you just kind of pull it out. There's another clip up top that you have to pull firmly out on in order for it to release. Now you need to release this side dash panel. There's a couple of clips near the outside, and then the clips closer to the door jam are a lot more firm. Just pull straight out and they'll come off.
Now there's a fuse panel, right where you took those panels off. There's a little tab on the bottom, push up and flop the cover. On this door harness connection, there's a little tab, a push-in, right there. You can see, I push it in and then pull that gray connector down. Now I follow up with a great shot at the elbow, but basically you need to just move the door around a little bit so you can pull the whole harness connection out and disconnect it. Now pull the other side out of the door, and normally, what I like to try to do on this is run the wires through the conduit, and then bring them through the body connection. You can see there's no room for any wires to go through on this body harness.
Here, I'm going to use a Philips screwdriver. I'm using a Philips screwdriver because it's fairly blunt, so it just kind of pokes through the rubber boot, and I don't have any danger of it going to any of the wires inside. You basically want to poke a hole into the rubber boot to run your wires. Here, I'm speeding as I'm running the signal wires in through the conduit, and then into the door. I realize as I get to the door, I need to cut the adhesive for the water shield back, this is just so I can run the wires outside the door. Basically, you want to be very careful not to run the wires anyway that's going to get caught up in your window or any of the mechanism in there. I run them to the outside of the door panel and up through the water shield.
Now just connect the signal wires, and I'll do the same thing as I put the harness for the power-fold through. Run that power-folding harness up and connect it. I'll fast-forward here. I use some wire ties and just secure all those wires to the existing harness, put the ties around them, cut them, and then put the water shield back in place. Again, very important, make sure that the wires aren't going to get caught in anything like the window mechanism or anything when it goes up and down. Work those wires through and get the conduit back in place. Secure it back into the door. Again, my apologies a little, but as I try and get this I'm re-plugging in the door harness to the body. It basically just requires that you get the harness in place a little bit. You work the door back and forth just to give yourself a little bit of extra room to angle the harness in there. It's kind of one of those things that you can struggle with it for five minutes and then all of a sudden you get it right and it just goes right into place.
Now I'm running the wires into the body of the vehicle. As I said, usually on some Dodge trucks I've been able run it right through the conduit and through the harness connection. This Ford truck, the harness connection is so tight I'm not able to do that. I don't like drilling holes in vehicles, so what I do is I just run it right to the pinch weld. I put some electrical tape on the pinch weld so that you can pinch the wires basically right between the weather strip and the body of the vehicle. The electrical tape will prevent them from getting chafed. You can see, I pinched it in there pretty good and once I take the weather strip off, the wires are formed pretty well to the body.
Just check them, make sure they're all one layer and that they're not on top of each other crisscrossing. Then you run the wires into the vehicle and obviously you want to repeat that whole process for the driver's door as well. On the driver side, the only thing is, I bring the wires right in through and then I have them go up into the dash pretty much right away. That way, you can wire-tie them up into the dash so they don't fall down at your feet or anything like that. I just pull them off through and up the side panel and then direct them over through the dash panel.
You have to run the wires to the dash, so I'm going to pull off this lower panel of the center console, and the same panel on the other side. Then lead for the power-fold which is the one with the finished end from the passenger side over to the driver side. From the driver side, run the power side of the marker light wire to the other side or to the passenger side of the vehicle so it can hook in to the fuse box. Right here is a good mounting surface for my switch, there's nothing in behind it. Basically, I have a little template cut out, same shape as the switch, and I'm going to put it right on centered, just a little bit lower because there is a brace back here. Now I just draw a line around that template and cut out within the line.
I use a drill and put a hole on each side where I want the switch. Then I get my Dremel tool out and shape the hole on a square. One important tip, always go small first. It's easier to make it too small, see the switch doesn't fit and make an adjustment until the switch fits. Now I can take my switch harness, feed them in from the back and through, then take my switch, plug it in, put it in place. If you need to use a little bit of glue as I do later on just to make sure the switch stays in place. This is a ground wire from the switch. This is my ground wire from my marker light on this side, and I'm going to remove one of these bolts and ground them right here to the body. To summarize what we've done on this side, we've got both harnesses up to the mirror running down through the door all wire-tied. Then coming through here, popping out across the weather strip and they're here.
We've got the ground from the power-fold switch grounded here and also the ground from the marker light on the left mirror connected here. Switch is installed. We've run the power source for the parking light that goes that way to the other side. The power source for the switch for the power-fold goes towards that side, and the harness for the power-fold for the right hand mirror is coming from the passenger side over, and we've connected it to the switch. We've also connected up in there the harness for the power-fold to the switch for the left hand side. We've wire-tied things together. We've still got things loose here because we're going to wire everything up on the other side first.
You can bring your glove box down so you can reach in behind there and route the wires from the other side. There's a couple of good places to wire-tie them up there so that they don't fall down on the passenger's feet. I'm going to bring the ground from the right hand mirror for the light up and ground it to that dash body bolt. Now I have my power from my fold and I've got my two power wires for my parking lights, or my marker lights on my gears 13:37.What I'm going to do, I'm going to cut this to the same length. Strip off the half inch of both, twist them, and then twist them together and take my power from my power-folding. Strip off a half inch for the insulation, twist it. Now I'm going to finish this in a fuse tap. It's a little bit long. Fast-forward as I put a fuse tap on that other lead.
You can see here the fuse tap with both fuses installed. Your original circuit where the fuse was plugged in is still protected by that same fuse. You plug that fuse in here, protect your original circuit the same way, and then this just adds actually a circuit on that's also protected by a fuse. You usually want to plug this in first, then plug that in. It makes it a little bit harder when you want to change fuses because you'll have to unplug these to change that fuse, but it's not that big of a deal.
We've plugged our lights into one of the headlamp, number 23, and we plugged the power-fold into the number four. Then we just kind of modified the cover of those a little bit to mix up the fuse taps back in place. With everything connected, you could see how the parking light feature looks and how the fold feature looks.
Now it's time to button up. I put the panel back on the center console on the passenger side, then put the kick panel back in place. Just be careful to look in behind, see the fasteners, and make sure they're going in to the right places. Work slower than faster, so you don't break anything. Put the other panel back in place and make sure your weather strip is all back in place. Put the carpet trim back in place and then put that side dash panel back in place. Make sure your water shield is back in place one more. Check all the wires, make sure they don't get in the way of anything.
I'm going to kind of burn through putting the door panel back on. Make sure you reconnect the cable, hang the door panel up, and make sure it slides down correctly, and is engaged on all points around. Put those clips for the speaker back in, the small half lower gasket, and install the speaker. Put all the other attaching bolts back on and install the switch panel. Obviously, I'm just showing you the passenger side. Again, you want to do all these for the driver side as well.
A little test time, we'll start up the vehicle. I'm going to put on the lights in the passenger side. You got the driver side, marker lights working and signal light's working. Passenger side, marker light's working and the signal light's working. You extend out, back in, and then quick test and the power fold feature.
We hope this video helps you out. Brought to you by www.1AAuto.com, your source for quality replacement parts and the best service on the Internet. Please feel free to call us toll-free, 888-844-3393. We're the company that's here for you on the Internet and in person.
Shop Products


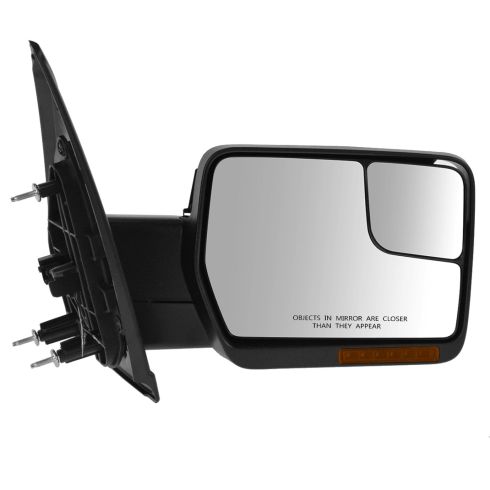
Ford F150 Lincoln Mark LT Passenger Side Mirror with Chrome Mirror Cap with Textured Black Mirror Cap TRQ MRA08412
Part Details:
- Upgrade LED Turn Signal
- Yes
- Powered
- Yes
- Yes
- Electric
- Black
- Textured
- No
- No
- No
- No
- Plastic
- No
- No
- 8
- Yes
- No
- No
- No
- Clear
- No
- 3
- Yes
- No
- 41.34 in
- 1 Black & 1 Chrome
- 1 Smooth & 1 Textured
- Yes
- Curved
- Yes

How to Replace Mirror 1998-2004 GMC Sonoma
How to repair, install, fix, change or replace a broken, smashed, cracked, or shattered rear side view mirror on GMC Sonoma, years 99, 00, 01, 02, 03, and 04.
