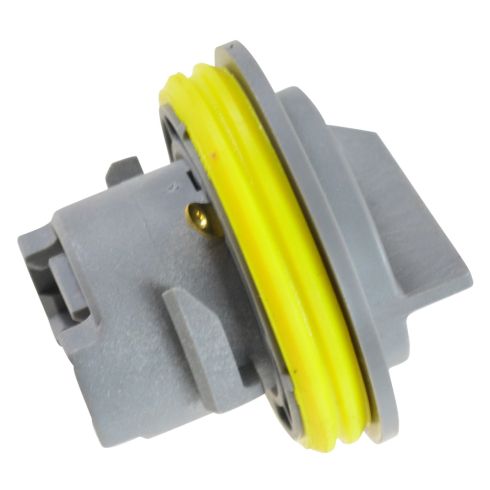
Genuine original equipment part (OEM) that was factory installed on your vehicle by the manufacturer.
Item Condition:New
Attention California Customers:
WARNING: Cancer and Reproductive Harm - www.P65Warnings.ca.gov.
1 Year Warranty
This item is backed by our 1-year warranty. In the event this item should fail during intended use, we will replace the part free of charge. This warranty covers the cost of the part only.
FREE Shipping is standard on Orders shipped to the lower 48 States (Contiguous United States). Standard shipping charges apply to Hawaii, Alaska and US Territories. Shipping is not available to Canada.
Expedited is available on checkout to the United States, excluding Alaska, Hawaii and US Territories as well as P.O. Boxes and APO/FPO/DPO addresses. Final shipping costs are available at checkout.
How to Replace Tail Light 1998-2003 Dodge Durango
How to Replace Tail Light 1996-2000 Dodge Caravan
Created on:
Tools used
Phillips Head Screwdriver
1. Removing the Taillight Assembly
Remove the two Phillips screws that secure the taillight.
Pull the taillight out.
Disconnect the harness.
2. Changing a Bulb
Twist out the socket.
Pull the bulb out.
Push the new bulb in.
Twist the socket back into place.
3. Replacing the Taillight
Twist the sockets into your new taillight.
Reconnect the harness.
Line up the taillight and press it into place.
Replace the two Phillips screws.
Brought to you by 1AAuto.com, your source for quality replacement parts and the best service on the internet.
Hi, I'm Mike Green. I'm one of the owners of 1A Auto. I want to help you save time and money repairing and maintaining your vehicle. I'm going to use my 20+ years' experience restoring and repairing cars and trucks like this to show you the correct way to install parts from 1AAuto.com. The right parts installed correctly. That's going to save you time and money. Thank you and enjoy the video.
In this video, I'm going to show you how to replace the tail light assembly, the lens and everything, as well as remove and replace the tail light bulbs. This is a 98 Durango. The only thing you should need is a Phillips screwdriver. Although on our truck, the fasteners had been changed, so we did need a different-sized wrench.
Taillight. Looking inside here would tell you how to open. There should be two Phillips screws here. It looks like this truck's had some damage. It's now a quarter inch bolt here, but you should be able to do it with a Phillips screwdriver. So you remove maybe one screw down here where I'm removing and one screw up here, and you pull the tail light out, back and kind of shake it out. There's a tab right here that clips into the quarter panel.
OK, so here's your tail light. You can service the bulbs by twisting any of these and then pulling them out. You will need the bulbs for the new taillight. And you can see also here that this is broken where it's supposed to mount. There should be a tab here that you would press and pull that socket off. Get the rest of the bulbs out. And then when you have one of these bulbs out, it's pretty easy to just pull out and just push into the sockets.
Our news light is from 1A Auto, as you can see. It's got the correct mounting points. They're not broken. I will put the bulbs back in. Everything mounts up just like the original. OK. Take out the harness. Put it right in. OK, again that tab goes into the quarter panel and we're going to use a couple of correct Phillips screws. And we're all set.
We hope this helps you out. Brought to you by www.1AAuto.com, your source for quality replacement parts and the best service on the internet. Feel free to call us toll free, 888-844-3393. We're the company that's here for you on the internet and in person. Thank you.
Tools used
Flat Blade Screwdriver
Phillips Head Screwdriver
1. Removing the Tail Light
Remove the two Phillips screws from the tail light
Pull the tail light off
2. Servicing the Bulbs
Twist the bulb socket counterclockwise out the light
Pull the bulb off of the socket
Push on the new bulb
Twist the bulb socket clockwise into the light
If you are replacing the tail light assembly, disconnect the wiring harness
3. Installing the Tail Light
Connect the wiring harness
Push the tail light into place using the locating tab
Insert the two Phillips screws into the tail light
Brought to you by 1AAuto.com, your source for quality replacement parts and the best service on the Internet.
Hi, I'm Mike from 1A Auto. I hope this how-to video helps you out, and next time you need parts for your vehicle, think of 1AAuto.com. Thanks.
In this video, we're going to show you how to service a taillight on this 1998 Dodge Caravan, same as any '96 to 2000 Caravan, as well as the Plymouth Voyager. It's a pretty easy operation, actually. We're going to show you both servicing, if you just need to change the bulb, as well as if you break a taillight, and you need to replace the whole assembly. The only tools you'll need are a Phillips screwdriver and, if you are replacing the whole assembly, you'll also need a flat-blade screwdriver.
To service the taillight on one of these Caravans, right back here there are two Phillips screws. I'll just kind of fast-forward here a little bit as I remove those two screws. Pull out and back on the light. Now, if you're just looking to service bulbs, they're right here. You twist these counter-clockwise, and pull out. There's your bulb. The bulb just pulls out and pushes back in. Just insert it back in correctly, and twist clockwise to lock.
To replace the whole assembly, you'll want to disconnect it. Use a regular screwdriver, and pry out this little safety tab here. Once you get it most of the way out, then you can press that tab and pull up.
There's your light out. Here's a new light from 1A Auto. You can see we put our sockets in here. Iit's going to connect in just like the original. Push the safety tab on. Put that tab in the side, and push it right on. Then start our two screws.
We hope this video helps you out. Brought to you by www.1AAuto.com, your source for quality replacement parts and the best service on the Internet. Please feel free to call us toll-free, 888-844-3393. We're the company that's here for you on the Internet and in person.
4676589
In Stock
Product Reviews
Loading reviews
5.00/ 5.01
1review
5 Stars
4 Stars
3 Stars
2 Stars
1 Star
1
0
0
0
0
Better quality than original!
Reed
August 3, 2021
Fits like original. The material used appears to be better than the one I replaced. Received it quickly and will definitely use 1A auto again.
Customer Q&A
No questions have been asked about this item.
Customer service
877-844-3393
Monday - Friday 8:00am - 9:30pm ET Saturday - Sunday 8:00am - 4:30pm ET
Plymouth is a registered trademark of FCA US LLC. 1A Auto is not affiliated with or sponsored by Plymouth or FCA US LLC.See all trademarks.
Enter Vehicle Year Make Model
Specify your vehicle's year, make and model to guarantee fit.
Year
Make
Model
Options
Drivetrain
This part doesn’t fit a . Select from parts that fit.