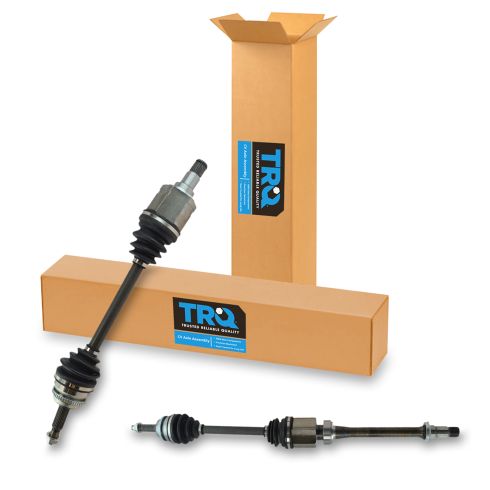
Kit Includes: (1) Front Driver Side CV Axle Assembly (1) Front Passenger Side CV Axle Assembly
Specification
Side Location
Driver & Passenger Side
Location
Front
Engine Displacement (Metric)
L4 2.4L
TRQ CV (constant velocity) drive axles are manufactured using premium raw materials designed to restore original performance. TRQ CV drive axles are new, so there is no core charge with your TRQ purchase. TRQ-designed drive axles utilize neoprene boots, moly grease, stainless steel clamps, and heat-treated ball tracks to ensure extended service life. Each TRQ axle is application-specific so each spline and thread will mate properly for a seamless fit. All products are fit and road-tested in our Massachusetts R&D facility to ensure we deliver on our promise of Trusted Reliable Quality.
Product Features
100% New: Manufactured to tighter tolerances for extended service life
Neoprene Boots: Improved durability compared to stock material
Moly Greased: Specifically-designed grease shield to reduce premature wear
Application Specific Design: No modification
CV axles are designed to transmit the power from your vehicle's drivetrain to the wheels while being able to flex and pivot to the demands of the steering and suspension systems. If your vehicle is making clicking noises at lower speeds or when making turns, it may be time to replace your CV axles with our 100% brand new assemblies.
Item Condition:New
Attention California Customers:
WARNING: This product can expose you to chemicals including Lead and Lead Compounds, which are known to the State of California to cause cancer, and birth defects or other reproductive harm. For more information, go to www.P65Warnings.ca.gov.
Lifetime Warranty
This item is backed by our limited lifetime warranty. In the event that this item should fail due to manufacturing defects during intended use, we will replace the part free of charge. This warranty covers the cost of the part only.
FREE Shipping is standard on orders shipped to the lower 48 States (Contiguous United States). Standard shipping charges apply to Hawaii and Alaska.
Shipping is not available to a P.O. Box, APO/FPO/DPO addresses, US Territories, or Canada for this item.
Expedited is available on checkout to the United States, excluding Alaska, Hawaii.
Final shipping costs are available at checkout.
How to Replace Driver Side CV Axle Shaft 2002-09 Toyota Camry
Created on:
Tools used
Socket Extensions
Torque Wrench
Rust Penetrant
Pry Bar
17mm Socket
Jack Stands
19mm Socket
Brake Parts Cleaner
21mm Socket
Center Punch
Ratchet
Floor Jack
Assistant
1/2 Inch Breaker Bar
1. Removing the Wheel
Pry off the center cap with a flat blade screwdriver
Loosen the 21mm lug nuts with the vehicle on the ground
Raise the vehicle with a floor jack
Secure the vehicle on jack stands
Remove the lug nuts
Pull off the wheel
2. Removing the Axle Nut
Insert a punch and hit with a hammer to separate the axle nut
Have an assistant hold the brakes
Loosen the nut with a 30mm twelve-point deep socket
Remove the nut and thread it on a few turns
3. Separating the Tie Rod
Straighten the cotter pin in the castle nut
Remove the cotter pin
Loosen the castle nut with a 17mm box wrench
Use a ball joint separator to separate the ball joint
Pull the tie-rod out of the knuckle
4. Removing the CV Axle
Remove the three 17mm bolt from the control arm
Pull the control arm off the knuckle
Tap the axle out of the knuckle
Remove the axle nut
Separate the axle out of the knuckle
Have a drain pan ready
Pry the axle out of the transmission
5. Installing the CV Axle
Insert the CV axle into the transmission
Tap the axle into the transmission with a dead blow mallet
Insert the axle into the knuckle
Tighten the axle nut by hand
Insert the control arm to the knuckle
Tighten the 17mm bolts to the control arm by hand
Tighten the 17mm bolts with a socket and ratchet
Tighten the 17mm bolts to 55 foot-pounds of torque
6. Reinstalling the Tie Rod
Insert the tie rod into the knuckle
Tighten the castle nut with a 17mm socket and ratchet
Insert the cotter pin
Bend the end down with needle nose pliers
7. Reinstalling the Axle Nut
Have an assistant hold the brake pedal down
Tighten the axle nut by hand
Torque the axle nut to 217 foot-pounds
Stake the axle nut with a punch to bend the nut into the groove
8. Reattaching the Wheel
Slide the wheel into place
Start the lug nuts by hand
Tighten the lug nuts preliminarily
Lower the vehicle to the ground
Tighten the lug nuts to 76 foot-pounds in a crossing or star pattern
Reattach the center cap
Hi, I’m Mike from 1A Auto. We’ve been selling auto parts for over 30 years!
Use a large pry bar or a flat bladed screwdriver to remove the wheel cover. Just kind of slide it between the wheel and the plastic. Pop it off. These lug nuts are a 21 millimeter socket. Use that and a breaker bar to loosen them while the vehicle's on the ground. Raise this for the vehicle. We're using a two post lift, but you can use a jack and jack stands. Lug nuts are loose. I can take my socket and finish removing them. Just going to hold on to the wheel. Take the last lug nut off. It's going to be loose. Don't want to drop it. Drop the lug nut, that's okay. Just don't want the wheel to fall.
Before we can remove this axle nut, we need to bend back the staking. Instead of a cotter pin this is what locks the axle nut in here. Going to take a small punch and a hammer and bend that out so that the nut can be turned off the axle shaft. Going to spray some rust penetrant on the nut and the threads to help it move. This uses a 30 millimeter 12-point deep socket. Take a larger breaker bar, then I'm going to have an assistant sit in the car and step on the brakes so it doesn't turn for me. Then I'll break it free. Someone helping you holding the brakes, take the breaker bar and our socket and turn this off. There it is. Give it a couple good turns while they're holding the brake. Make sure it's moving nice and free. Now going to switch it to a smaller ratchet. Little easier to handle. Work on taking it off the rest of the way. All right. It's pretty loose now. I can take it off with my hands.
For now, I'm just going to keep the old one on there so the axle doesn't slide back out on me while I'm trying to remove it. This ball joint on the tie end needs to be separated from the knuckle so we can turn the knuckle and help push the axle out. So I'm going to remove the cotter pin that's in here. Kind of bend it back with some needle nose pliers. Pull it out.
Now we can remove this castle nut and separate the tie rod end. Spray some rust penetrant on here to help this castle nut come off. 17 millimeter box wrench. Break it free. It's on here pretty tight. Going to use a mallet to break it free. Try to pop this out. This actually came up pretty easily. If this ball joint was stuck in place, you could try to hit here with a hammer to break it free. It sits on a taper. You run the risk of breaking this knuckle if you're hitting it really hard with a hammer.
It's recommended you use a ball joint separator. It just sort of goes on like here and then as you turn it, it separates the ball joint out. It usually snaps out when it breaks free. This one luckily came loose. Pop it right out. Place it aside.
We have already replaced this ball joint, but we need to remove it to pull the axle out. Sometimes these bolts, or these nuts on these studs could be 17 millimeter. On our new one they're 19mm. This is still 17mm on this bolt.
I'm going to start with the 17 millimeter bolt and remove that. Remove these 19 millimeter nuts. I'm going to pull down on the control arm and push up on the knuckle. Pop it out of there. All right. I need to tap the axle through the hub assembly. Just going to use a big dead blow mallet. I've got the nut on here. Just tap it out. Now it's going to come free so I can take the nut out. I'm going to reach behind here and pull it straight out as I separate it from the knuckle. Can turn the knuckle as need be. Stuck in here. Push this out. All right. See the axle is just in the transmission right now.
Get a drain pan ready to catch any transmission fluid that might come out the opening once we remove the axle. Take a pry bar and go right under the edge of the CV axle, up against the transmission and try to pry it out. I'm also holding this end of the axle so it doesn't fall out completely. There it is. Reach up and try to pull it straight out so I don't damage the transmission seal. Then I'm just going to feed it right out of the wheel well.
Here's our old CV axle from our vehicle and our brand new one from 1aauto.com. There's no core on this. It's ready to go. You can see it's the same length, same style, splines that go into the transmission with the lock ring. It's got our ABS tone ring. Has a new axle nut. Also, has the spot where it will get staked when were done. This should fit in the vehicle great and get you back on the road.
This end needs to go in the transmission. We're going to go straight in with it. Switch hands. I can go underneath. I want to guide this straight into the transmission making sure not to damage the axle seal. Kind of find the splines. Just wiggle it in. Once it gets pretty close, I can then take the dead blow mallet and hit it home. There it is. You're going to get the new axle through the hub assembly. Try to turn it. Got the axle nut handy because we're going to capture it after it goes through. Just going to put it right here. Push this away. Want to go all the way in. Might have to turn it. It get lined up with the splines. It'll push through. We're going to grab that axle nut and put it on so it doesn't pop back through. Pull this lower arm down. Move the knuckle over. Get these studs caught. Also, turn this. Get them lined up. Get the bolt caught first. Get these nuts caught. I'm going to snug these down before I torque them. Torque these two nuts and the bolt to 55 foot-pounds.
Reinstall the tie rod end. Turn the knuckle. Reinstall the castle nut. Turn it down a little more. Cotter pin hole lined up. Install a new cotter pin. Install a new cotter pin. Bend it over with my needle nose pliers. With someone holding the brake for you, torque the axle nut to 217 foot-pounds. Now, with it torqued, instead of using a cotter pin, we need to stake this axle nut. So I'm going to use a punch. I'm going to bend the metal right into this groove that's in the axle.
If you've gotten this brake rotor all greasy from touching it, you just want to take some brake parts cleaner and clean it off before you drive the car. Wipe off anything excess with a rag. Those look like rust spots, they'll come right off as soon as you drive it. You just don't want any grease on here.
Reinstall our wheel. Important to note, these lug nuts have a taper. A taper meets the wheel, matches the inside of the wheel. Don't install them with the flat side like this. That is incorrect. Install them with the taper to the wheel. It helps locate the wheel on the lug nut side. I'm just using a socket and ratchet to bring these down snug before I put the car on the ground. Torque the lug nuts to 76 foot pounds. Going in a cross pattern. Reinstall the hub cap. Got to line up the opening of the valve stem with the valve stem on the wheel. Just push it in place.
Thanks for watching. Visit us at 1AAuto.com for quality auto parts, fast and free shipping, and the best customer service in the industry.
CSA82565
In Stock
Product Reviews
Loading reviews
4.69/ 5.016
16 reviews
5 Stars
4 Stars
3 Stars
2 Stars
1 Star
13
2
0
1
0
Hi
O
May 20, 2018
I really really like this my order its very very good
Great parts
samurai-
October 20, 2018
The parts were the right for my car and now I drive smooth around town
L
December 16, 2018
So far so good still working on the passenger side. Customer service was amazing.
Great parts
Devon
December 29, 2018
Good quality parts would recommend 1A Auto to buy parts from. Will be buying more from them.
Superb Quality!
J
March 14, 2019
These axles are superb quality and shipped to me super fast! 1A Auto has a new customer for life!
Had issues with the parts
Felipe
May 3, 2019
I have always been happy with 1AAuto but I had an issue this time around. The axle seal/cover was bent and I had to re-use the old one. I dont know if it was damaged during shipping or if was just defective. Anyways I just removed the old one and re-used it. Normally everything is spot on but not this time. I also have a picture of the defective part.
Amazing
Ahmed
November 11, 2019
Thanks for the high quality product. After a month and 30k miles, product seems great as of this moment
No problems
G
November 24, 2019
My mechanic installed this part with no problems. My car drives so much better now.
New axles
jody
July 1, 2020
Packaging was damaged and a shield was bent, I was able to salvage my old shield and axles mounted nicely
Customer service on 100%
O
August 4, 2020
1aauto thank you guys for being the best site to buy parts I bought driver side and passanger axles and got the part fast but when I got it I notice my driver side part was missing. I sent a message about the missing part and I was not able to check for a reply, but for my surprise when I checked for a reply I received a message that my part is being sent in. Their was with no hassle no need of hunting down for reply. Thank you so much this company will always get my business from this amazing customer service
Odair
February 20, 2022
They fitted as expected, I've had no issues with these parts, thank you 1A Auto team.
Great
Chidozie
September 18, 2023
Great ??
Quality product
R
February 4, 2024
Quality product as always!
Replacement axles
Harold
May 25, 2024
This item was exactly as advertised and it worked great
Paul
May 31, 2024
Easy install, great video to take a person through the steps.
works well
rozain
September 12, 2024
works well
Customer Q&A
After replacing cv axle shaft can your car still pull one way?April 4, 2019
XHamster X
10
There could be multiple reasons why you're having this particular problem. We suggest taking your vehicle to a nearby reputable shop to identify the cause. Once you know the cause, we'll be happy to see if we carry the parts and how-to videos needed for your repair.
April 4, 2019
Emma F
Good day,
Can this CV Axle works with the Japanese version/built ACV40 Camry? It uses the same U250E transmission so I assume the spline diameter is the same for the input shaft not sure about the output shaft.May 3, 2020
Nathan L
10
Yes, this part is not specific to where the vehicle was built. Thanks for the inquiry!
May 4, 2020
Andra M
Does the passenger side cv include the bearing that goes inside the cv axle support housing?March 12, 2023
Stephen C
10
Yes, the bearing will be included.
March 14, 2023
Jessica D
What is the length of the drivers side? My original is just over 28" but everyone I find to replace is just over 26" . Why is that?April 5, 2023
Greg L
10
Actual Measurements are not listed or available. Our parts are exact replacements for your vehicle's OEM parts. As long as your vehicle specifications match up with our listing, these parts will directly fit and function like the originals.
April 5, 2023
Emma F
Was the new axle shorter than the original one?April 15, 2023
John D
10
Witch side?
April 17, 2023
Kilon L
will this fit the 3l v6 motor?October 6, 2024
Mark W
10
This part will not fit your vehicle, but we may have a part that is listed to fit.
Please enter your vehicle's year make and model in the search bar at the top of the page. This will display parts guaranteed to fit your vehicle. Just be sure to verify all of the information shown in the Vehicle Fit tab before ordering.
October 7, 2024
Kemal S
Customer service
877-844-3393
Monday - Friday 8:00am - 9:30pm ET Saturday - Sunday 8:00am - 4:30pm ET
Toyota is a registered trademark of Toyota Motor Corporation. 1A Auto is not affiliated with or sponsored by Toyota or Toyota Motor Corporation.See all trademarks.
Enter Vehicle Year Make Model
Specify your vehicle's year, make and model to guarantee fit.
Year
Make
Model
Options
Drivetrain
This part doesn’t fit a . Select from parts that fit.