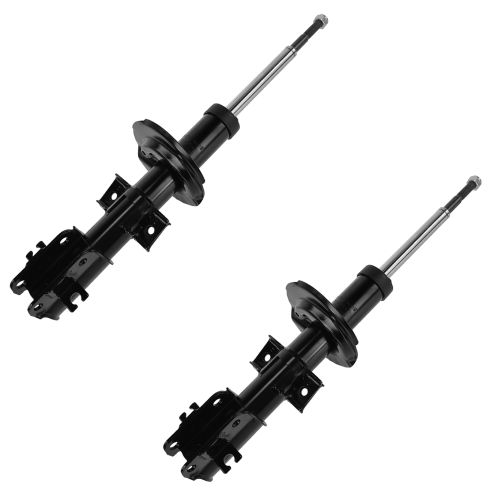
Kit Includes: (1) Front Passenger Side Strut Assembly (1) Front Driver Side Strut Assembly
Quantity: 2 Piece
Specification
Side Location
Driver & Passenger Side
Location
Front
Our direct fit gas-charged shock absorbers help restore your vehicle's handling and ride quality to just like new.
Item Condition:New
Attention California Customers:
WARNING: This product can expose you to chemicals including Chromium (Hexavalent Compounds), which is known to the State of California to cause cancer, and birth defects or other reproductive harm. For more information, go to www.P65Warnings.ca.gov
Lifetime Warranty
This item is backed by our limited lifetime warranty. In the event that this item should fail due to manufacturing defects during intended use, we will replace the part free of charge. This warranty covers the cost of the part only.
FREE Shipping is standard on orders shipped to the lower 48 States (Contiguous United States). Standard shipping charges apply to Hawaii and Alaska.
Shipping is not available to a P.O. Box, APO/FPO/DPO addresses, US Territories, or Canada for this item.
Expedited is available on checkout to the United States, excluding Alaska, Hawaii.
Final shipping costs are available at checkout.
How to Replace Front Strut Assembly 1998-2000 Volvo S70
Created on:
Tools used
14mm Wrench
13mm Socket
15mm Wrench
Torque Wrench
16mm Wrench
14mm Socket
15mm Socket
17mm Wrench
18mm Wrench
16mm Socket
17mm Socket
Jack Stands
19mm Wrench
18mm Socket
19mm Socket
6mm Allen Wrench
Ratchet
Floor Jack
1/2 Inch Breaker Bar
13mm Wrench
1. Remove the wheel
Loosen the lug nuts with your 19 mm socket and ratchet or a lug wrench.
Raise and secure the vehicle.
2. Remove the brakes
Check out our other videos for more detailed instructions on brakes
3. remove the strut
Hit the top three nuts and bottom two with penetrating oil
Remove the three 13 mm bolts.
disconnect the stabilizer link from the strut
Use a 17 mm socket to break the stabilizer link nut loose and then use an Allen wrench and a wrench to remove it the rest of the way.
Unclip the ABS cable from the strut.
Remove the 18 mm bolts at the bottom of the strut.
Pull the strut from the vehicle.
4. Install the new strut
Fit the strut into place and hand thread the three nuts up top.
Fit the strut into the steering knuckle and bolt in the 18 mm bolts.
Torque the 18 mm bolts to 55 to 60 ft lbs.
Tighten the top three nuts to 20 to 22 ft lbs.
5. Reassemble the stabilizer links and brakes
Tighten together the stabilizer link.
Clip the ABS cable back onto the strut.
Check out our other videos for more detailed brake assembly instructions.
6. Put the wheel back on.
Hand tighten the lug nuts
Lower the vehicle
See your owner’s for torque specs for the hub nut or bolt.
Torque the lug nuts in a star pattern to 100 ft lbs.
Brought to you by 1AAuto.com, your source for quality replacement parts and the best service on the Internet. Hi, I'm Mike Green. I'm one of the owners of 1A Auto. I want to help you save time and money repairing and maintaining your vehicle. I'm going to use my 20 plus years experience restoring and repairing cars and trucks like this to show you the correct way to install parts from 1AAuto.com. The right parts installed correctly, that's going to save you time and money. Thank you and enjoy the video.
In this video, we're going to show you how to replace a front strut actually remove and reinstall. The struts on this vehicle are in fine shape so we just take it out and put it back in to show you. This is the same for most Volvos of this era. In fact, it's the same for most cars that use front strut suspension. Tools you'll need: jack and jack stands, 13 to 19 millimeter sockets, ratchet, a breaker bar or if you don't have a breaker bar an extra piece of pipe to get some leverage on that ratchet, 3/16 or six millimeter Allen wrench, and a torque wrench. Obviously if you're doing it on a different vehicle, those tools will vary slightly. If you don't have the benefit of air tools, you'll want to use a nineteen millimeter socket and ratchet and a breaker bar or your tire iron. Loosen the lug nuts while your car is on the ground, then lift it up and remove lift it up, secure it, and then remove the lug nuts all the way. OK, I'll just speed it up here as I'm taking that wheel off. You'll notice I use fast forward a lot when I'm just doing pretty basic tasks. You want to loosen the three 13 millimeter bolts that hold your strut to the top. So I'm just going to use some penetrating fluid, and then I'll fast forward here as I remove I'm going to remove two of them.
I'm going to loosen up the one that's closest to the fender and just leave it barely on there so it holds the strut up. Next we're going to disconnect our stabilizer link from the strut so we're going to use some penetrating oil there and then just put some penetrating oil on the strut bolts. The keen observer will note here that I have the brakes apart. You do not need to remove the brakes in order to do this repair. I just shot this as kind of part of another repair I did so again you don't have to remove the front brakes to replace your strut. I'm going to take a seventeen millimeter socket and put it on here with a larger ratchet. See if I can't break it loose. Now that those have broken free, you'll find that the center stud is going to spin so you can put an Allen wrench in there. A 3/16 or six millimeter Allen wrench will work. The Allen wrench holds the stud. I loosen it up. Just speed up here as I remove that nut the rest of the way and disconnect the top of that stabilizer link. Additionally there's an ABS harness that's attached to the strut just with a rubber grommet, and you can just pull that away from its clip. The bolts for the struts are 18 millimeter. I suggest a breaker bar or a piece of pipe on your ratchet.
Then speed it up here as I change it over to my ratchet and a wrench and remove those bolts the rest of the way. OK, now here I'm just removing the actual bolts from the steering knuckle and the strut. OK, once they have those out, I still hold the strut at the bottom and then remove that nut the rest of the way on top and now the strut pulls right out. Just a note before I start reinstalling. This vehicle did not need a new strut. I actually just kind of filmed this as part of doing another repair so you're going to see me putting in the old strut and that is why. Don't really believe in putting new parts into a car that doesn't need them. OK, now putting your strut back up in there. What you don't see here is I actually have the nut for the top in my hand. Line the holes up. Pull your suspension down. Push your strut around. Put your bolts in. Start these nuts on. OK, now you want to torque these bolts to between 55 and 60 foot pounds, and then go up on top and put your other nuts on. You want to torque them to 20 to 22 foot pounds. OK, now put your stabilizer link back in place and start the nut on and then use your wrench and Allen wrench to tighten it up. This part it's not a critical suspension part. It's important but not critical. It probably does have a torque spec but I just tighten basically just as tight as I can get it using the Allen wrench and the combination wrench. You can see that the tire has the wheel has a space here and that goes over this spike so I'm going to grab this spoke below that space. Put the wheel on. OK, just going to speed it up here as I put in the lugs by hand then use my impact wrench just too preliminarily tighten the lugs. Torque your lug nuts to 100 foot pounds.
We hope this helps you out. Brought to you by www.1AAuto.com, your source for quality replacement parts and the best service on the Internet. Please feel free to call us toll free (888) 844-3393. We're the company that's here for you on the Internet and in person.
SBA58156
In Stock
Product Reviews
Loading reviews
There are no reviews for this item.
Customer Q&A
No questions have been asked about this item.
Customer service
877-844-3393
Monday - Friday 8:00am - 9:30pm ET Saturday - Sunday 8:00am - 4:30pm ET
Volvo is a registered trademark of Volvo Trademark Holding AB. 1A Auto is not affiliated with or sponsored by Volvo or Volvo Trademark Holding AB.See all trademarks.
Enter Vehicle Year Make Model
Specify your vehicle's year, make and model to guarantee fit.
Year
Make
Model
Options
Drivetrain
This part doesn’t fit a . Select from parts that fit.