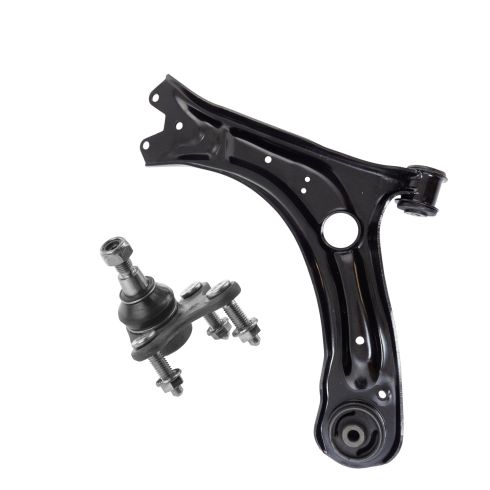
Our control arms are designed to be direct replacements for the original factory parts. They are 100% brand new and require no modifications for installation. No special tools are required because all of the bushings come pre-installed.
Our steering and suspension components are pre-greased and sealed for long life and do not require the extra maintenance typically required by greaseable versions.
Item Condition:New
Attention California Customers:
WARNING: This product can expose you to chemicals including Lead and Lead Compounds, which are known to the State of California to cause cancer, and birth defects or other reproductive harm. For more information, go to www.P65Warnings.ca.gov.
Lifetime Warranty
This item is backed by our limited lifetime warranty. In the event that this item should fail due to manufacturing defects during intended use, we will replace the part free of charge. This warranty covers the cost of the part only.
FREE Shipping is standard on orders shipped to the lower 48 States (Contiguous United States). Standard shipping charges apply to Hawaii and Alaska.
Shipping is not available to a P.O. Box, APO/FPO/DPO addresses, US Territories, or Canada for this item.
Expedited is available on checkout to the United States, excluding Alaska, Hawaii.
Final shipping costs are available at checkout.
How to Replace Ball Joints 2006-14 Volkswagen GTI
Created on:
Tools used
Socket Extensions
Flat Blade Screwdriver
Torque Wrench
Phillips Head Screwdriver
Pry Bar
16mm Socket
17mm Socket
18mm Socket
Ratchet
1. Removing the Wheel
Loosen the lug nut covers with the supplied lug nut tool
Loosen the 17mm lug nuts with the vehicle on the ground
Raise the vehicle with a floor jack
Secure the vehicle on jack stands
Remove the lug nuts
Pull off the wheel
2. Removing the Ball Joint
Remove the three 16mm bolts from the ball joint
Loosen the upper nut with an 18mm box wrench
If the stud keeps spinning, hold the base with locking pliers
Remove the nut
Lower the control arm and remove the ball joint
3. Installing the Ball Joint
Insert the ball joint into place
Tighten the 18mm nut by hand
Tighten the 18mm nut with a box wrench
Tighten the three 16mm bolts
Torque the 16mm nuts to 16 newton meters
4. Reattaching the Wheel
Slide the wheel into place
Start the lug nuts by hand
Tighten the lug nuts preliminarily
Lower the vehicle to the ground
Tighten the lug nuts to 120 Newton meters in a crossing or star pattern
Tighten the lug nut covers
Hi, I’m Mike from 1A Auto. We’ve been selling auto parts for over 30 years!
All right, so we're going to take the tire off. On most Volkswagens there's little caps that go over these lugs. And the caps, you're going to need the tool from the spare tire kit. You will put in and grab, it's like a hook, and you'll pull the cap out. But this vehicle does not have those on currently. So we're just going to loosen up the lugs with a 17mm socket and a breaker bar. One at a time, just a little bit.
The reason I'm jacking this vehicle, you're not going to want to use a jack or jack stands on here on the control arms or on this aluminum because you may break the aluminum. Or there. Some places you can jack up from, just over here where the pinch weld is. On this Volkswagen you can see there is specific spots where you're supposed to jack the vehicle or support the vehicle. These little arrows indicate that. And right on the pinch weld is the strongest part to be jacking and supporting. Same over here. This side. This little arrow pointing down. This one looks like it got smashed a little bit.
So we're going to take off the lugs. Volkswagen has lug bolts, not lug nuts, or lug studs. So you need to be careful when pulling off the wheel. Then you grab the wheel and set it down. Next, we're going to separate the ball joint from the control arm. We're going to use the 16mm deep socket and the extension and a ratchet. All right, we're going to loosen up the upper ball joint nut. It's an 18MM wrench. Now we're going to use a pry bar. Try to separate the ball joint from the knuckle.
If you're struggling, sometimes a fork will help get the ball joint out, especially if you're not going to reuse it, because it will probably mess up the rubber boot. So, because the ball joint, if you can see the whole stud is spinning, we're going to need to use some locking pliers at the base, to hold it. And that's loose enough. Should be able to do it with your fingers. It came out. And then pull the lower control arm, and we can pull it out.
This is our old part, this is our new part from 1Aauto.com. As you can see it comes with the nut. There is this cover that covers the boot, that's just to protect it during shipping. You want to make sure you take that off, otherwise you're going to have a very hard time getting this on. But as you can see, they look similar. They have the same studs. And there is an additional Allen. The old one has it too. If you were struggling to take the nut off like we were you can use an Allen. You will have to take the axle out to get access to this, but that would make it easier if you were in a jam like we were.
Take our ball joint and line the stud up. We're going to take our 18mm nut, get it started. Tighten it up with our 18mm wrench. If this stud ends up spinning, take notice while you're tightening it up, you can put a jack underneath the ball and push up on it, and that will put pressure on it so that it will stay locked and be easier to tighten. In this case, ours did not spin so we were good. Put the nuts on. We're going to use a torque wrench and these nuts have to be torqued.
Now we're going to install the tire. Line it up with the holes and hold it, and we'll use our 17mm socket to put our lug studs on. Or lug bolts. Whatever you want to call it. Put our center cap on. Now we're going to torque the lug studs to 120 newton meters, in a star pattern. When you do it in a star pattern it makes the wheel go flush to the brake rotor properly.
Whenever you change front end components or remove front end components and reinstall them, you always want to go to a local garage and have an alignment performed, because you are going to change the geometry of the wheel and tire going down the road, and you do not want premature wear on your tires. So you want to make sure you do that, and you'll be all set.
Thanks for watching. Visit us at 1AAuto.com for quality auto parts, fast and free shipping, and the best customer service in the industry.
PSA66808
In Stock
Product Reviews
Loading reviews
5.00/ 5.01
1review
5 Stars
4 Stars
3 Stars
2 Stars
1 Star
1
0
0
0
0
Great service !!!
Steven
September 17, 2019
I saved a ton of money on my control arms for the Vw passat. Shipping was fast. Totally satisfied. I highly recommend 1a auto parts !!!
Customer Q&A
No questions have been asked about this item.
Customer service
877-844-3393
Monday - Friday 8:00am - 9:30pm ET Saturday - Sunday 8:00am - 4:30pm ET
Enter Vehicle Year Make Model
Specify your vehicle's year, make and model to guarantee fit.
Year
Make
Model
Options
Drivetrain
This part doesn’t fit a . Select from parts that fit.