What's up guys? I'm Andy from 1A Auto. In this video, I'm going to show you how to replace the rear trailing arm bushings on this 2001 BMW 325xi.
If you need this part or other parts for your vehicle, click the link in the description, head over to 1aauto.com.
I'm going to loosen up these lug bolts. I'm going to use a 17 mm socket and a breaker bar.
Now I'm going to raise and support the vehicle. We're using a two-post lift. If you're doing this at your house, you can use a jack and jack stands.
Now, I'm going to take the 17 mm socket and extension just to take the lug bolts out. Now when I go to take the last one out, I am going to hold the wheel so that the wheel doesn't fall.
Take that one out. Set it aside and grab the wheel. Shake it off.
After I get the wheel off, I'm just going to support the lower control arm because I want to remove the shock, and I'm going to support right here. If you're doing this on the ground you can use a floor jack, just to raise this up a little bit. Once you get it to move a little bit, you should be able to take the shock bolt out.
Now, with the lower control arm supported, I'm just going to take an 18 mm socket and an air gun. I'm going to take this bolt out.
If you don't have any air tools you can always use a ratchet or a breaker bar. Take that out. Slide the bolt out. Now, I can lower the control arm. It's going to take the tension off the coil spring. Just going to move this brake pad wear sensor wire. Just pull it out of that clip right there. Just move it out of the way. It's fine like that. That's good.
Now, I'm going to remove this bolt right here. There's a nut on the inside here, so I'm just going to use an 18 mm wrench. Hold that nut, 18 mm socket, and then an air gun. You can use a ratchet if you don't have an air gun.
Loosen that up. Take the nut off. Carefully remove this bolt. Oops.
Now, that can separate.
I want to take these three 18 mm bolts out right here. That's of the lower trailing arm, but first I want to take off some of these wires. I don't want to ... I want to give them a little more slack because I don't want to break them. I'm taking those up. Slide those out of the clips. And those are the ABS wires and the break sensor wires. Brake pad sensor wire.
Now, I'm going to use an 18 mm socket and my air gun. You can use a breaker bar if you don't have an air gun.
Just going to loosen these up a little bit first. I'm not going to take it out completely.
Once they're all loose, then I'll take them out.
Pull that out. That's why I left one of them in, so if this falls, it's not going to hit anything or hit myself, and I can support this. Take this last one out. And there we go.
Now, I'm just going to get a pry bar to get underneath this spring. Try to slide this out. Just be careful. You don't want it to hit you. Just like that. With the spring out, it makes it a little bit easier to get this upper control arm out of the way. Just take the pry bar and get it underneath here.
On the top side of the bolt, I'm going to use a 17 mm wrench to hold the bolt. And then underneath the car, I'm going to use a 13 mm socket extension and an air gun. Or you could use a ratchet. I'm going to take the nut off. I'm going to take that side off. And then also this other side right here.
The tension on the brake hose is somewhat concerning to me. So, what I want to do is remove this clip right here. I'm just going to take some needle nose pliers. Pull this clip off. Or I'm going to take a screwdriver and slide it in here. Try to slide the clip out. Just pull that clip out. Slide the hose, and now, there's a little less tension on the hose so I can tip this down so that we can access this.
I could actually put a block of wood under here, and that would keep this from twisting. I'm just going to take the block of wood and stick it right there. Just be careful. You don't want it to damage the gas tank. Ideally, if you could get a block of wood to go this way, this would be better. But you don't want it to fall on you too while you're working on it.
There we go. Right there is good. Just going to spray this down. Spray the bolt down with a little rust penetrant. Let it soak for a little bit. I'll spray the bushing down as well while I'm there because that bushing was pretty bad.
I'm going to use an 18 mm socket and an air gun. Loosen this up. And the nut's spinning on the back side. So, I'm going to have to use a wrench to hold the nut. I'm going use an 18 mm wrench on the back side. Same 18 on the front.
Take that nut off. Slide the bolt out. Slide this bracket off.
So, this is not the exact tool for this job, but this should work. They do make special pullers and installers to use for this, but we should be able to get it out with this.
This is a ball joint tool. It has multiple adapters. So, if there's any extra stuff, just slide that off. Slide a cone. Seems like it'll fit. Tighten this up. It's a good idea to wear safety glasses while you're doing this. And what you want is you want something that's bigger than the bushing on this side so that the bushing will slide into that and something that's smaller than the bushing, so it pushes it through on this side.
So now I'm just going to tighten this up. You could just use a hand ratchet if you want. We're just going to use a gun.
One thing about using a ratchet, you can tell if it's binding up. If you start using a gun, you're not really going to notice it starts binding up.
It's on there. Pretty good. What I'm actually going to do while there's tension on it, I'm just going to take the air hammer and give it a couple of taps right there. That might loosen it up a little bit.
So, sending the bushing through that way really isn't working for me. So, I set the tool up the other way around. So, when I'm pushing on this screw right here, it's going to pull the tool and pull the bushing towards me, and the bushing will get sucked into here. So we'll give that a try and see how that works.
So, I didn't like the way the tool was working or wasn't working. So, they do make a special tool for this that you can use. I don't have that. So, what I'm doing is using some threaded rod, and I'm just going to use some adapters from some other tool sets. One to push the bushing out from the inside and one so that the bushing fits through there.
So, let's make this work. Sometimes you got to get creative when you're doing something like this.
So, I'm going to hold a wrench on the nut on the back side, and I'll tighten up the front side. And if it works right, it should suck the bushing right into there.
It's getting easier. So, think it's working pretty well. There we go. Pull that off. There's the bushing right inside there.
All right, now I can take the tool apart, and there's the bushing. It's all rotted away. Good time to change it.
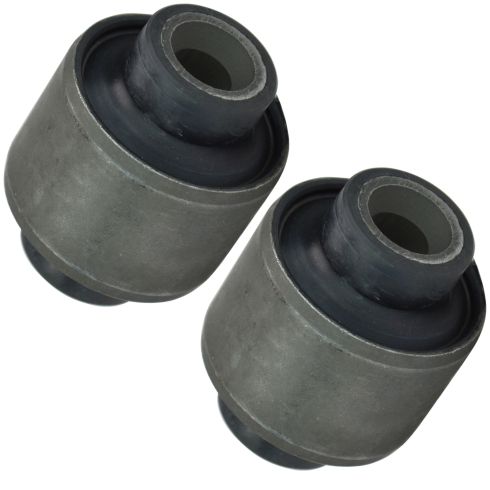
Here's the old part. Here's the new rear trailing arm bushing from 1AAuto.Com. If this one was not badly corroded, the shape would be the same. It has the holes in the same location. Same the rubber. Get yours at 1AAuto.com, and you'll be ready to rock and roll.
To install this, you want to kind of remember the way the old one came out. If you don't remember the way the old one came out, these rubber pieces generally go like this. They don't go up and down, so we'll reassemble it that way. And then I'm just going to take this tool. This is similar to the tool I just used and then take a bigger cup on the backside so when I press this in, it has some room to go in there. Put this nut on the back side, just like that. Get this lined up.
Oh, and one thing I forgot to mention, when you had the old one out, you could take some Emery cloth or some sand paper and just stand around on the inside of the trailing arm just to smooth it out. You don't want to take too much material off, but just take some of the rust off, and we'll just take a socket and a ratchet that fits the tool and just tighten this up. As I tighten this up, it's going to suck the bushing right into the trailing arm.
There we go. That one's in there just like the old one was. I can take the tool off.
Now, we can put this bracket back on. You want to make sure that you have the two mounting holes going towards the front of the vehicle, the single hole towards the back.
Slide that in position just like that, and then I'm going to take the bolt ... I put some copper anti-seize on there so that in the future if I ever have to take this out again, it'll come out easily. Put the nut on the back side. Then I'll take an 18 mm wrench on the backside and an 18 mm socket and a ratchet on the front side. Tighten this bolt down. Make this a little quicker. I'm just going to use the gun.
Alright, so you want that kind of level too when you're doing that. We'll use a torque wrench and a wrench on the backside. Tighten this to 81 foot pounds. Then we'll take the brake hose and reposition that into that bracket. All right, now just reinstall the clip. Slide that in position. You can take a little hammer, give it a tap. Tap it in. Just make sure that locks in place. Now it looks good.
Now, I'm going to install these bolts for the sway bar link. Now, I'm replacing the bolts because the bolts were pretty rusty, so the size is going to be different. Normally, you'd have a 17 mm on top and a 13 down below. I have 12 and 12 here. So, we'll just put these on.
So, I'm just going to use an electric ratchet, and tighten these down, and then use a wrench underneath.
Do the same on this side.
I'll just snug these down with a regular ratchet. That's good. Same on this side. That's good.
Take the spring, make sure you have this cone bushing on the bottom and then the open one up top. Now, for taking the spring out and putting it in, we had this bolt out right here and then the bolts out for this lower control arm here. It just made this a lot easier to get the spring in and out. I have seen other people take and put a floor Jack in between here and push down on this upper control arm, but I feel like that puts a lot of strain on the rear axle, and I feel like it might do some damage. So, be careful doing that. Not to say it's impossible to do it that way, but ... So, we'll get this lined up. Push this in. Take a pry bar.
Try to slide this into position. I'm just going to take a longer pry bar. Pry right above the sway bar link and the frame. Just pry it down. Just try to get over that piece right there, and push the spring in.
There we go. Be careful with your fingers. And that's good. That's good down below. That's good up top.
Now we want to get this lined up with the upper control arm. Take the bolt ... I put a little copper anti-seize on the bolt. So, sometimes you could take a pic or a screwdriver pick works a little bit easier. Get that to line up, and then take your bolt. Get your bolt started. There we go. Then I can just take an 18 mm socket electric ratchet. Tighten this down.
That's all the way through. Then we can put the nut on the other side. Get that nut on. Take an 18 mm wrench and just tighten this up. That's good. Then I'll take a torque wrench, 18 mm socket, 18 mm wrench and torque this to 81 foot pounds.
Now I'm gonna raise this trailing arm into position right there and then put the bolts in. Just get the bolts started. I got those other front two bolts in, and now I'll raise this up. Get this back one in. Then I can snug them all down with a 18 mm socket and that airgun.
I'm just loosening this pull jack. Get that out of the way. Then, I'll take an 18 mm socket and a torque wrench. Tighten these to 57 foot pounds. There we go.
Now, I'll take these ABS wire and break sensor wire and reposition these back in the clips and same with the clips on top. You can get these from above if you can't get them from down below.
With a screw jack, I'm just going to get underneath the trailing arm right here. You could probably put a floor jack underneath right there. I'm just going to raise this up a little bit more so that I can get the shock bolt in. Get that lined up. Get that started.
I'm going to tighten this bolt down with a torque wrench and an 18 mm socket. Tighten this down to 74 foot pounds.
Anytime you do any kind of suspension work like what we did today, it's a good idea to go down to your local shop and have the vehicle aligned. That way, the tires go down the road straight, and you don't have premature tire wear.
Now I'm going to take the wheel and slide in position. Make sure the hole is lined up and hold the wheel. I'm going to take my 17 mm socket and the lug stud and get one started. And I can grab the other ones.
Now, I'm going to use a 17 mm socket and a torque wrench, and I'm going to torque these lug bolts in a star pattern to 95 foot pounds.
Go right around and again, just make sure everything's tight. And you're good to go.
Thanks for watching. If you want the parts to do it yourself, check out 1AAuto.Com, the place for DIY auto repair.


