How to Replace Air Ride Suspension Compressor 2007-14 Chevy Suburban
Created on: 2017-09-11
How to remove, install, or replace, a broken or burned out air suspension compressor on 07, 08, 09, 10, 11, 12, 13, 14, Chevy, Chevrolet, Suburban.
-
step 1 :Removing the Air Suspension Pump
- Raise the vehicle with a jack
- Secure the vehicle on jack stands
- Remove the 13mm bolt from the frame
- Pry the pick-up filter from the wire clip
- Maneuver the pick-up filter free
- Remove the 13mm bolt in the frame
- Loosen the 13mm bolt from the compressor bracket
- Lower the compressor off
- Disconnect the connectors from the pump
-
step 2 :Preparing the New Pump
- Pry the clips out from the cover
- Remove the cover from the bracket and old compressor
- Remove the T25 Torx bolts from the bracket
- Pry the old airlines out of the clips on the bracket
- Remove the pump from the bracket
- Remove the old air connector hose
- Slide the connector hose onto the new compressor
- Remove the plastic band from the new connector
- Place the pump into the bracket
- Tighten the T25 Torx bolts to the bracket
- Press the cover onto the bracket
- Place on the new pressure sensor and locking washer with a 24mm wrench
- Connect the electrical connector to the pressure sensor
-
step 3 :Installing the Air Suspension Pump
- Slide the two studs into the holes in the frame
- Tighten the 13mm bolt into the frame
- Insert the pick-up filter into place and clip it in
- Connect the connectors to the pump
Tools needed
-
13mm Socket
24mm Wrench
Socket Extensions
Rust Penetrant
Jack Stands
Ratchet
Floor Jack
Trim Tool Set
T25 Torx Driver
Hi, I’m Mike from 1A Auto. We’ve been selling auto parts for over 30 years!
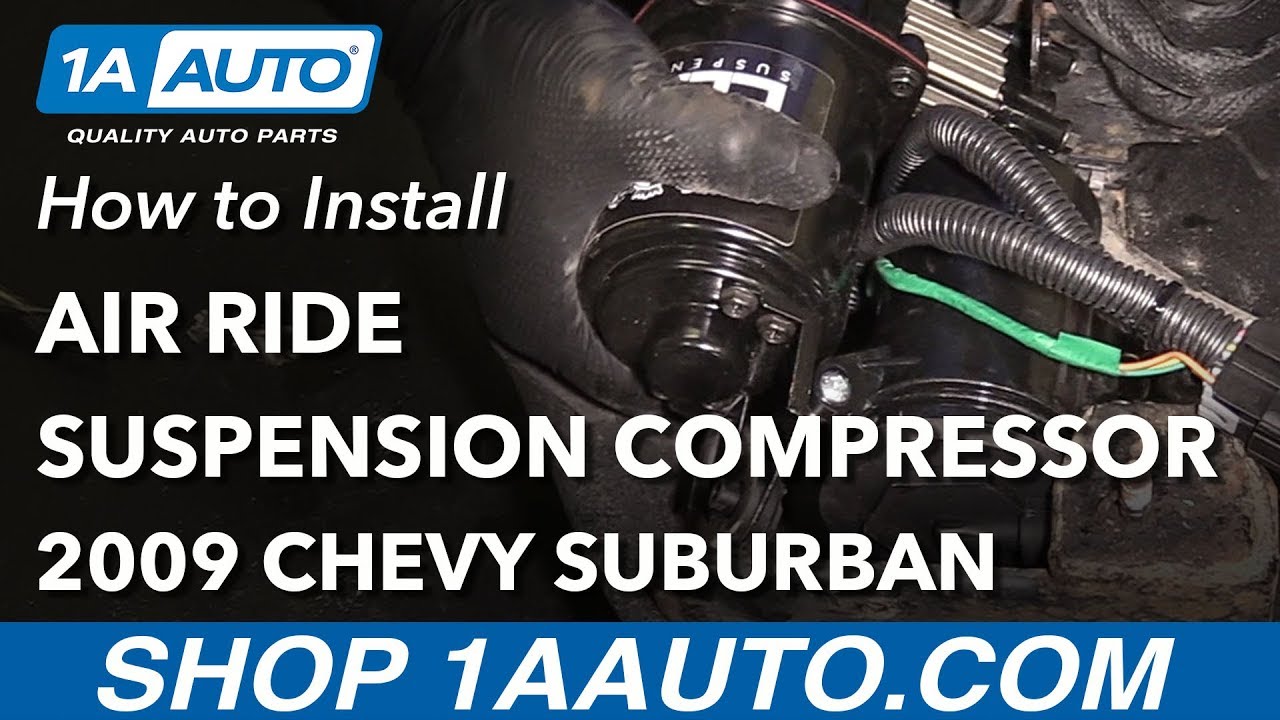
Raise and support the vehicle. The air pump for the air suspension is behind the driver's side rear tire, located on the frame. These two bolts here, you actually don't loosen them. There are little studs that will slide off. There is a bolt up here. You're going to have to go through the frame. It's 13 millimeters. Unbolt it. Once that's unbolted, we'll knock this free. It'll come backwards. We'll pull it down. Unclip from the connectors. But before we do that, we're going to follow this line up and there's actually a little pick up, probably where it picks ups air. It's up here on the filler neck with a clip. I'm going to take a prying tool and pry off the barbed clip that it's on. There it is. There it is. Slink through a couple of other things here. Fish it out of here.
Now I'm going to remove the 13 millimeter bolt that's up and through the frame, and we'll get this pump loose. Bring it down and unhook the connectors on top. Spray some rust penetrant as best I can. It's a hole through the frame. I can feel the nut. I can't see it. Spray some rust penetrant in there. I know it's on a stud, so I'm going to use a 13 millimeter deep socket and an extension in a ratchet. So it actually wasn't that tight. These are studs that go through the frame and hold onto it. I shouldn't really have to loosen them, but maybe to relieve a little bit of pressure with this rust, I'm going to spray some rust penetrant on them. Spray back here, too, to help them slide. Just give them a little loosen. They're 13 millimeter. It's coming loose. I'll grab it with both hands. Try to work it back and forth. There it is up. And up and out their slots that come right out.
It's still connected to the top, so I'm not going to let go of it. This line's actually already been disconnected. Disconnect the electrical connector. Disconnect this line here. This plastic tab off. Get this off. Pull the air pump out.
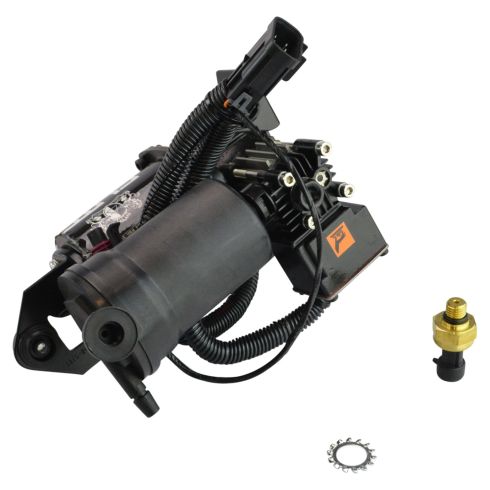
Here's our old air suspension pump we pulled from the vehicle and our brand new one from 1AAuto.com. As you can see, it doesn't come with a bracket, so we'll have to swap the bracket to our new pump. But, other than that, it is pretty much identical. It's got the same style electrical connector. Adjust it just like that. This electrical connector is the same. It will connect to the sensor up here. It comes with a sensor we will install up here.
We'll swap over this airline. Reconnect the airline that's over here in the back side of the pump. So if your air suspension isn't working, this will fix you up and get you on the road. Let's spray some rust penetrant on the backside of these bolts here. Torque bolt here and then another one in here. Get a better look at them. Have to remove this rubber protector. I'll take a trim prying tool and just pry these Christmas tree clips out of here. Pry them out. Bend the cover back. That should be enough.
So there's actually a bolt here, here, and here. Going to remove those. These are T25 Torx. Remove this first one. Stuck in there with rust. This is the side, it came out with a little bushing part. That's okay.
This airline is attached, so I'm going to slide it out of the clip. And this airline is attached here. Spread the spring clip out that's holding on. Should slide off. The spring clip is removed. The spring clip back where it was so it doesn't get lost. Pump out of here. There's our brackets separated. I need to swap this air hose for the little filter where it sucks in air. This hose here on the new pump goes through this little block right into the pump.
On this original one, it's capped off and then they used a Y fitting so that it ends up being connected from here to here. Basically, the same exact thing except I'm going to remove it from here. Actually, if it's too hard to remove from here, you can cut this off here and then just place it on the new pump. I'm going to use some hose cutters. Just cut this. Place that on the new pump. Take this elastic band off. We don't need it anymore. Place our new pump back into the original bracket. Feed this hose down like this. Fiddle with the bracket a little bit. Put this hose back into the clip. Take this other piece off.
Reinstall this screw. T25 Torx. Just going to get one started. And then line up the other one, so the way the pump is not holding on the screw. This is a rubber bushing, so I'm just going until I feel it get tight and then I will stop. The last one at the bottom. Little trickier with the rubber piece here, which I get started by hand first. Going to pull out this other clip that's in here. Give me a little more space. That's easier. Push our clips back in, our rubber protector. Go ahead and clip on this airline. Put this clamp down over it. These go into the car. Need to add this pressure sensor. It has a lock in washer, just like original, and an O-ring on there. Doesn't matter what direction you install that washer. Get it threaded by hand to get it started.
I installed the pump into the bracket first so it would be easier to hold it while I tighten it. You can use an adjustable wrench or this is 24 millimeter. I'm just going to tighten it down. Don't over tighten it because it is just going into plastic. That O-ring will seal, so as you feel it start to get tight, be able to turn more with the wrench a little bit. That feels good. Install the electrical connector into it. It connectors here. It sits like this in the car.
Now it's ready to go back up into the car. Slide these two studs back in the holes in the frame while lining this one up. I'll reach in from the back side of the frame and put in this 13 millimeter nut and we'll reconnect the lines. Going to be all set. Slides up here. Slide forward to lock it in. Using a 13 millimeter deep socket and extension, reach up into the frame. And tighten it.
Feel like it's tight. I'll stop. Place our air inlet tube back up onto the filler neck where it came from. Clip it back into place. Reconnect the airlines and the electrical connection on top. And the pump is replaced.
Thanks for watching. Visit us at 1AAuto.com for quality auto parts, fast and free shipping, and the best customer service in the industry.
Shop Products


How To Replace Rear Air Shocks 2000-14 Chevy Suburban
This video demonstrates how to remove the rear air shock if it's broken or weak or if the vehicle is sagging. The 1A experts will reveal the steps needed
