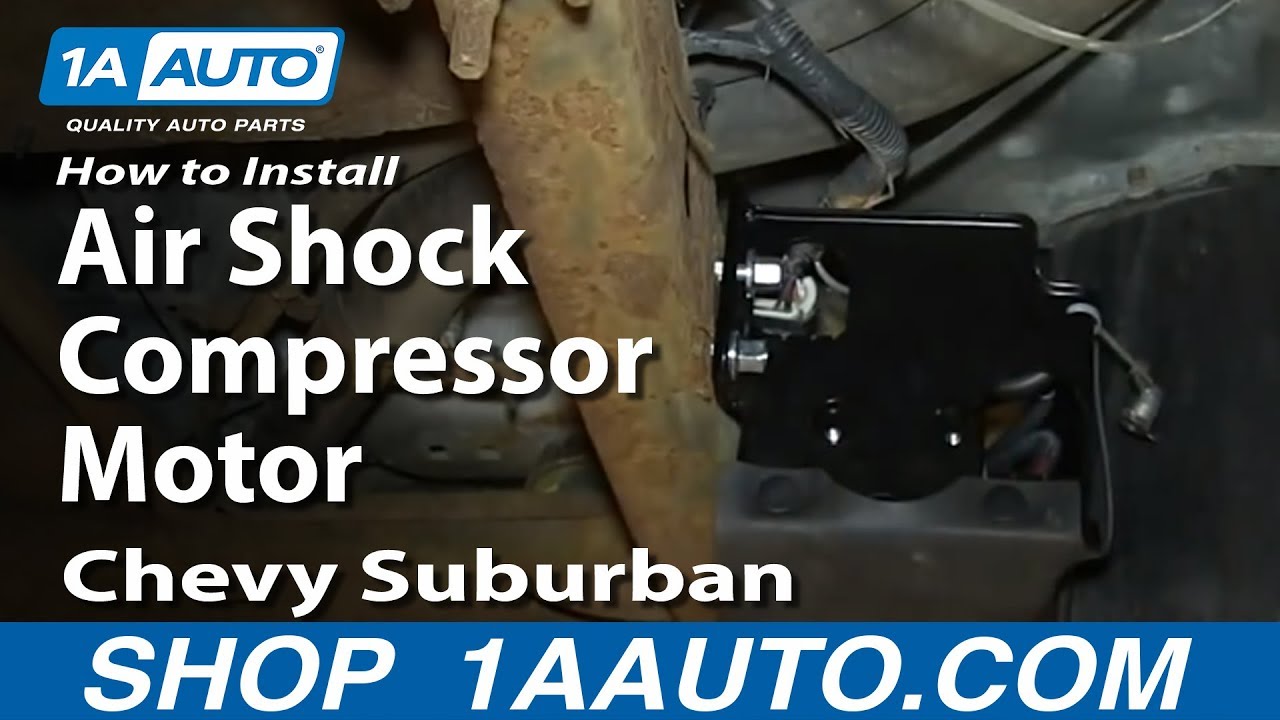
How To Replace Air Shock Compressor Motor 2000-06 Chevy Suburban
Created on: 2014-06-04
Check out this video on how to replace or install an air shock compressor motor on your 00-06 Chevy Suburban.
-
step 1 :Removing the Air Ride Compressor
- Remove the spare wheel
- Pull the hose off of the air ride compressor
- Reset the hose clip
- Loosen the three 12mm nuts from the compressor
- Lift the air compressor up and out
- Disconnect the compressor wiring harness
- Disconnect the second compressor hose at the chassis
-
step 2 :Removing the Motor from the Compressor
- Pull the clips out of the compressor cover with a pair of pliers
- Remove the three T25 Torx bolts from the compressor
- Pull the motor off of the compressor
-
step 3 :Preparing the New Motor
- Disconnect the hose from the old motor
- Push the hose onto the motor
- Pry the wiring harness from the old motor
- Remove the Phillips screw from the old motor
- Remove the wire ties from the wiring harness
- Pull back the wiring covers
- Clip the wires with wire cutters
- Match the wires to the corresponding, color-coded ones on the new motor
- Clip each wire
- Strip the end of each wire
- Push the wires into the splices
- Crimp the splices with pliers
- Put the compressor in a vice
- Twist the drier off of the compressor
- Remove the three T25 screws from the old motor bracket
-
step 4 :Preparing the new Drier
- Note that there is a spring inside the drier
- Carefully twist off the lid of the drier
- Pull the spring out of the drier
- Pull the gasket out of the drier
- Pull the screen out of the drier
- Pull the pad out of the drier
- Remove the beads from the drier
- Pull the second pad out of the drier
- Pull the second screen out of the drier
- Insert the new screen into the drier
- Insert the new pad into the drier
- Pour the new beads into the drier
- Insert the second new pad into the drier
- Insert the second new screen into the drier
- Put the new spring in place
- Put a new gasket on the drier lid
- Twist on the drier lid
-
step 5 :Reconstructing the Compressor
- Put a new O-ring onto the drier end
- Twist the drier onto the compressor
- Loosen the 8mm bolt from the compressor
- Insert the wire from the old compressor
- Tighten the 8mm bolt
- Reconnect the wiring harness to the drier
- Push the pads into the bracket
- Put the compressor onto the bracket
- Insert the three T25 screws to attach the new motor to the bracket
- Seat the wiring harness in the bracket
-
step 6 :Reinstalling the Compressor
- Connect the compressor wiring harness
- Hang the compressor in place by its bolts
- Tighten the 12mm nuts onto the compressor bracket
- Push the compressor hoses back into place
Tools needed
-
Wire End Cutters
12mm Socket
Hammer
Socket Extensions
Phillips Head Screwdriver
Vise-Grips
8mm Socket
Ratchet
Needle nose pliers
Wire Cutters
T25 Torx Driver
Brought to you by 1AAuto.com, your source for quality replacement parts and the best service on the Internet.
Hi, I'm Mike from 1A Auto. I hope this how-to video helps you out, and, please, next time you need parts for your vehicle, think of 1AAuto.com.
In this video, we're going to show you how to replace the air compressor on this 2002 Chevy Suburban with the air ride system. It's the same part and similar process on these Suburbans from 2000 to 2013. The items you'll need are a new air compressor from 1AAuto.com, 8 millimeter and 12 millimeter socket and ratchet with an extension, T25 Torx bit, Philips screwdriver, pliers, vise, hammer, wire cutters and wire strippers.
Now, your air compressor is right here and you should probably start off by removing your spare wheel. Okay, as you can see, the compressor on our vehicle is in really poor shape and this video is basically going to show you how to replace just the compressor motor, the electronic part. You're going to reuse the other compressor parts. On this vehicle we find that it just doesn't work because of the poor shape of the rest of the compressor. If your vehicle is rusty, you may want to consider, and I'd highly recommend, spending the extra money on the entire assembly that 1AAuto sells. Then, what you want to do is just pull out the clip on this hose and pull it from the compressor. Then, you want to just reset that clip by just pushing it back in. You want to loosen these two 12 millimeter nuts and the one in through this hole, and we'll just fast forward as Mike does that. Now, lift the air compressor up and then pull it forward. You want to just push the tab on this harness and pull it free and then twist this hose free from up here.
Now, you want to just pull out these clips holding this cover into place, just using a pair of pliers. You just want to hold on to the clip and just pry it out. Do the same to the other two. Then, you want to remove these three T25 Torx bolts. We'll just fast forward as Mike does this. These are some of the parts that if they break . two of mine broke off. So, they were unusable. If I wanted to just use the motor, like I said we ended up going with the whole assembly that 1AAuto sells.
Now, on the left, is the old motor; on the right, is the new one from 1A Auto. You can see they're identical and they're going to fit exactly the same. You do have to transfer a couple of things over from the new motor though as we'll show you right now. First, you want to just pull hose free. Ours is in pretty bad shape and ended up taking half the motor with it. Just empty it out and push it into place in your new motor. Then, just pull up on the tab and disconnect this harness and then pry this connection from here. It helps to use the screwdriver to just kind of pry it out. Then, you just want to just remove this Philips screw right here. It's pretty rusty, but we do the best we can with it. Now, remove the wire ties using some wire cutters. Now, you just want to pull back this cover and pull back this cover. There's a clip right here and then clip right here. Now, you can pull your wires free. Again, just pull back that cover off of each of these wires. Now, you just want to line up your wires and then clip the wire and then use your wire strippers to strip the end of the wires. Now, you're going to want to twist the ends of those wires that you just stripped and then push the matching colors into the splices: the red wire with red wire, white wire with white wire, blue wire with blue, black with black. You can now use your crimping pliers to crimp the splices. We'll fast forward as we repeat that for all four wires.
Now we have the assembly in a vice and we're going to twist the drier free. You're supposed to be able to take these T25 bolts off and remove this bracket and transfer it. Let's see how we can transfer. Transfer it onto there and then you would wrap these wires around and clip them to that bracket. As you can see, from our old motor, there is just no way where you're going to be able to get those things apart. Now, take this air filter and just put it into a vice and twist the top off and you want to do it carefully because there is a spring inside of there. Now the new air compressor comes with a kit to rebuild this so just pull the spring out, pull the gasket off, pull this screen out and this pad. You want to dump out these pebbles and then pull out the pad on the bottom and the screen that's on the bottom as well. Put the filter back into place and put the new screen down in and the pad, then the new beads, then the pad and then another screen. Now, you can take your new spring and push that into place and then take your lid, put the new gasket around the lid and twist that down into place. Now, take the new O-ring and put it on to this end here and then just twist this into your new air compressor. Then you want to just remove this front screw using your 8 millimeter socket and ratchet and just pull that free and you can put your wire from your old compressor on to it and then put the bolt back down into place.
Reconnect this harness and then you can push these pads into their proper holes and we'll show you one of them and you just push it up into place and then repeat the process with the other two and because of the condition of our old bracket, we can't really show you putting the compressor back into the bracket but you would just put it back into place and then replace those three T25 Torx bolts and then just push that harness back into the bracket. You take your harness and connect it to your new compressor. As you can tell, the whole assembly that I'm holding is a brand new unit. Like I said, the compressor in our vehicle was so bad that this was the way we had to go, and I would recommend that, if your compressor is as rusty as ours was or even close, spend the extra money and get the whole assembly. It's a matter of just three bolts and a couple of connections to remove and replace. Push this hose up into place, and then push this hose back into place as well and then you're all set
We hope this video helps you out. Brought to you by www.1AAuto.com, your source for quality replacement parts and the best service on the Internet. Please feel free to call us toll-free, 888-844-3393. We're the company that's here for you on the Internet and in person.
Shop Products


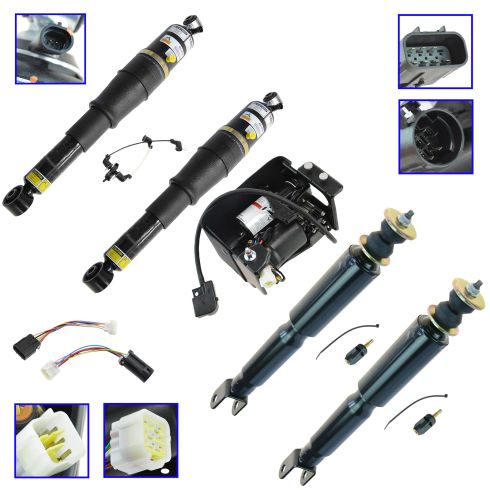
Chevrolet GMC Cadillac Front & Rear 5 Piece Air Suspension Kit Arnott ARSFK00016
Part Details:
- (1) Air Suspension Compressor
- (2) Rear Electronic Conversion Air Shocks
- (2) Front Electronic Conversion Shock Absorbers
- 5 Piece

How to Replace Air Ride Suspension Compressor 2007-14 Chevy Suburban
How to remove, install, or replace, a broken or burned out air suspension compressor on 07, 08, 09, 10, 11, 12, 13, 14, Chevy, Chevrolet, Suburban.
