How to Replace Blower Motor Resistor 2000-03 Chevy Impala
Created on: 2011-03-02
Replace the heater and A/C fan blower motor in your 00-03 Chevy Impala with the steps 1A Auto provides in this video.
-
step 1 :Access the blower motor resistor
- Remove the lower vanity panel using a pair of needle nosed pliers to remove the push clips.
- Unplug the courtesy light.
-
step 2 :Remove the blower motor resistor
- Remove the wiring harness bracket with your 5 mm socket and ratchet.
- Use your T20 Torx driver to remove the three screws around the motor.
- Pull the motor down.
- Unplug the wiring harness from the motor.
- Unplug the resistor from the harness.
- Unbolt the now unplugged resistor with you 7/32 inch socket and ratchet with a U joint extension and remove it.
-
step 3 :Install the new blower motor fan speed resistor
- Use your 7/32 inch socket, ratchet and U joint extension to bolt it back in.
- Install the blower motor and plug everything back in.
- Bolt the motor back in with your T20 Torx driver and ratchet.
- Install the harness bracket with your 5mm socket and ratchet.
- Test and replace the vanity cover and courtesy light.
Tools needed
-
Socket Extensions
Flat Blade Screwdriver
T20 Driver
5mm Socket
Ratchet
Swivel
Needle nose pliers
Brought to you by www.1AAuto.com-- Your source for quality replacement parts and the best service on the internet.
Hi I am Mike Green. I am one of the owners of 1A Auto. I want to help you save time and money repairing or maintaining your vehicle. I am going to use my 20 plus years experience restoring and repairing cars and trucks like this, to show you the correct way to install parts from 1AAuto.com. The right parts installed correctly; that's going to save you time and money. Thank you and enjoy the video.
In this video we're going to replace the blower motor resistor on this Impala. You know when you need one of these if your fan only works in four or five or one or two. Basically you are missing speeds and lots of GM vehicles use this resistor. The procedure's probably similar; although, maybe small differences. For this vehicle we needed needle nose pliers, a flat blade screw driver, a 5mm socket and driver, a T20 Torx Bit driver with a ratchet extension, and a flexible joint.
Start by removing this lower panel. This clip there and clip there and there's also a pin that holds it right there. What you want to do first is take a pair of needle nose pliers. Kind of push up on the panel and get the pliers in there. We'll fast forward here a little bit as I just kind of work the pliers into that pin and pull it down. These clips; bring the panel down and you can unhook your curtsey light. Now you are going to remove this bracket that's next to the motor; it's two 5mm bolts. I'll speed it up a little bit here. That bracket just kind of holds that wiring harness. You need to have that wire harness out of the way to remove the motor.
Next there are three T20 Torx screws; one here, one here, and then one right back in there; this one here. For the rear one I'm using an extension and a ratchet; really contorting myself in here. Fast forward here a little bit. As you can see use that ratchet and socket extension to get that rear one. Then the other two are pretty easy just with a driver and your T20 Torx bit. Once the motor's down, then you basically pull this wire harness down. Pull your motor down and then you are going to want to reach back in here, very hard for me to film, I'll show you basically how to do it later. Reach back in, press the tab on your lead, and pull it out and your motor is out.
Here's the connector. There's the tab. What you are doing is you're feeling up in there and pushing on that tab right there in order to release it. Once you have your motor out this lead right here comes from your resistor. You can see your resistor is right back here and the first thing you want to do, this is a little clip on this, just use your finger pull that clip back and disconnect that lead. Now you can also see there are a couple bolts; one back in here and one right here. They are 7/32s. There is also a bolt in behind where that lead connected in. You are going to need a driver with a 7/32 socket and I have a flexible joint on it. You can use that to get back. Push on the insulation some, the insulator, push on there and you just need to loosen this one up maybe a turn not too much.
Now the one I can't film at all, if you stick your finger back up under where you disconnected that lead, kind of in the side, you'll feel the bolt. You can see I just got my driver and my flexible joint and socket stuffed up in there and they went on to the bolt. Now here again just a couple turns maybe a half turn or one turn whatever you can get out of that one. Now you want to fully remove this one, which I guess you could call the easy one; fast forward through that. Now you reach up and in and pull the front part of it down and then pull it off those rear bolts. You can see by the way I'm struggling with it I don't think I got the hidden bolt very loose. I kind of just muscle it off there. I get it off that bolt pretty easy and then just kind of pull it off that other one and it comes down and out.
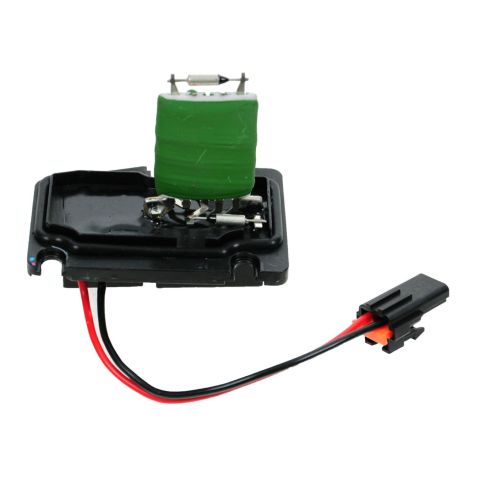
Now what I've done is I've got my adjustable wrench, I've set it to basically the head size of one of my 7/32 bolts, and I'm just going to get back in here and get on this bolt way in the back. Just make sure I loosen it up another half a turn or so. That will just make sure I can get the whole thing back together easily. Here's my original resistor and the new resistor from 1AAuto. You can see that the base of them is all the same. It's going to bolt in correctly and then the plugs are exactly the same. The receptacle for your other harness is correct as well. It's going to bolt in and plug in correctly and fix your speeds.
Maybe a little difficult to film here, but I'll do my best. We're going to put the new resistor up in here. Put it up in and we're going to tilt it to go back on to those bolts; feels like everything is all set. See there's a couple of little you just got to make sure you push it back up in there. Once you get this one tightened up, whether or not you tighten up the other one is pretty much optional because it is so hard to get to. I'll get that one and then I'm not even going to try the other one. Reconnect this harness. Take our motor and put it back up and connect that lead.
I am going to fast forward through putting the blower motor up in there. If you want to see this part of it in regular speed, check out our video for the Impala blower motor. If you've gotten it off it's pretty easy to put the blower motor up in there. Make sure you don't pinch any wires, tighten your three Torx bolts, and then connect your tube. Then put everything else back together.
We hope this helps you out. Brought to you by www.1AAuto.com. Your source for quality replacement parts and the best service on the internet. Please feel free to call us toll free 888-844-3393. We're the company that is here for you on the internet and in person.
Brought to you by www.1AAuto.com-- Your source for quality replacement parts and the best service on the internet.
Hi I am Mike Green. I am one of the owners of 1A Auto. I want to help you save time and money repairing or maintaining your vehicle. I am going to use my 20 plus years experience restoring and repairing cars and trucks like this, to show you the correct way to install parts from 1AAuto.com. The right parts installed correctly; that's going to save you time and money. Thank you and enjoy the video.
In this video we're going to replace the blower motor resistor on this Impala. You know when you need one of these if your fan only works in four or five or one or two. Basically you are missing speeds and lots of GM vehicles use this resistor. The procedure's probably similar; although, maybe small differences. For this vehicle we needed needle nose pliers, a flat blade screw driver, a 5mm socket and driver, a T20 Torx Bit driver with a ratchet extension, and a flexible joint.
Start by removing this lower panel. This clip there and clip there and there's also a pin that holds it right there. What you want to do first is take a pair of needle nose pliers. Kind of push up on the panel and get the pliers in there. We'll fast forward here a little bit as I just kind of work the pliers into that pin and pull it down. These clips; bring the panel down and you can unhook your curtsey light. Now you are going to remove this bracket that's next to the motor; it's two 5mm bolts. I'll speed it up a little bit here. That bracket just kind of holds that wiring harness. You need to have that wire harness out of the way to remove the motor.
Next there are three T20 Torx screws; one here, one here, and then one right back in there; this one here. For the rear one I'm using an extension and a ratchet; really contorting myself in here. Fast forward here a little bit. As you can see use that ratchet and socket extension to get that rear one. Then the other two are pretty easy just with a driver and your T20 Torx bit. Once the motor's down, then you basically pull this wire harness down. Pull your motor down and then you are going to want to reach back in here, very hard for me to film, I'll show you basically how to do it later. Reach back in, press the tab on your lead, and pull it out and your motor is out.
Here's the connector. There's the tab. What you are doing is you're feeling up in there and pushing on that tab right there in order to release it. Once you have your motor out this lead right here comes from your resistor. You can see your resistor is right back here and the first thing you want to do, this is a little clip on this, just use your finger pull that clip back and disconnect that lead. Now you can also see there are a couple bolts; one back in here and one right here. They are 7/32s. There is also a bolt in behind where that lead connected in. You are going to need a driver with a 7/32 socket and I have a flexible joint on it. You can use that to get back. Push on the insulation some, the insulator, push on there and you just need to loosen this one up maybe a turn not too much.
Now the one I can't film at all, if you stick your finger back up under where you disconnected that lead, kind of in the side, you'll feel the bolt. You can see I just got my driver and my flexible joint and socket stuffed up in there and they went on to the bolt. Now here again just a couple turns maybe a half turn or one turn whatever you can get out of that one. Now you want to fully remove this one, which I guess you could call the easy one; fast forward through that. Now you reach up and in and pull the front part of it down and then pull it off those rear bolts. You can see by the way I'm struggling with it I don't think I got the hidden bolt very loose. I kind of just muscle it off there. I get it off that bolt pretty easy and then just kind of pull it off that other one and it comes down and out.
Now what I've done is I've got my adjustable wrench, I've set it to basically the head size of one of my 7/32 bolts, and I'm just going to get back in here and get on this bolt way in the back. Just make sure I loosen it up another half a turn or so. That will just make sure I can get the whole thing back together easily. Here's my original resistor and the new resistor from 1AAuto. You can see that the base of them is all the same. It's going to bolt in correctly and then the plugs are exactly the same. The receptacle for your other harness is correct as well. It's going to bolt in and plug in correctly and fix your speeds.
Maybe a little difficult to film here, but I'll do my best. We're going to put the new resistor up in here. Put it up in and we're going to tilt it to go back on to those bolts; feels like everything is all set. See there's a couple of little you just got to make sure you push it back up in there. Once you get this one tightened up, whether or not you tighten up the other one is pretty much optional because it is so hard to get to. I'll get that one and then I'm not even going to try the other one. Reconnect this harness. Take our motor and put it back up and connect that lead.
I am going to fast forward through putting the blower motor up in there. If you want to see this part of it in regular speed, check out our video for the Impala blower motor. If you've gotten it off it's pretty easy to put the blower motor up in there. Make sure you don't pinch any wires, tighten your three Torx bolts, and then connect your tube. Then put everything else back together.
We hope this helps you out. Brought to you by www.1AAuto.com. Your source for quality replacement parts and the best service on the internet. Please feel free to call us toll free 888-844-3393. We're the company that is here for you on the internet and in person.


How to Replace Blower Motor Resistor 2000-06 Nissan Sentra
If you can't change the vent speed in your 00-06 Nissan Sentra, check out this video on how to replace the blower motor resistor, and fix it yourself!
