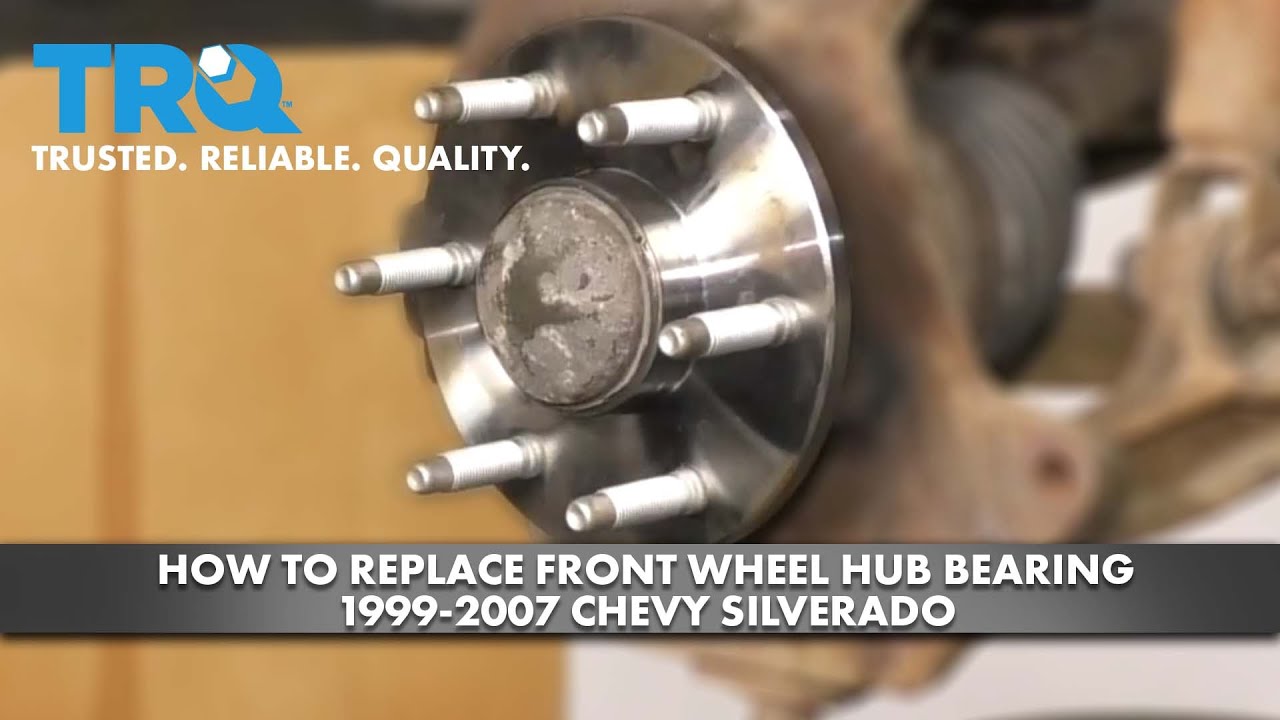
How to Replace Front Wheel Hub Bearing 1999-2007 Chevy Silverado
Created on: 2020-06-22
Watch this video to learn how to install a new wheel bearing and hub assembly on your 1999-2007 Chevy Silverado.
Tools needed
-
Torque Wrench
Hammer
Pry Bar
18mm Socket
Liquid Thread Locker
Trim Tool Set
Brake Parts Cleaner
Safety Glasses
Gloves
Copper Anti-Seize
Wheel Chocks
Center Punch
Brake Grease
Brake Caliper Compressor Tool. Quad Piston. Ratchet Style.
Ratchet
Floor Jack
Wire Brush
36mm Socket
All right. So, one of the first things you need to do is safely raise and support the vehicle. Once you've done that, you're going to remove all six of your lug nuts. Remove your wheel. Now, the next thing that we would want to do is take a look at our caliper right here. Look all around it to make sure you don't see any moisture coming out. If you see moisture coming out of it, more than likely, it's got a fluid leak. Assuming it looks like it's in good condition, we're going to go ahead and push back the piston a little bit. Grab your small pry bar, come right in between the caliper and up against the pad if you can or even the rotor, and then we're just going to carefully, slowly push this back. So, now the next thing that I would want to do is come right on the backside and I would remove the bolts that are holding the whole caliper bracket to the knuckle itself. There's going to be two of them and they're going to hold on this whole unit. Me, personally, what I like to do is inspect everything as I go. I don't want to just take this off and potentially have bad brakes. So, I'll actually take the caliper apart. I'm going to take off the two bolts that hold the caliper to the bracket and inspect those pads so I know I have good parts.
Once your caliper's off, take a good look. Make sure you don't see any moisture coming around these boots right here. If you see any moisture, you have a brake leak. You need to replace your caliper. Now, we can grab onto those pads. We'll take them right off of here and just take a nice look. This one has plenty of meat all the way around. It's not damaged in any way. If anything, it could use a little bit of parts cleaner, but that's about as much as I would go. Let's take a look at this one. That looks perfect as well. If they were worn at an angle or anything like that, that would be an issue that you'd need to diagnose. Let's get this bracket off of here. Let's remove the rotor. The next thing we need to do is get this cap off of here. I'm just going to use this pry bar. Next, we're going to remove our 36-millimeter axle nut. Get that washer off of there. Remove your 18-millimeter outer tie rod end nut. The next thing we need to do is hit right along here on the knuckle to break the outer tie rod end free. You can also notice that your outer tie rod end threads don't come all the way down to this point. So, if you wanted to, you can just give a couple of light bonks in an upward direction here. If that doesn't work, go ahead and make your way up here.
So, now if you follow this cable coming up along your upper control arm past your frame, and if you could see up behind here, see if I can bend that, you can see right where the connection is going to go in. Okay? That's got a little push clip that's going down into this bracket there. So, we're going to just go ahead and take that out. I have a little forky tool. Now, I'll bring it to where you can see. This was the push clip that was going down into this metal piece here. Separate the two. I always like to take a peek, make sure there's no funny colors in my connector. Make sure nothing's broken or torn. Set that aside. At this point, you can go ahead in between here. You can use something as simple as a pocket screwdriver or your finger even maybe, and you can start popping off these clips. This one right here is a little bit different. It's got two little ears that you're going to need to squish in. You can either do one at a time and just kind of try to work it at an angle or you can try to squeeze both with some pliers. There it is. The next thing we need to do is break our axle free from the wheel bearing. Go ahead and break that free with some penetrant and then use a punch right in the center there and a hammer. If you can see the axle moving, then you're doing all right. Now, the next thing we need to do is come from the backside of the knuckle, approximately where the axle is going to be. If I was to press in and out on the axle, you can see where the bolt's going to be.
For this one up here, obviously, I'm not going to be able to use my socket and ratchet. I'm going to have the upper ball joint in the way. Just use my wrench, carefully get it on there. There we are. And then we'll just wrench it right off of there. Go ahead and spray the area with some penetrant. The next thing we're going to do is remove the bearing from the knuckle itself. Before I get to hitting on it, I'm going to go ahead and put on this axle nut there. That's going to prevent the bearing from potentially falling off and hurting me. And then I'm just going to take my hammer and I'm going to give it a couple of loving bonks to try to pull it away from the knuckle. So, I have a nice clear gap here. I'm just going to keep on working at it. All right. That looks good. Remove the nut off of here, remove our bearing, and remove it from the backing plate. Now, the next thing we need to do is clean up the area where the new bearing is going to ride. If you were to look right along this area here, all in this circle is going to be up against the bearing. So, let's go ahead and clean that up as much as possible and then right along this edge right here as well. Pretty much the flat areas facing out towards us, the bearing is going to be pressed right up against it.
So, we've got the inside pretty cleaned up as much as we could. We cleaned up the outer portion here where the bearing is going to mount up against. Now, just check that splined area. Make sure there's no crud inside there. If you need to clean it down, go ahead and clean it down using some parts spray. Now, I'm going to push through all those bolts. Just take a peek at them and make sure they're still in good condition. If there's any thread locker, just try to clean it off of there. I'm going to go ahead and use a little bit of thread locker. I like to use thread locker on these for sure. Perfect. I'm gonna put a little bit right here too. Let's take a quick look at that backing plate. Make sure it's in good condition, it's not damaged in any way, it's not bent. Grab our new bearing, go ahead and put the wire right straight through there, and then line up the area where the wire is supposed to go through. Just like that. Now, we're going to take that and we're going to put the wire facing towards the top front of the vehicle. And just go ahead and twist it until it fits in on the axle and slide it right in. Okay.
All the bolts are bottomed out. Let's go ahead and torque them to 133 foot-pounds. That's torqued. Let's get our ABS cable back on here. Push the small side because if you were to look you'd see a larger side, put the smaller side right through here. Make sure it clicks in. Make sure it's secure. This is going to go across the top of your control arm. And then make its way over to here. This clip should sit right inside this groove. This groove right here is for that clip. Okay. We'll connect these in, give them a nice tug, make sure it's secure. Put your push clip through the hole. The next thing we're gonna do is get this outer tie rod end back on here. Torque this to 48 foot-pounds. Okay. Let's get our washer on there and our axle nut. The next thing we need to do is hold this so it can't spin. I'm just going to use a nice long pry bar, put it across the studs, and then we're going to torque our axle nut to 177 foot-pounds. Now, it's going to be time to get our cap back on. We want to make sure we cover this back up. Just take a peek at it and make sure it's in decent condition. If you don't see any holes in it, I would use some of this gasket maker. I'm going to come right along the area that's going to seal up against that bearing. This is going to keep the moisture out of there. That looks pretty great. Let's go ahead and get it on there. There it is. Neaten it up a little bit. Awesome.
The next thing that you would want to do is make sure you clean up the area on your rotor that's going to mate up against your wheel bearing. So, if you were to look at the backside, all right along here that's going to mate against the bearing needs to be clean. Let's use some copper never-seize right here on the hub. Let's get the rotor back up on here. Now, we're going to use one lug nut, screw it all the way on so it holds the rotor from moving around. The next thing we're going to need to do is push back the brake caliper. To do that, you can either open up this bleeder screw right here, and you take a risk, of course, breaking it either going in or out. Or you can just go ahead and turn the caliper around. I like to use a pad, and then you would just use something to squish this down and force those pistons back down and in. This is a tool that works great for the job. Just put it in here. As I crank, it's going to spread and it's going to push back those pistons. I'm going to do this nice and slow. You'll notice this is pushing in both pistons at the same time. If you tried to push in one piston at a time, more than likely the other piston is going to want to come out.
So, now we just need to take a peek along here and just double-check those boots. Make sure that they're not swollen, or pushed out, or ripped, or torn in any way, and there's definitely no leakage. These look great. So, what I'm going to do is I'm going to continue on by using a little bit of caliper grease and I'm going to go right along the mating surfaces where the caliper is going to touch directly against the brake pad. The next things that we need to do is clean up our slider bolts here and, of course, get all the thread locker off of our mounting bolts. Now that I have these cleaned up, let's continue on by installing the caliper. Let's grab our bracket and our two bolts. I like to use a little bit of thread locker on them, but we'll call it your prerogative. Go ahead and slide that in, start in those bolts, we'll snug them up, and then we're going to torque them to 139 foot-pounds. You're gonna notice that one of your pads has two of these brake wear indicators and then the other one's going to have one. The pad that has two, goes on the inside. Put the outer pad on there. Let's grab the caliper, slide it right down over here. Be careful for these boots. You want to make sure that they're lined up with the hole so the slider can go through. Perfect.
At this point, we're going to add some lubricant to the sliders. When we're going to add it, we're going to put it along here all the way up to there, but you don't need to get it up onto the threaded area. Let's go ahead and put those in there. Bottom these out. Torque them to 80 foot-pounds. The next thing that I would want to do is pump up the brake and make sure everything's functioning properly. You also pump up the brake for safety so that way there, when you get inside the vehicle after you're done with this job, you will have a brake pedal. Now that we've pumped up the brake, I just want to check that brake fluid real quick. Now, let's go ahead and get this off of here and we'll get the wheel on. Now, let's go ahead and torque our lug nuts to 140 foot-pounds. Center cap, go ahead and pop it on there.
Shop Products


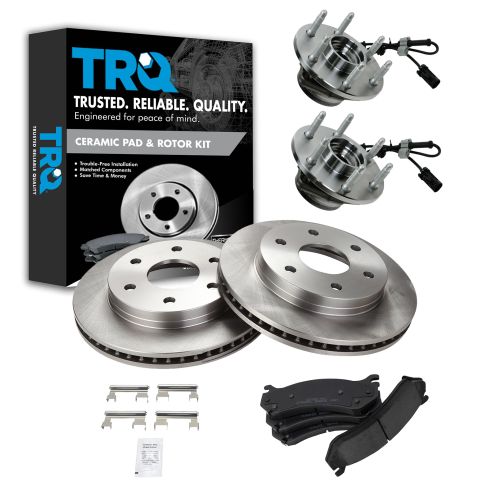
Chevrolet GMC Cadillac Front Ceramic Brake Pad & Rotor Kit with Wheel Bearings TRQ BKA17001
Part Details:
- Premium Posi
- Ceramic
- Tapered Roller Bearing
- (2) Front Brake Rotors
- (2) Front Wheel Bearing & Hub Assemblies
- (1) Front Ceramic Brake Pad Set

How to Replace Front Wheel Hub Bearing 2005-16 Ford Mustang
Watch this video to learn how to install a new engineered to fit TRQ front wheel hub and bearing on your 2005-14 Ford Mustang.
