How to Replace Headlight 2001-04 Ford Escape
Created on: 2012-06-06
In this video, 1A Auto shows you how to replace the broken, damaged, cracked, faded, cloudy, or chipped headlights in a 01-04 Ford Escape.
-
DO NOT TOUCH the bulbs- the oil from your fingers will burn into the light and foul your bulb. Clean with rubbing alcohol and a soft cloth if the bulbs do get touched.
step 1 :To replace just the headlight bulbs
- Pop the hood and secure.
- Reach behind the headlight assembly and remove the rubber boot and pull away the retaining wire
- Remove the bulb and unplug the harness
- Reverse the process to install new bulbs
-
step 2 :Remove the front bumper cover
- Use a 10 mm socket and ratchet to remove the front bumper cover.
- Disconnect your fog lights if you have them.
- Remove the bumper cover and set aside.
-
step 3 :Remove the headlight assembly
- Remove the four 10mm bolts securing the headlight assembly
- Unplug the bulbs and harness.
-
step 4 :Install the new headlight assembly
- Plug in the bulbs and harness
- Bolt the headlight assembly in using your 10 mm socket and ratchet.
-
step 5 :Install the bumper cover
- Plug your fog lights back in if you have them
- Secure your bumper cover by replacing all the push clips and bolts.
- Close your hood and enjoy your new 1A Auto headlights.
Tools needed
-
Phillips Head Screwdriver
10mm Socket
Ratchet
Brought to you by 1AAuto.com, your source for quality replacement parts and the best service on the internet.
Hi, I'm Mike from 1A Auto. I hope this how-to video helps you out, and next time you need parts for your vehicle think of 1AAuto.com. Thanks.
In this video we're going to show you how to service the headlight on this 2002 Ford Escape same as any 2001 to 2004. We show you first just changing the bulb if that's all you want to do and then we also show you the entire procedure for removing the whole headlight assembly and replacing it helpful if you have clouded or faded or even a broken headlight assembly. Only tools you'll need are a short Phillips screwdriver and a 10mm socket with a ratchet and extension.
If you're just looking to replace a headlight you'll want to pop your hood and then you come right over here and here's the back of your light. You want to reach in and grab the sides of this connector and squeeze. You'll feel a couple tabs. Squeeze those tabs and pull off your connector. Then you can pull off this boot here, and now there's a little, not sure if you can see this, there are a couple little tabs here. You push them in and down. Then you push this one in and up and this retainer comes out and then you can pull your headlight out. There's your bulb. A new bulb just goes in reverse of the procedure. Put the bulb in. It should be lined up with this prong up two on the sides and one on top. Then put your retainer back in. Push the bottom one up or actually push it into lock. Push the top one into lock. Take your boot. You kind of have to stuff it in there a little bit. Just fast forward here a little bit as I get that boot into place. Make sure it goes around the bulb properly and then locks in on the outside perimeter. Put your lead back and that just pushes right back on.
If you need to change your whole assembly because it's broken or faded or cloudy, to start you're going to have to take the bumper cover off which is not that difficult. You're going to remove a 10mm bolt here and here to start. Fast forward here as I use a 10mm socket and ratchet to remove those two bolts and pretty much this is what I'll do throughout the video. I'll show you the step and then I'll kind of fast forward through me doing it.
Now you can see I have the car raised up off the ground. You don't need to raise the car off the ground. It just certainly makes it a lot easier to film. There's going to be a series of Phillips clips. So here's one of the clips. Use your Phillips screwdriver. Lightly try and turn this. The center should come out, and then when the center comes out the whole clip will pop out. So there's three on the side here. There are three on the other side as well as a couple right up under here underneath your grill.
And here again we'll fast forward as I remove the rest of those clips. Once you get those out then there are two more. You pull this back and it's probably a little difficult to see but up in there is another one of those little Phillips clips. If you feel up in here with your hand you'll feel the head of it. The bet strategy for these is actually just pull firmly down on them and the clips will break free. Now there are a series of 10mm bolts under here. One there, one there. There's a few up under here on the other side. So I'm going to fast forward through removing these. Because these bolts are up underneath, a lot of times they're rusted from salt and sand and what not so they'll be difficult to get apart and you could see as I went through in the previous shot, one of them was broken off and you may break one or two off but do your best to get them out. One of them I actually go back spray on some penetrant, wait and see if the penetrating oil will help. If you break one or two of them off it's not the biggest thing. You can put it back together with just one or two of them missing.
You can see as I get the last bolt broken free the bumper cover is about to basically come right off. You can see I've got that bumper cover off now. If your vehicle does have fog lights then at this point before you pull the bumper cover too far off you would want to reach inside and just disconnect each fog light. Now there are four bolts that hold the headlight; one here, one here, and then one over here, and one right down here. Up the speed a little bit as I just remove those four bolts. Lift up on that tab there. Lift up there. Pull out there. The light comes forward. You can just twist this bulb counterclockwise and it comes out. Again just like before just squeeze the tabs on the sides of your bulb connection and the light is being difficult so I'm going to go to Plan B. I cannot get this one out. Pull the boot. Unclip the retainer. I had to take it out the hard way. There's your light out.
New light from 1AAuto. One thing you might want to do. You can actually put this nut back on kind of finger tight. Take the plastic off the side here. Plug our headlight in. Put our marker light back in. Twist clockwise to lock it. Now it's all back in. Now I'll speed up here again as I start the last, the three bolts that hold it in and then tighten them up nice and firm. Obviously, you repeat for the other side. If you've got a broken damaged or clouded headlight, you'll want to replace them in pairs and usually even if you have a broken headlight you're going to want to replace the other side. It makes much better vision at night and much more clear just a better looking vehicle overall.
I'm going to kind of speed through this a little bit. At this point the first thing you want to do is make sure that all your clips are out especially those clips you had to kind of reach up underneath make sure those are out of the bumper cover and then if you have fog lights reconnect them and then have your two bolts ready for the top and put the bumper cover back in place and just kind of finger tighten those two top bolts to hold it.
Now go up underneath and just make sure that the black lower fascia kind of overlaps the gray part of the fascia and on my vehicle the center bolt was still there so I just kind of put that in and preliminarily tightened it up to hold things in place. Next you're going to put all the clips back in and you want to kind of set them up like this. Have the screw kind of just inserted a little bit so that you can push them in place and then obviously do the ones up underneath first. Push them into the fascia first and then up into the fender and lock them in place, and obviously repeat for the other side as well.
Kind of keeping the work pace going, I'm going to put the clips up in underneath the grill and then I'm going to start all the 10mm bolts for the bottom. Again, if one of these, or one or two of them break, not a big deal. You can put it back together with what you have. It's pretty much inevitable that if you have a car with quite a few miles on it that one or two of them will break. Then once you're done starting them in then tighten them up. Now here I'm just putting the rest of those Phillips-style pins back in that hold the sides of the wheel wells. Then finish up by tightening the two top bolts on each side of the grill.
We hope this helps you out. Brought to you by www.1AAuto.com, your source for quality replacement parts and the best service on the internet. Please feel free to call us toll free, 888-844-3393. We're the company that's here for you on the internet and in person.
Shop Products


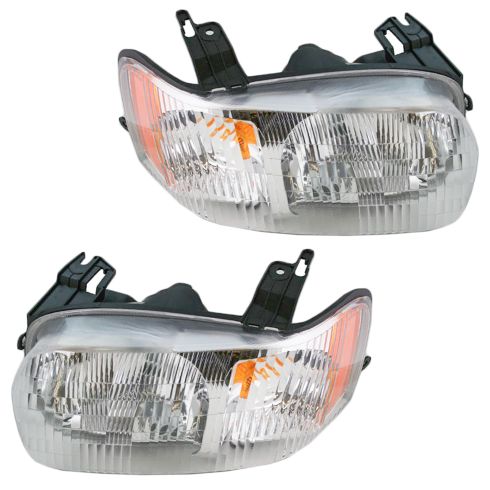
2001-04 Ford Escape Driver & Passenger Side 2 Piece Headlight Set DIY Solutions LHT03217
- 2 Piece
- (1) Passenger Side Headlight Assembly
- (1) Driver Side Headlight Assembly

How to Replace Headlights Bulbs 2006-08 Dodge Ram
Watch this video to learn how to replace a cloudy or cracked headlight or change a burnt out bulb. The experts at 1A Auto teach you how to replace the headlights on your 06-08 Dodge Ram.
