
How to Replace Hood Latch 1997-2001 Toyota Camry
Created on: 2016-12-12
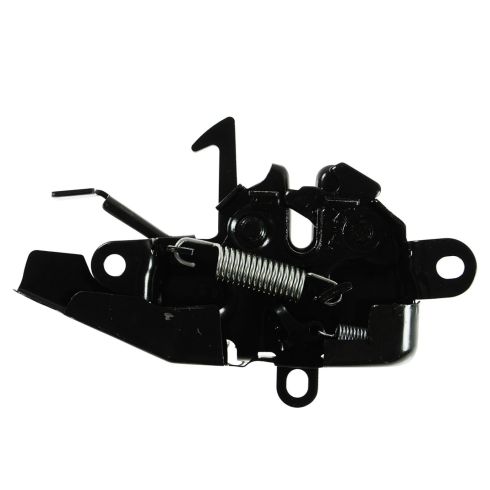
How to repair, install, fix, change or replace a broken or weak hood latch on 97, 98, 99, 00, 01 Toyota Camry
-
step 1 :Removing the Hood Latch
- Mark the hood latch edges with a paint pen
- Remove the three 10mm bolts from the hood latch
- Release the hood latch cable
-
step 2 :Installing the Hood Latch
- Pull the cover off the old hood latch
- Clip the cover onto the new hood latch
- Clip the cable into the hood latch
- Line up the hood latch with the paint marks
- Start the three 10mm bolts into the hood latch
- Close the hood
- Tighten the three 10mm bolts
- Open and close the hood to check the alignment
Tools needed
-
1/4 Inch Ratchet
Socket Extensions
10mm Socket
Ratchet
Marker / Writing Utensil
Hi, I'm Mike from 1A Auto. We're dedicated to delivering quality auto parts, expert customer service, fast and free shipping, all backed by our 100% satisfaction guarantee. Visit us at 1AAuto.com, your trusted source for quality auto parts.
In this video, we're going to be working with our 1998 Toyota Camry. We're going to show you how to remove and replace your hood latch. If you like this video please click subscribe. We have a ton more information on this and many other vehicles. If you need this part for your car you can follow the link down in the description over to 1AAuto.com. Here are the items you'll need for this repair.
Before removing our hood latch we're going to mark the edges with a paint pen. This way we know roughly where we're going to install our new latch. Using a 10 millimeter socket and ratchet we'll remove the 10 millimeter bolts on either side. In the third one we have to access through the grill with a 10 millimeter socket an extension. It helps to use a quarter inch drive here because it's thinner and easier to get through the grill. Pull the latch out and release this plastic door on the back. Our cable has already popped out of place so you'll need to release it from the end as well.
Here we have our old part which we removed from our vehicle and our new part from 1AAuto.com. As you can see, these parts are exactly the same. We have the same hooks and springs, the same center latch setup, the same three bolt locations. Underneath this cover, which we'll have to transfer over from our old part to our new part, we have the same mechanism to operate the latch as well as the same retainer for our release cable.
Remove the old rear cover by pulling out at the top here. Lock the bottom tab in and reinstall the two clips at the top. Open the access door. We'll install the cable through and lock it into its tabs as well as setting the ball end of the cable through and locking it into the mechanism.
Flip the mechanism over, set it back over its holes. Make sure that we're lined up to our marks we made earlier and we aren't going to tighten any of the hardware fully yet. We just want to get that started. We'll start with the bottom one since it's the most difficult. Start at the top two bolts. Again, we want to try to line up to our old marks. Close the hood fully. With the hood closed we know our latch is aligned properly on the striker, so finish tightening those three 10 millimeter bolts. Reopen your hood and reclose it to check for proper alignment. If everything works out you're good to go.
Thanks for watching. Visit us at 1AAuto.com for quality auto parts, fast and free shipping, and the best customer service in the industry.
Shop Products

How to Replace Hood Latch 2005-11 Honda Civic
New Hood Latch from 1AAuto.com How to repair, install, fix, change or replace a broken, loose, or bent, hood latch on 08 Honda Civic.
