
How to Replace Hood Latch 2005-11 Honda Civic
Created on: 2017-12-01
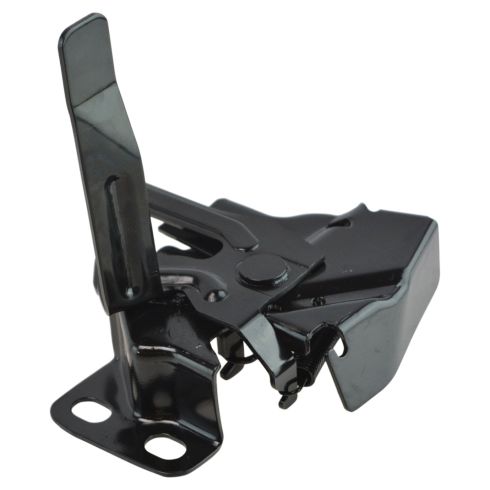
New Hood Latch from 1AAuto.com How to repair, install, fix, change or replace a broken, loose, or bent, hood latch on 08 Honda Civic.
-
step 1 :Removing the Air Guide
- Pry up the push clips from the air guide and side guides
- Pry up from the sides of the air guide
- Pull the lip of the air guide back from the grille
- Remove the air guide
-
step 2 :Removing the Hood Latch
- Spray the bolts on the hood latch on the radiator support
- Remove the 10mm bolts from the hood latch
- Lift the hood latch off the radiator support
- Disconnect the connector
- Pull the cable up and disconnect the feed from the latch
-
step 3 :Installing the Hood Latch
- Insert the cable underneath the hook and snap it in
- Insert the connector underneath the support
- Hand-tighten the 10mm bolts
- Tighten the 10mm bolts
- Slide the connector into the mount
- Connect the connector
-
step 4 :Installing the Air Guide
- Slide the air guide up and over the bump stops
- Slide the lip into the grille
- Slide the lip into the sides
- Place the side guides over the end of the air guide
- Press on the push clips
Tools needed
-
Socket Extensions
Flat Blade Screwdriver
Phillips Head Screwdriver
Rust Penetrant
10mm Socket
Ratchet
Needle nose pliers
Pick
Hi, I’m Mike from 1A Auto. We’ve been selling auto parts for over 30 years!
We're going to remove this plastic air guide in the engine compartment. It's got some push clips. Use a small, flat-bedded screwdriver to work those out. I'm going to use my trim tool. Pop 'em out. Do the same with the other one. This is actually clipped underneath this whole piece of trim here. We're going to pull up and just pop it out. And do the same on this side, just pull it up. And pop that pin out. And push it this way a little bit. Lift that up.
It's got a lip that's kind of pushed into the grille. So just pull out. And pull this trim out. Might need to pull that clip out. Just going to pop this one up so I can move this trim a little better. Just need to slide it over like that, and then we're going to pull this out from behind the grille. Going to slide it up and off of the hood latch. Flex it off. Just going to spray some rust penetrant on the bolts that are mounting the hood latch to the radiator support.
There's an opening in behind. These are 10mm. Use a socket wrench to remove them. Just using a universal joint on the lower one. Can't quite get the extension straight on. Just got to be careful of the radiator. Go back to a regular extension and remove the last one. List the latch off the radiator support to unplug it. It's a little sensor that tells you the hood's open. Unplug it here. Slide it off the radiator support.
This tab's got some flex to it. There's a little lock right here you can push down and then, I'm going to use two fingers, push it, and then slide that off. And you can feed that out. I'm going to undo the cable, going to pull it up. And then you need to feed the led weight end out. It's like a little hook you feed out underneath. And then we pull it out of place and the latch is off.
We're going to reinstall it. The holes are slotted. If you need to adjust the up and down you can. Right now, we're just going to line up using the marks left by the bolts and put them in where they were originally. So I'm going to start. We're going to hook up the hood cable, and it's going to go underneath and under the hook. Just like that. Snap it in place. It will connect to underneath. I'll hook up the bolts first. This one gets started. We'll install the last one underneath. Just going to tighten it up. When I feel it gets tight I'm going to stop, and I'll do the same for the others. I'm going to plug the connector back in. First I'm going to slide it over the little mount for it. Just going to hear this say lock. And the latch is reinstalled.
I'm going to reinstall this air guide. It's kind of flexible so I'm just going to slide it up and over. And I'm going to fit it over these little rubber bump stops. These tabs actually go underneath the fender. And then this lip goes behind the grill. I'm going to kind of flex it into place just like that. I'm going to slide this over. Fold this up, and put those like that. Do the same for the other side. Kind of flip this in. Push it in, flip this over, and put this under the plastic trim.
Reinstall the clip that was here. Going to reinstall this clip on this side and repeat that for the other side. Going to reinstall these push clips and do the same for both sides. Close the hood. We're going to remove this plastic air guide in the engine compartment. It's got some push clips. Use a small, flat-bladed screwdriver to work those out. I'm going to use my trim tool. Pop them out. Do the same with the other one. This is actually clipped underneath this whole piece of trim here. We're going to pull up and just pop it out. And do the same on this side, just pull it up. And pop that pin out.
And push it this way a little bit. Lift that up. It's got a lip that's kind of pushed into the grille. So just pull out. And pull this trim out. Might need to pull that clip out. Just going to pop this one up so I can move this trim a little better. Just need to slide it over like that and then we're going to pull this out from behind the grille. Going to slide it up and off of the hood latch. Flex it off. Just going to spray some rust penetrant on the bolts that are mounting the hood latch to the radiator support. There's an opening in behind. These are 10mm. Use a socket wrench to remove them. Just using a universal joint on the lower one. Can't quite get the extension straight on. Just got to be careful of the radiator.
Go back to a regular extension and remove the last one. List the latch off the radiator support to unplug it. It's a little sensor that tells you the hood's open. Unplug it here. Slide it off the radiator support. This tab's got some flex to it. There's a little lock right here you can push down and then I'm going to use two fingers, push it, and then slide that off. And you can feed that out.
I'm going to undo the cable, going to pull it up. And then you need to feed the lead weight end out. It's like a little hook you feed out underneath. And then we pull it out of place and the latch is off. We're going to reinstall it. The holes are slotted. If you need to adjust the up and down you can.
Right now, we're just going to line up using the marks left by the bolts and put them in where they were originally. So I'm going to start. We’re going to hook up the hood cable, and it's going to go underneath and under the hook. Just like that. Snap it in place. It will connect to underneath. I'll hook up the bolts first. This one gets started. We'll install the last one underneath. Just going to tighten it up. When I feel it gets tight I'm going to stop and I'll do the same for the others.
I'm going to plug the connector back in. First I'm going to slide it over the little mount for it. Just going to hear this say lock. And the latch is reinstalled. I'm going to reinstall this air guide. It's kind of flexible so I'm just going to slide it up and over. And I'm going to fit it over these little rubber bump stops. These tabs actually go underneath the fender. And then this lip goes behind the grill. I'm going to kind of flex it into place just like that.
I'm going to slide this over. Fold this up, put those like that. Do the same for the other side. Kind of flip this in. Push it in, flip this over, and put this under the plastic trim. Reinstall the clip that was here. Going to reinstall this clip on this side and repeat that for the other side. Going to reinstall these push clips and do the same for both sides. Close the hood.
Thanks for watching. Visit us at 1AAuto.com for quality auto parts, fast and free shipping, and the best customer service in the industry.
Shop Products

How to Replace Hood Latch 2000-06 GMC Yukon
Check out this video to learn how to install a new TRQ hood latch for your 2000-06 GMC Yukon.
